Table of Contents
- 1 Why This Grandma’s Peach Pie Is the Ultimate Summer Dessert
- 2 Ingredients You’ll Need (And Why Each One Matters)
- 3 Step-by-Step Instructions (Beginner Friendly!)
- 4 Grandma’s Secret Tips for Perfect Peach Pie Every Time
- 5 Easy Variations and Substitutions
- 6 How to Store and Reheat Your Peach Pie
- 7 Common Mistakes to Avoid (So Your Pie Turns Out Perfect!)
- 8 Frequently Asked Questions
- 9 Conclusion
There’s a reason my grandma’s kitchen was the most popular spot in our small Ohio town every July and August. The moment the first peaches hit the farmer’s market stands—fuzzy, golden-pink, and smelling like pure sunshine—she’d be up before dawn, hauling a bushel back to her worn oak counter, and by noon, the entire house smelled like melted butter, ground cinnamon, and fruit that tastes like summer itself. Her traditional peach pie wasn’t fancy. There were no drizzles of icing, no intricate decorations, no fancy plating. It was simple, honest, and made with hands that had been rolling pie dough for six decades. And it was the kind of dessert that made everyone at the Fourth of July potluck go quiet for a full three seconds when they took their first bite, juice dribbling down their chin, eyes widening at the perfect balance of flaky, salty crust and sweet, spiced peaches.
I spent every summer of my childhood perched on a wobbly stool next to her, watching her fingers work the dough, learning exactly how to tell when a peach was ripe enough (give it a gentle squeeze just above the stem—if it yields slightly, no hard, rock-like spots, it’s ready) and why she always, always let the peach filling sit for a full 30 minutes before scooping it into the crust. She’d wipe a bit of flour off her cheek, smile at me, and say, “Good pie takes patience, kiddo. You can’t rush the peaches, and you can’t rush the crust. The magic happens while you wait.”
Now, years later, I’ve tweaked her recipe just a tiny bit to make it even more approachable for home bakers—even if you’ve never successfully made a pie crust from scratch before. But it still has that same old-fashioned, made-with-love flavor that screams summer. This is the pie I bring to every backyard barbecue, the one I slice up and eat on my porch swing while the fireflies start to blink in the grass, the one my kids beg for the moment peach season hits. It uses simple ingredients you probably already have in your pantry—no hunting down specialty items at the grocery store—and that secret resting step? It’s the game-changer that keeps the filling from turning into a runny mess, and lets all those sweet, cinnamon-y flavors meld together until they taste like a hug from grandma. Serve it warm with a scoop of vanilla bean ice cream, and I promise you’ll be making it on repeat until the last peach is picked in September.
Why This Grandma’s Peach Pie Is the Ultimate Summer Dessert
Nothing says summer quite like a freshly baked traditional peach pie, and this recipe hits every note that makes the season special. First, it’s built around peak-season fresh peaches—the kind that are so juicy you have to eat them over the sink. Using fruit that’s in season means you don’t have to add extra sugar or artificial flavorings to get that bright, sweet taste. The filling is nestled in a flaky, buttery crust that shatters when you bite into it, with just the right amount of cinnamon and sugar to complement the peaches without overpowering them. It’s sweet, but not cloying, spiced but not overwhelming.
This recipe is designed for real life, too. The ingredients are simple—you probably have flour, sugar, butter, and cinnamon in your pantry already, and peaches are cheap and abundant at farmer’s markets and grocery stores all summer long. It’s easy enough to make on a lazy Sunday afternoon, but impressive enough to be the star of your Fourth of July gathering or a neighborhood potluck. My grandma always said peach pie is the only dessert that tastes better when you eat it on a warm evening with a breeze blowing, and she was right—there’s something about sitting on your porch with a slice of this pie, a fork in one hand and a glass of sweet tea in the other, that feels like the definition of summer.
The real secret, though, is the resting step for the filling. Most peach pie recipes skip this, but my grandma swore by it. Letting the tossed peaches sit for 30 minutes before baking lets them release their natural juices, which mix with the sugar, cinnamon, and cornstarch to create a thick, glossy syrup that coats every slice of fruit. No more runny filling pooling at the bottom of your plate. And when you serve it warm with a scoop of vanilla ice cream? The ice cream melts into the crust and filling, creating a creamy, sweet mess that you’ll want to lick off your fork.
This pie is forgiving, too. Even if your lattice crust isn’t perfect, even if you tear the dough a little when rolling it out, it will still taste amazing. Grandma always said the best pies are the ones made with love, not perfectionism.
Ingredients You’ll Need (And Why Each One Matters)
I’ve broken the ingredients down into two parts: the flaky butter pie crust, and the juicy peach filling. Every ingredient has a purpose, and I’ve explained why each one is there, so even beginner bakers can understand how the recipe works.
For the Flaky Butter Pie Crust
You’ll need:
– 2 1/2 cups all-purpose flour: This is the base of the crust, providing structure. I use unbleached all-purpose flour, but bleached works too—just avoid cake flour, which is too soft to hold up to the filling.
– 1 teaspoon kosher salt: Kosher salt has a cleaner, less metallic flavor than table salt, and it balances out the sweetness of the filling. Don’t skip it—unsalted crust with sweet filling can taste flat.
– 1 tablespoon granulated sugar: This adds a tiny hint of sweetness to the crust, which pairs perfectly with the peaches. It’s optional if you prefer a strictly savory crust, but grandma always added it.
– 1 cup (2 sticks) cold unsalted butter, cut into 1/2-inch cubes: Cold butter is the absolute key to a flaky crust. When the cold butter hits the hot oven, it melts and creates steam pockets, which separate the layers of dough to make that light, flaky texture. If the butter melts before baking, you’ll end up with a tough, dense crust.
– 6-8 tablespoons ice water: The ice is important here—you want the water as cold as possible to keep the butter from melting while you mix the dough. Add it a tablespoon at a time, just until the dough comes together.
For the Juicy Peach Filling
You’ll need:
– 6-7 cups peeled, sliced fresh peaches (about 8 medium peaches): This is the star of the show. Use ripe, in-season peaches for the best flavor—they should give slightly when you squeeze them, with no green tones near the stem. Avoid peaches that are mushy or have bruises, as they’ll turn to mush in the oven. Don’t use canned peaches here—they’re too soft and syrupy, and you’ll lose that fresh peach flavor.
– 3/4 cup granulated sugar: This sweetens the filling just enough to complement the peaches. If your peaches are extra sweet, you can reduce this to 1/2 cup, but don’t cut it too much—peaches get tart when baked.
– 2 tablespoons cornstarch: This thickens the juices released by the peaches, so your filling isn’t runny. You can use flour instead, but cornstarch makes a clearer, glossier syrup that doesn’t taste starchy.
– 1 teaspoon ground cinnamon: The classic peach pie spice. Use fresh ground cinnamon if you can—it has a much stronger, warmer flavor than old pre-ground cinnamon.
– 1/4 teaspoon ground nutmeg (optional): Grandma always added a pinch of nutmeg for extra warm, earthy flavor. It’s subtle, but it makes the filling taste more complex.
– 1 tablespoon fresh lemon juice: This does two things: it prevents the peeled peaches from browning while you prep, and it balances out the sweetness of the sugar so the filling doesn’t taste flat.
– 1/4 teaspoon salt: A tiny pinch of salt brings out the natural sweetness of the peaches, just like it does in the crust. Don’t skip it!
Step-by-Step Instructions (Beginner Friendly!)
I’ve broken this down into three easy parts, with tips along the way to help you avoid common mistakes. Don’t rush through any step—remember grandma’s advice about patience!
How to Make the Perfect Flaky Pie Crust
1. In a large mixing bowl, whisk together the flour, kosher salt, and granulated sugar until combined. This ensures the salt and sugar are evenly distributed, so you don’t get a bite of pure salt.
2. Add the cold cubed butter to the flour mixture. Use a pastry cutter, two forks, or your fingers to cut the butter into the flour. You want to work quickly here to keep the butter cold. Stop when the mixture looks like coarse crumbs with pea-sized pieces of butter still visible. Those little butter pieces are what will create the flaky layers in your crust—if you mix until the butter is fully incorporated, you’ll get a tough crust.
3. Add the ice water one tablespoon at a time, tossing the mixture with a fork after each addition. After 6 tablespoons, squeeze a small handful of dough in your hand. If it holds together, it’s ready. If it crumbles, add another tablespoon of water. Be careful not to add too much—wet dough is tough dough.
4. Turn the dough out onto a clean surface, and gently press it together into a ball. Divide it into two equal discs, wrap each tightly in plastic wrap, and chill in the refrigerator for at least 1 hour, or up to 2 days. Chilling does two things: it relaxes the gluten in the flour, so the crust doesn’t shrink when baking, and it keeps the butter cold so those flaky layers form. If you’re in a rush, you can chill the dough for 30 minutes, but 1 hour is better.
Tip: If at any point the dough feels warm or sticky, pop it back in the fridge for 10 minutes before rolling. Warm dough is hard to work with and leads to tough crust.
How to Prep the Peach Filling
1. Bring a large pot of water to a boil. While the water heats up, use a paring knife to score a small “X” on the bottom of each peach (opposite the stem end). This makes peeling so much easier.
2. Gently lower the peaches into the boiling water, and let them boil for 30-60 seconds. You’ll see the skin start to peel back at the X. Don’t boil them longer than a minute, or the peaches will get mushy.
3. Use a slotted spoon to transfer the peaches immediately to a bowl of ice water. Let them sit for 1 minute to stop the cooking process. The skin should slip right off when you pull it—if it doesn’t, put the peach back in the boiling water for 10 more seconds.
4. Slice the peeled peaches into 1/2-inch thick slices, discarding the pits. Add the slices to a large mixing bowl.
5. Add the granulated sugar, cornstarch, cinnamon, nutmeg (if using), lemon juice, and salt to the bowl with the peaches. Gently toss with a rubber spatula until all the peaches are evenly coated. Be gentle here—you don’t want to mash the peaches.
6. Let the peach mixture sit at room temperature for 30 minutes. This is the secret step! The peaches will release their natural juices, which will mix with the sugar, cornstarch, and spices to form a thick syrup. After 30 minutes, stir the mixture gently. If there’s a lot of liquid at the bottom of the bowl, add 1 more teaspoon of cornstarch and stir again.
Tip: If you’re using peaches that are extra juicy, you might need to add an extra 1-2 teaspoons of cornstarch. If they’re less juicy, you might need a tiny bit less. You’ll get the hang of it after one batch!
Assembling and Baking Your Pie
1. Preheat your oven to 400°F (200°C). Position a rack in the lower third of the oven—this helps the bottom crust cook through so it doesn’t get soggy.
2. Take one disc of chilled dough out of the fridge. On a floured surface, roll it out into a 12-inch circle, about 1/8-inch thick. If the dough cracks at the edges, just press it back together with your fingers. Roll from the center out, turning the dough a quarter turn every few rolls to keep it even.
3. Gently transfer the rolled dough to a 9-inch pie plate. You can wrap the dough around the rolling pin to lift it, then unroll it over the plate. Press the dough gently into the bottom and up the sides of the plate, leaving a 1-inch overhang around the edges. Trim any ragged edges with a knife.
4. Take the second disc of dough out of the fridge, roll it into a 12-inch circle, then use a sharp knife or pizza cutter to cut it into 10-12 1-inch wide strips. These will be your lattice crust.
5. Pour the peach filling into the prepared crust, using a slotted spoon to leave most of the excess syrup in the bowl (too much syrup will make the bottom crust soggy). Dot the top of the filling with 1 tablespoon of cold butter, cut into small pieces—this adds extra richness, just like grandma did.
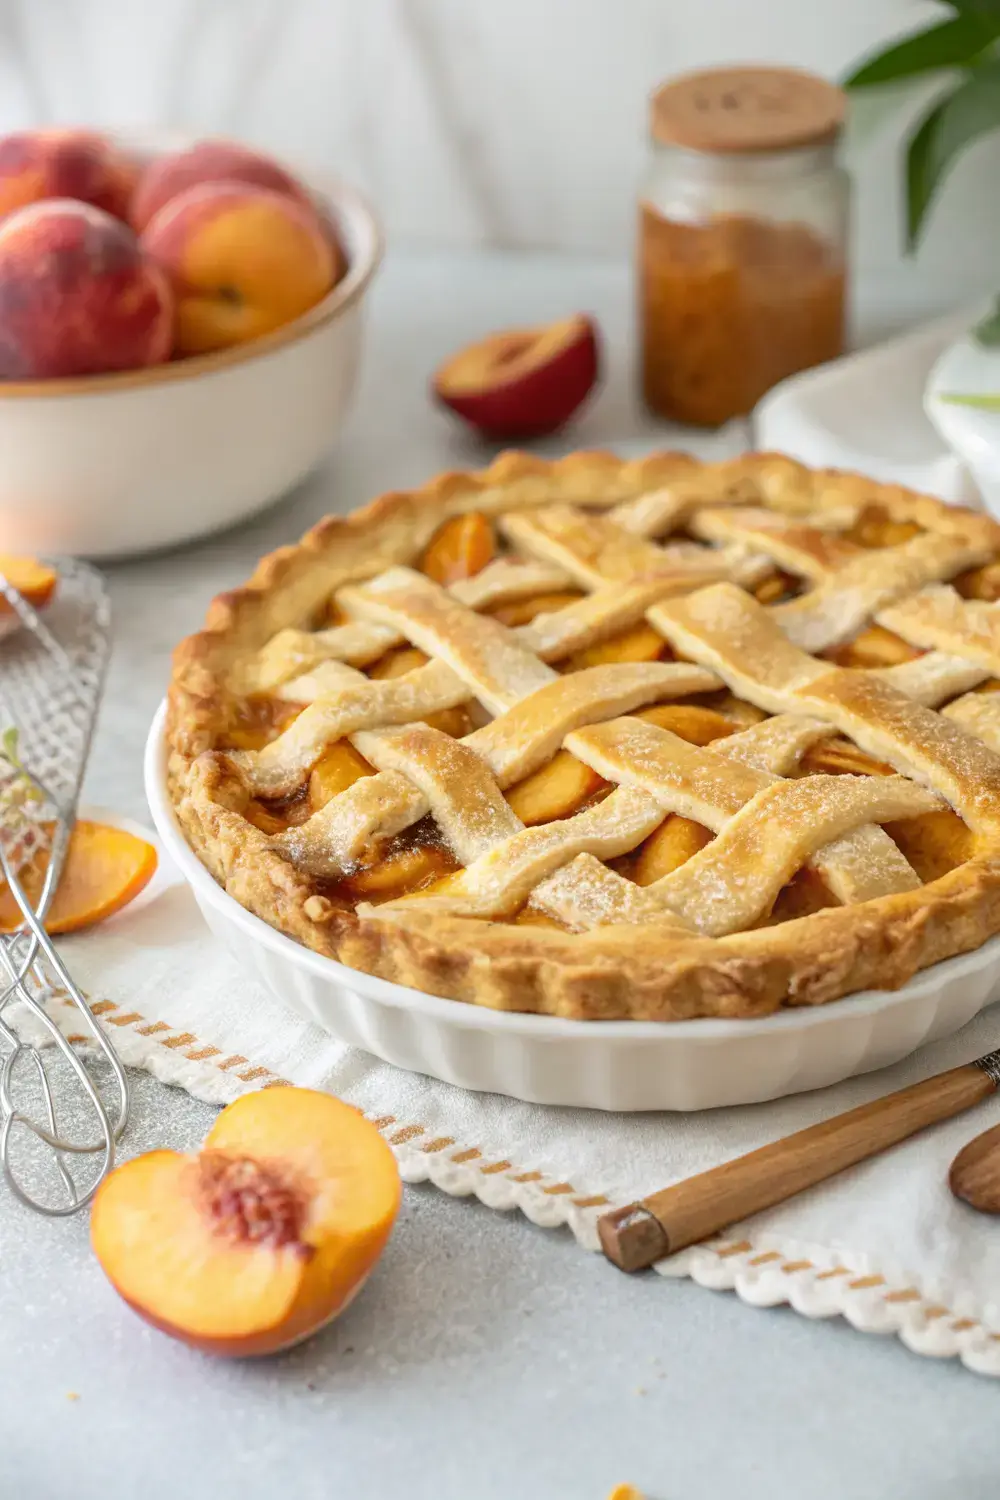
6. To make the lattice crust: Lay 5-6 strips of dough across the top of the filling, spacing them evenly. Fold back every other strip halfway, lay one strip perpendicular across the ones that are still down, then unfold the folded strips over the new strip. Repeat with the remaining strips, weaving them under and over each other, until you have a full lattice. It doesn’t have to be perfect! Even a messy lattice looks charming and homemade.
7. Trim the ends of the lattice strips so they line up with the 1-inch overhang of the bottom crust. Fold the overhang of the bottom crust up over the ends of the lattice strips, then crimp the edges with a fork or your fingers to seal them. Grandma used her fingers to make little ripples, but a fork works just as well.
8. In a small bowl, whisk together 1 egg and 1 tablespoon of water to make an egg wash. Brush the egg wash over the entire lattice crust and the crimped edges—this will make the crust golden brown and shiny when baked. Sprinkle with coarse sugar if you want a little extra crunch and sparkle.
9. Place the pie on a baking sheet (to catch any drips of syrup) and bake at 400°F for 20 minutes. Then reduce the oven temperature to 375°F, cover the edges of the crust with a pie shield or strips of aluminum foil to prevent burning, and bake for another 35-45 minutes. The pie is done when the filling is bubbling thickly (you’ll see the syrup bubbling through the lattice) and the crust is a deep golden brown.
10. Remove the pie from the oven and let it cool completely on a wire rack for at least 2 hours before slicing. I know it’s tempting to cut into it while it’s warm, but the filling needs time to set. If you cut it too early, the juices will run out and you’ll have a messy slice with no filling. Trust me, the wait is worth it.
Tip: If you don’t have a pie shield, cut a circle of aluminum foil with a hole in the center, and place it over the pie after the first 20 minutes of baking. This protects the edges from burning while the rest of the pie cooks.
Grandma’s Secret Tips for Perfect Peach Pie Every Time
Over the years, I’ve picked up a few extra tips from grandma and my own baking trials that will take your peach pie from good to amazing:
– Use a mix of peach varieties if you can. Georgia peaches are sweet and juicy, while California peaches are a little firmer. Mixing them gives you the best of both worlds: sweet flavor and filling that holds its shape.
– Keep everything cold. If your kitchen is warm, chill your mixing bowl and pastry cutter before making the crust. Warm butter is the enemy of flaky crust.
– Don’t overwork the dough. The more you handle the dough, the more gluten develops, and the tougher the crust gets. Mix only until the dough just comes together, and handle it as little as possible when rolling.
– If your crust tears while transferring to the pie plate, don’t panic. Just press the tear together with your fingers, or patch it with a small piece of scrap dough. No one will know once it’s baked.
– Let the pie cool completely. I can’t stress this enough. A warm pie has runny filling, but a cooled pie has thick, glossy syrup that stays in the slice.
– For an extra golden crust, brush the egg wash on twice—once before baking, and once 10 minutes before the pie is done.
Easy Variations and Substitutions
This traditional recipe is perfect as-is, but sometimes you want to switch things up. Here are some easy variations that still stay true to the original flavor:
– Mixed berry peach pie: Add 1 cup of fresh blueberries or raspberries to the peach filling for a pop of color and tart flavor. The berries pair perfectly with peaches and cinnamon.
– Brown sugar swap: Replace half the granulated sugar in the filling with light brown sugar for a deeper, caramel-like flavor. This is great if your peaches are a little tart.
– Gluten-free crust: Replace the all-purpose flour in the crust with a 1:1 gluten-free baking blend. You may need to add an extra tablespoon of ice water, as gluten-free flour absorbs more liquid.
– Frozen peach option: If peaches aren’t in season, you can use frozen sliced peaches. Thaw them completely, then drain off any excess liquid before tossing with the sugar and spices. Let them rest for 30 minutes as usual—you may need to add an extra teaspoon of cornstarch since frozen peaches release more juice.
– Crumb top instead of lattice: If you don’t want to mess with a lattice crust, you can make a simple crumb topping: mix 1/2 cup flour, 1/2 cup brown sugar, 1/4 cup cold butter, and 1/2 teaspoon cinnamon until crumbly, then sprinkle over the filling before baking. Skip the egg wash if you use a crumb top.
– Spice it up: Add a pinch of ground ginger or nutmeg to the filling for extra warm spice. Grandma sometimes added a tiny pinch of cardamom, which is amazing but subtle.
All of these substitutions are easy, and none of them require specialty ingredients. Feel free to experiment and make the recipe your own!
How to Store and Reheat Your Peach Pie
Peach pie stores beautifully, so you can make it ahead of time for parties or enjoy leftovers all week:
– Room temperature: Cover the cooled pie loosely with aluminum foil or plastic wrap, and store at room temperature for up to 2 days. Don’t refrigerate it unless your kitchen is very hot (above 75°F), as the cold can make the crust soggy.
– Refrigerator: If you need to store it longer, cover the pie tightly and refrigerate for up to 5 days. The crust will soften a little, but the flavor will still be great.
– Freezer: You can freeze a fully baked pie for up to 3 months. Let it cool completely, then wrap it tightly in two layers of plastic wrap, then a layer of aluminum foil. To thaw, unwrap it and let it sit at room temperature for 4-6 hours, or overnight in the fridge.
– Reheating: To reheat individual slices, microwave them for 20-30 seconds until warm. To reheat a whole pie, preheat your oven to 350°F, cover the pie loosely with foil (to prevent the crust from burning), and bake for 15-20 minutes until warmed through. Reheating brings back the crispy crust and gooey filling, almost like it’s fresh out of the oven.
Tip: If you freeze the pie, don’t add the egg wash before baking. Brush it on right before you put the frozen pie in the oven, and add 10-15 minutes to the baking time.
Common Mistakes to Avoid (So Your Pie Turns Out Perfect!)
Even experienced bakers make mistakes sometimes, but these common pitfalls are easy to avoid:
1. Using unripe or overripe peaches: Unripe peaches are hard and tart, and won’t soften properly when baked. Overripe peaches are mushy and will turn to applesauce in the oven. Stick to peaches that give slightly when squeezed, with no green tones.
2. Overworking the pie dough: The more you mix, roll, and handle the dough, the tougher it gets. Mix only until the dough comes together, and handle it as little as possible when rolling and transferring to the pie plate.
3. Skipping the chilling step for the dough: Chilling relaxes the gluten and keeps the butter cold. If you skip this, the crust will shrink when baking, and be tough and dense.
4. Not letting the peach filling rest: This is the most common mistake. Skipping the 30-minute rest means the cornstarch won’t have time to absorb the peach juices, leading to a runny filling. Set a timer so you don’t forget!
5. Cutting the pie while it’s hot: I know it’s tempting, but hot filling hasn’t set yet. You’ll end up with a puddle of juice on your plate and no filling in your slice. Wait the full 2 hours for cooling.
6. Not covering the crust edges: The edges of the pie cook faster than the rest of the crust, so they burn easily. Use a pie shield or foil strips to protect them after the first 20 minutes of baking.
7. Using too much or too little thickener: Too much cornstarch makes the filling gummy and starchy. Too little makes it runny. Stick to the 2 tablespoons for 6-7 cups of peaches, and adjust by a teaspoon if needed after the resting step.
Avoid these mistakes, and you’ll have a perfect pie every time.
Frequently Asked Questions
Can I use canned peaches instead of fresh?
I don’t recommend it. Canned peaches are packed in syrup, so they’re too sweet and soft, and they’ll make the filling runny. Fresh peaches have a bright, natural flavor that canned peaches can’t match. If you absolutely can’t get fresh peaches, use frozen instead—they’re closer to fresh than canned.
Can I make the pie crust ahead of time?
Yes! The dough discs can be stored in the fridge for up to 2 days, or frozen for up to 3 months. Thaw frozen dough in the fridge overnight before rolling. You can also pre-bake the crust (blind bake) ahead of time: roll out the bottom crust, press it into the pie plate, cover with parchment paper and pie weights, bake at 375°F for 15 minutes, remove weights and parchment, bake 5 more minutes, then let cool. Store at room temp for 1 day before filling.
My filling is too runny, how do I fix it?
If the filling is still runny after baking, it’s usually because the cornstarch didn’t activate, or you didn’t let the filling rest. Next time, add an extra teaspoon of cornstarch, and make sure to let the filling sit for 30 minutes. If your baked pie is runny, you can scoop the filling out, simmer it in a small pot with 1 teaspoon of cornstarch mixed with 1 tablespoon water until thickened, then pour it back into the crust. It’s a fix, but better to prevent it!
Can I freeze the unbaked pie?
Yes! Assemble the pie completely, but don’t brush with egg wash or bake. Wrap it tightly in two layers of plastic wrap and one layer of foil, then freeze for up to 3 months. When ready to bake, unwrap it, brush with egg wash, and bake at 400°F for 20 minutes, then reduce to 375°F for 45-55 minutes (add 10-15 minutes to the baking time since it’s frozen).
Do I have to use a lattice crust?
Not at all! If lattice feels too intimidating, you can use a solid top crust: roll out the second disc, place it over the filling, cut 4-5 slits in the top to let steam escape, crimp the edges, and bake as usual. You can also use a crumb top, as mentioned in the variations section.
How do I know when the peaches are ripe enough?
Give the peach a gentle squeeze near the stem. It should yield slightly, like a ripe avocado. It should smell sweet at the stem end. Avoid peaches with green tones, hard spots, or bruises. If your peaches are a little underripe, leave them on the counter for 1-2 days until they ripen—don’t put them in the fridge, which stops the ripening process.
Can I reduce the sugar in the filling?
You can reduce the granulated sugar to 1/2 cup if your peaches are very sweet. Don’t reduce it more than that, or the filling will be too tart, and the cornstarch won’t have enough sugar to react with, leading to a runnier filling.
Why is my crust tough?
Tough crust is almost always caused by overworking the dough, adding too much water, or not chilling the dough. Next time, mix only until the dough comes together, add water 1 tablespoon at a time, and chill the dough for at least 1 hour. Also, make sure your butter is cold when you start!
Conclusion
There’s something so special about a homemade peach pie that you just can’t get from a store-bought one. It’s the smell that fills your house while it bakes, the pride of rolling out your own crust, the way everyone’s face lights up when you bring it to the table. This grandma’s traditional peach pie recipe is more than just a dessert—it’s a way to carry on a little bit of that old-fashioned summer magic, whether you’re serving it at a Fourth of July barbecue, sharing it with neighbors, or eating a slice on your porch while the sun goes down.
I hope this recipe becomes a staple in your house, just like it is in mine. Remember to be patient with the dough, let the peaches rest, and don’t stress if your lattice isn’t perfect. The best part of this pie is the love and memories that go into making it. Serve it warm with a scoop of vanilla ice cream, grab a fork, and take a bite of summer. I promise, it tastes just like grandma’s.


