Welcome to a Festive 4th of July Cookout
The Fourth of July is more than just a date on the calendar; it’s a celebration of freedom, community, and the joy of sharing good food under the summer sun. Imagine a backyard filled with the sizzle of the grill, the aroma of fresh herbs, and colorful plates that echo the red, white, and blue of the American flag. For many of us, the highlight of the holiday is the cookout – a chance to gather friends and family, enjoy simple yet unforgettable dishes, and create memories that last all summer long.
The good news is that you don’t need a culinary degree or hours of prep time to pull off a show‑stopping spread. With a few clever ideas, vibrant colors, and a dash of creativity, you can serve up a menu that looks as spectacular as it tastes. This article walks you through a complete 4th of July cookout plan, from eye‑catching appetizers to a refreshing dessert that will make your dessert table pop. Every recipe is designed to be beginner‑friendly, uses ingredients you likely already have on hand, and stays clear of pork, bacon, and any alcoholic beverages, keeping the focus squarely on wholesome, festive flavors.
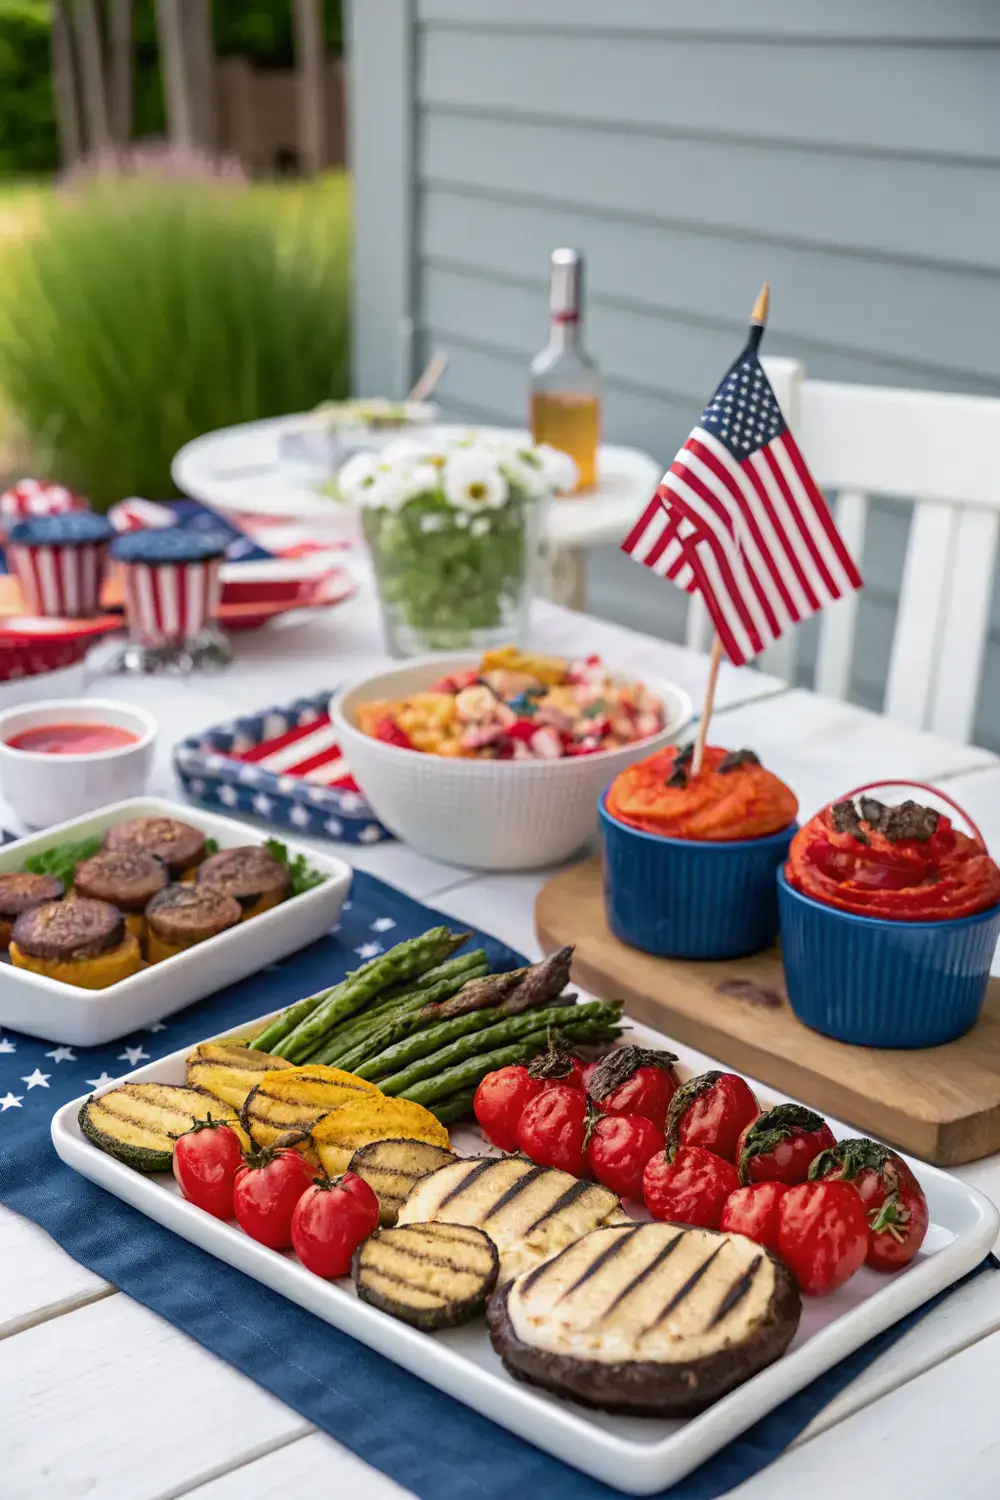
Patriotic Grilled Vegetable Skewers
These skewers are a colorful centerpiece that brings the spirit of the holiday to the grill. By using a mix of red, white, and blue vegetables, you get a dish that’s as beautiful as it is tasty, and the smoky char adds depth without any complicated techniques.
Ingredients and Why They Matter
– Red Bell Pepper – adds a sweet, crisp bite and a vivid red hue. Choose firm, glossy peppers for the best texture.
– Yellow Squash – provides a buttery flavor and a sunny yellow contrast that balances the reds.
– Zucchini – its mild taste lets the other vegetables shine, while its green color adds a fresh visual element.
– Red Onion – offers a gentle bite and a pop of deep purple that complements the reds.
– Cherry Tomatoes – burst with juicy sweetness and add bright red accents.
– Mozzarella Balls (mini) – these white pearls bring a creamy, milky flavor and a soft texture that contrasts nicely with the vegetables.
– Olive Oil – helps the veggies caramelize on the grill and keeps them moist.
– Sea Salt & Freshly Ground Black Pepper – simple seasonings that enhance the natural flavors.
– Fresh Basil Leaves – optional, but they add a fragrant, aromatic finish.
Step‑by‑Step Instructions
1. Prepare the Vegetables – Wash all produce thoroughly. Slice the bell pepper, yellow squash, and zucchini into bite‑size pieces (about 1‑inch cubes). Separate the red onion into wedges, halve the cherry tomatoes, and keep the mozzarella balls whole.
2. Assemble the Skewers – Soak wooden skewers in water for 10 minutes to prevent burning. Thread the vegetables and mozzarella alternately: start with a piece of red bell pepper, then a cherry tomato, a zucchini cube, a yellow squash piece, a red onion wedge, and finish with a mozzarella ball. This pattern creates a rainbow effect.
3. Season – In a large bowl, toss the assembled skewers with olive oil, a pinch of sea salt, and a dash of black pepper. Make sure every piece is lightly coated.
4. Preheat the Grill – Heat the grill to medium‑high (about 400°F). A hot grill gives a nice char without overcooking the vegetables.
5. Grill the Skewers – Place the skewers on the grill, turning every 2‑3 minutes. Grill for about 8‑10 minutes total, until the vegetables are tender‑crisp and have appealing grill marks.
6. Finish with Fresh Basil – Remove the skewers and sprinkle fresh basil leaves over the top for a fragrant burst.
Tips for Success
– Don’t overcrowd the grill – give each skewer space so heat can circulate evenly.
– Watch the mozzarella – it softens quickly; remove the skewers as soon as the veggies are done to avoid a melted mess.
– Variation – swap mozzarella for cubed tofu or halloumi for a different texture.
Star‑Shaped Watermelon Bites
A fun, refreshing appetizer that’s as patriotic as it is playful. These bite‑size watermelon stars are perfect for a summer gathering and require only a few tools.
Ingredients and Explanations
– Seedless Watermelon – its natural sweetness and juicy texture make it ideal for a quick snack. Choose a watermelon that feels heavy for its size, indicating ripeness.
– Small Cookie Cutter (Star Shape) – a simple kitchen tool that creates uniform, eye‑catching shapes.
– Fresh Mint Leaves – optional garnish that adds a cool, aromatic note.
– A Pinch of Sea Salt – enhances the watermelon’s natural sweetness.
Step‑by‑Step Instructions
1. Cut the Watermelon – Slice the watermelon into a thick slab (about ½‑inch thick). This provides a stable surface for cutting.
2. Use the Cookie Cutter – Press the star cutter firmly into the watermelon slab. Press down evenly to get clean cuts. If the cutter sticks, lightly dust it with powdered sugar to prevent tearing.
3. Arrange on a Platter – Place the star‑shaped pieces on a serving tray, spacing them out for a neat presentation.
4. Add the Finishing Touch – Lightly sprinkle each bite with a pinch of sea salt and garnish with a tiny mint leaf on top.
Tips for Success
– Keep the watermelon cold – store the cut pieces in the refrigerator until serving to maintain crispness.
– Alternative cutter shapes – if you don’t have a star cutter, a small cookie cutter in the shape of a heart or circle works just as well.
Grilled Corn on the Cob with Red, White, and Blue Toppings
Corn is a classic summer side, and dressing it with colorful toppings turns it into a patriotic treat that’s both sweet and savory.
Ingredients and Why They Matter
– Fresh Corn on the Cob – look for ears with bright green husks and moist silk; they indicate peak freshness.
– Butter (or a plant‑based alternative) – adds richness and helps the toppings adhere.
– Mayonnaise – creates a creamy base that holds the colorful toppings in place.
– Red Paprika – gives a vivid red hue and a subtle smoky flavor.
– Crumbled White Cheese (such as feta or cotija) – adds a salty, creamy contrast and a white color.
– Fresh Blueberries – provide a natural blue pop and a hint of sweetness.
– Chopped Fresh Cilantro – optional, for a fresh herbal note.
– Lime Wedges – for a bright, tangy finish.
Step‑by‑Step Instructions
1. Prep the Corn – Peel back the husks (but keep them attached at the base) and remove the silk. Pull the husks back over the cob to protect the kernels while grilling.
2. Preheat the Grill – Medium heat (around 375°F) works well for corn.
3. Grill the Corn – Place the corn directly on the grill grates. Turn every 5 minutes, rotating for even charring, for a total of 12‑15 minutes. The kernels should be tender and have light grill marks.
4. Make the Creamy Base – In a small bowl, combine softened butter (or plant‑based butter) with a generous spoonful of mayonnaise. Mix until smooth.
5. Apply the Base – While the corn is still warm, brush the butter‑mayo mixture all over each ear. The heat will melt the butter, creating a glossy coating.
6. Add the Toppings – Sprinkle red paprika evenly over the corn for a vibrant red color. Then crumble white cheese over the top, followed by a scattering of fresh blueberries. Finish with a squeeze of lime juice and a sprinkle of cilantro if desired.
Tips for Success
– Don’t over‑cook – corn should stay juicy; excessive charring can make it dry.
– Butter alternative – for a dairy‑free version, use a plant‑based butter or coconut oil.
– Variation – swap blueberries for diced purple grapes for a different texture.
Red White and Blue Berry Trifle
A layered dessert that looks as stunning as it tastes, this trifle combines fresh berries, vanilla‑flavored custard, and a light whipped topping. It’s perfect for making ahead and serving in individual glasses or a large bowl.
Ingredients and Explanations
– Fresh Mixed Berries (strawberries, blueberries, raspberries) – provide the red and blue colors and natural sweetness.
– Vanilla Instant Pudding Mix – creates a smooth, creamy custard base without the need for stovetop cooking.
– Milk (or a dairy‑free alternative) – hydrates the pudding mix; choose whole milk for richness or almond milk for a lighter option.
– Whipped Topping (store‑bought or homemade) – adds a fluffy white layer that mimics the “white” of the flag.
– Granola or Crushed Shortbread Cookies – gives a crunchy texture contrast.
– Fresh Mint Leaves – optional garnish for a pop of green.
Step‑by‑Step Instructions
1. Prepare the Custard – In a large bowl, whisk the vanilla pudding mix with cold milk according to the package directions. Let it set for about 5 minutes until thickened.
2. Layer the Trifle – In a clear glass bowl or individual glasses, start with a layer of crushed granola or shortbread cookies. This adds a crunchy foundation.
3. Add Custard – Spoon a generous layer of the vanilla custard over the crunchy base.
4. Add Berries – Distribute a mix of sliced strawberries (red) and whole blueberries (blue) over the custard. For extra visual appeal, arrange the berries in a pattern that mimics the flag’s stripes.
5. Repeat Layers – Add another layer of granola, custard, and berries until the container is filled, finishing with a layer of custard.
6. Top with Whipped Topping – Pipe or spoon a generous amount of whipped topping over the final custard layer.
7. Garnish – Place a few fresh mint leaves on top for a pop of green and a hint of freshness.
Tips for Success
– Chill Before Serving – Refrigerate the trifle for at least 1 hour to let flavors meld and the layers set.
– Make Ahead – This dessert can be prepared a day in advance; just keep the whipped topping separate until ready to serve to maintain its texture.
Simple Side Dishes to Complement the Menu
A well‑rounded cookout includes a few easy sides that balance flavors and textures.
Classic Coleslaw (No Mayo, Light Yogurt Version)
Ingredients
– Shredded Green Cabbage – provides crunch and a mild flavor.
– Carrot, Grated – adds sweetness and a pop of orange.
– Plain Greek Yogurt – a creamy, low‑fat alternative to traditional mayo.
– Apple Cider Vinegar – gives a gentle tang.
– Honey – a touch of natural sweetness.
– Salt & Pepper – to taste.
Instructions
1. In a large bowl, combine cabbage and carrot.
2. In a separate small bowl, whisk yogurt, vinegar, honey, salt, and pepper.
3. Pour the dressing over the vegetables and toss until evenly coated.
4. Refrigerate for 20‑30 minutes before serving.
Lemon‑Herb Quinoa Salad
Ingredients
– Quinoa – a protein‑rich grain that’s gluten‑free and fluffy.
– Lemon Juice – brightens the dish.
– Olive Oil – adds richness.
– Fresh Parsley, Chopped – offers herbaceous flavor.
– Diced Cucumber – adds cool crunch.
– Salt & Pepper – seasoning.
Instructions
1. Rinse quinoa under cold water, then cook according to package directions (usually 2 parts water to 1 part quinoa). Let it cool.
2. In a bowl, combine cooked quinoa, cucumber, parsley, lemon juice, olive oil, salt, and pepper. Toss gently.
These sides are quick, require minimal cooking, and can be prepared while the grill is heating.
Putting It All Together: A Seamless Cookout Flow
1. Prep Early – The night before, wash and cut vegetables for the skewers, slice watermelon, and prepare the pudding for the trifle. Store everything in airtight containers in the refrigerator.
2. Set Up the Grill Station – Arrange your grill tools, skewers, and corn on a side table. Have a bowl of water for soaking wooden skewers nearby.
3. Cook in Batches – Start with the corn, then move to the vegetable skewers. While those are grilling, assemble the watermelon bites and keep them chilled.
4. Serve Family‑Style – Place the skewers on a large platter, the corn on a separate board, and the trifle in a clear bowl so guests can see the layers. Offer the coleslaw and quinoa salad in small bowls for easy self‑service.
5. Enjoy the Moment – Encourage guests to mingle, take photos of the colorful spread, and savor each bite. The vibrant colors and simple flavors will keep the focus on fun and celebration.
Storage and Reheating Tips
– Grilled Vegetables – Cool completely, then store in a sealed container in the fridge for up to 3 days. Reheat gently on the grill or in a hot skillet to retain texture.
– Watermelon Bites – Keep refrigerated in a single layer; they stay fresh for 1‑2 days. Serve chilled.
– Corn – Wrap grilled corn in foil and refrigerate. Reheat on the grill for 5 minutes or microwave briefly.
– Berry Trifle – Keep refrigerated; the custard and berries stay fresh for 2 days. Add whipped topping just before serving to keep it airy.
– Side Dishes – Coleslaw and quinoa salad keep well for 3‑4 days. Give them a quick stir before serving.
Common Mistakes to Avoid
1. Over‑crowding the Grill – Too many items at once can lower the temperature, leading to steaming instead of grilling. Cook in batches for best results.
2. Skipping the Soak for Skewers – Dry wooden skewers can burn, imparting a bitter taste. Always soak them beforehand.
3. Using Pre‑Cut Fruit That’s Too Soft – Watermelon that’s overly ripe may fall apart. Choose firm, just‑ripe watermelon for clean cuts.
4. Neglecting Seasoning – Even simple dishes benefit from a pinch of salt and a splash of acid (like lime or vinegar) to brighten flavors.
5. Leaving the Trifle Uncovered – Exposed to air, the whipped topping can dry out. Cover the trifle with plastic wrap until ready to serve.
Frequently Asked Questions
Can I make these recipes vegetarian?
Yes, all the dishes are naturally vegetarian. The grilled skewers use mozzarella or tofu for protein, and the corn, sides, and dessert contain no meat or animal products beyond dairy, which can be swapped for plant‑based alternatives.
What if I don’t have a star‑shaped cookie cutter?
A small knife can be used to cut watermelon into squares, then use a small cookie cutter or even a sharp paring knife to carve out star shapes. The key is to keep the pieces uniform for an attractive presentation.
How can I keep the corn from drying out on the grill?
Leave the husks on while grilling and brush the corn with butter or a plant‑based alternative. The steam trapped by the husks keeps the kernels moist.
Can I substitute the yogurt in the coleslaw?
Absolutely. If you’re avoiding dairy, use a plain coconut‑milk yogurt or a dairy‑free sour cream alternative. The tangy flavor will still shine.
Is it safe to prepare the trifle a day ahead?
Yes. Store the trifle in the refrigerator, covered, and add the whipped topping just before serving to maintain its light texture.
What are some kid‑friendly variations?
For younger guests, you can add a drizzle of honey over the grilled corn, use mini mozzarella balls instead of the larger ones on the skewers, or replace the berries in the trifle with sliced bananas and strawberries for a milder flavor.
Conclusion
Creating a memorable 4th of July cookout doesn’t require extravagant ingredients or hours of labor. By focusing on vibrant, colorful foods that celebrate the red, white, and blue theme, you can wow your guests with minimal effort and maximum impact. From the smoky aroma of grilled vegetable skewers to the refreshing burst of star‑shaped watermelon bites, each dish contributes to a festive atmosphere that feels both patriotic and welcoming. Pair these mains and sides with a stunning berry trifle, and you have a complete menu that satisfies every palate while staying friendly to dietary restrictions.
Remember to prep ahead, keep the grill organized, and enjoy the process of cooking and sharing. With these easy‑to‑follow recipes, beginner‑friendly techniques, and helpful tips, your backyard will become the go‑to spot for a truly unforgettable Independence Day celebration. Fire up the grill, gather your loved ones, and let the colors, flavors, and smiles flow freely. Happy 4th of July!


