Table of Contents
A Warm Welcome to Backyard Bliss
When the sun climbs higher and the scent of fresh-cut grass drifts through the air, families across the United States start gathering around grills and picnic tables. There’s something magical about turning a simple backyard into a culinary playground, and one of the most beloved ways to celebrate the season is with a plate of smoky, caramelized chicken drumsticks glazed to perfection. In this guide, you’ll discover every step needed to create juicy, flavor‑packed drumsticks that are easy to prepare, budget‑friendly, and perfect for everything from lively picnics to quick weeknight suppers. We’ll walk through why the glaze works, how to marinate for maximum tenderness, and even share clever variations that keep your meals exciting without ever compromising on taste or simplicity.
Why Drumsticks Deserve the Spotlight
Chicken drumsticks often play second fiddle to breasts or thighs, yet they bring a unique set of advantages that make them ideal for grilling. The dark meat stays moist even when exposed to high heat, and the bone adds a subtle, earthy depth that elevates every bite. Because they’re inexpensive and widely available, they’re a go‑to choice for feeding a crowd without breaking the bank. Plus, their shape offers a perfect surface area for that glossy, sticky glaze that clings to each piece, giving you that restaurant‑style finish right at home. Whether you’re feeding kids who love to pick at their food or adults who appreciate a satisfying chew, drumsticks deliver on both texture and flavor.
Ingredients: The Building Blocks of Flavor
Core Ingredients
- Chicken drumsticks – Aim for 12 to 14 pieces, each about 6 to 7 ounces. Look for plump, pink flesh with a smooth surface; avoid any that appear discolored or have an off‑smell.
- Ketchup – Provides the sweet base that balances the tangy and smoky notes. Choose a brand that lists tomatoes as the first ingredient for authentic flavor.
- Brown sugar – Adds caramelization and a deep, molasses‑like sweetness. Light brown sugar works best, but dark brown adds a richer undertone.
- Apple cider vinegar – Lends a bright acidity that cuts through the sweetness and helps tenderize the meat.
- Worcestershire sauce – Brings umami depth and a hint of spice; a classic staple in many barbecue sauces.
- Garlic powder – Gives a warm, aromatic backdrop without the mess of fresh garlic.
- Onion powder – Enhances the savory profile and rounds out the flavor.
- Smoked paprika – Introduces a subtle smoky aroma that mimics a low‑and‑slow smokehouse vibe.
- Black pepper – A pinch adds gentle heat and complexity.
- Olive oil – Helps the marinate coat each drumstick evenly and prevents sticking on the grill.
- Salt – Essential for bringing all the flavors together; about ½ teaspoon per pound of meat is perfect.
Optional Add‑Ins for Creative Twists
- Red pepper flakes – Add a few if you enjoy a gentle kick.
- Fresh herbs – Chopped thyme or rosemary can be mixed into the glaze for an herbaceous lift.
- Chipotle in adobo – A teaspoon of mashed chipotle adds smoky heat without overwhelming the palate.
- Fresh fruit juices – A splash of orange juice can introduce bright citrus notes, especially great for summer.
Step‑by‑Step: From Marination to the Final Glaze
1. Prep the Marinade
In a large bowl, whisk together ketchup, brown sugar, apple cider vinegar, Worcestershire sauce, garlic powder, onion powder, smoked paprika, black pepper, and salt. Slowly drizzle in olive oil while continuing to stir, ensuring the mixture becomes a smooth, glossy coating. Taste a tiny spoonful and adjust seasoning—if you’d like it sweeter, add a touch more brown sugar; if you prefer it tangier, add a splash more vinegar. This balance is key to achieving that signature sweet‑tangy glaze that will cling perfectly to the chicken.
2. Marinate the Drumsticks
Pat the drumsticks dry with paper towels—a dry surface helps the marinade adhere better. Toss them into the bowl, making sure every crevice is coated. For the best flavor penetration, cover the bowl with plastic wrap and let the drumsticks sit in the refrigerator for at least 30 minutes, but up to 8 hours if you have the time. Longer marinating periods allow the acidic components to break down muscle fibers gently, resulting in extra juiciness.
3. Pre‑heat the Grill
When you’re ready to cook, pre‑heat your outdoor grill to medium heat, which is roughly 350‑375 °F (175‑190 °C). Aim for a surface where a thin layer of oil sizzles but the flames do not roar too high—medium heat offers a gentle cooking environment that ensures the meat cooks through without burning the glaze. Clean the grill grates with a brush and lightly oil them to prevent sticking.
4. Grill and Baste for Caramelization
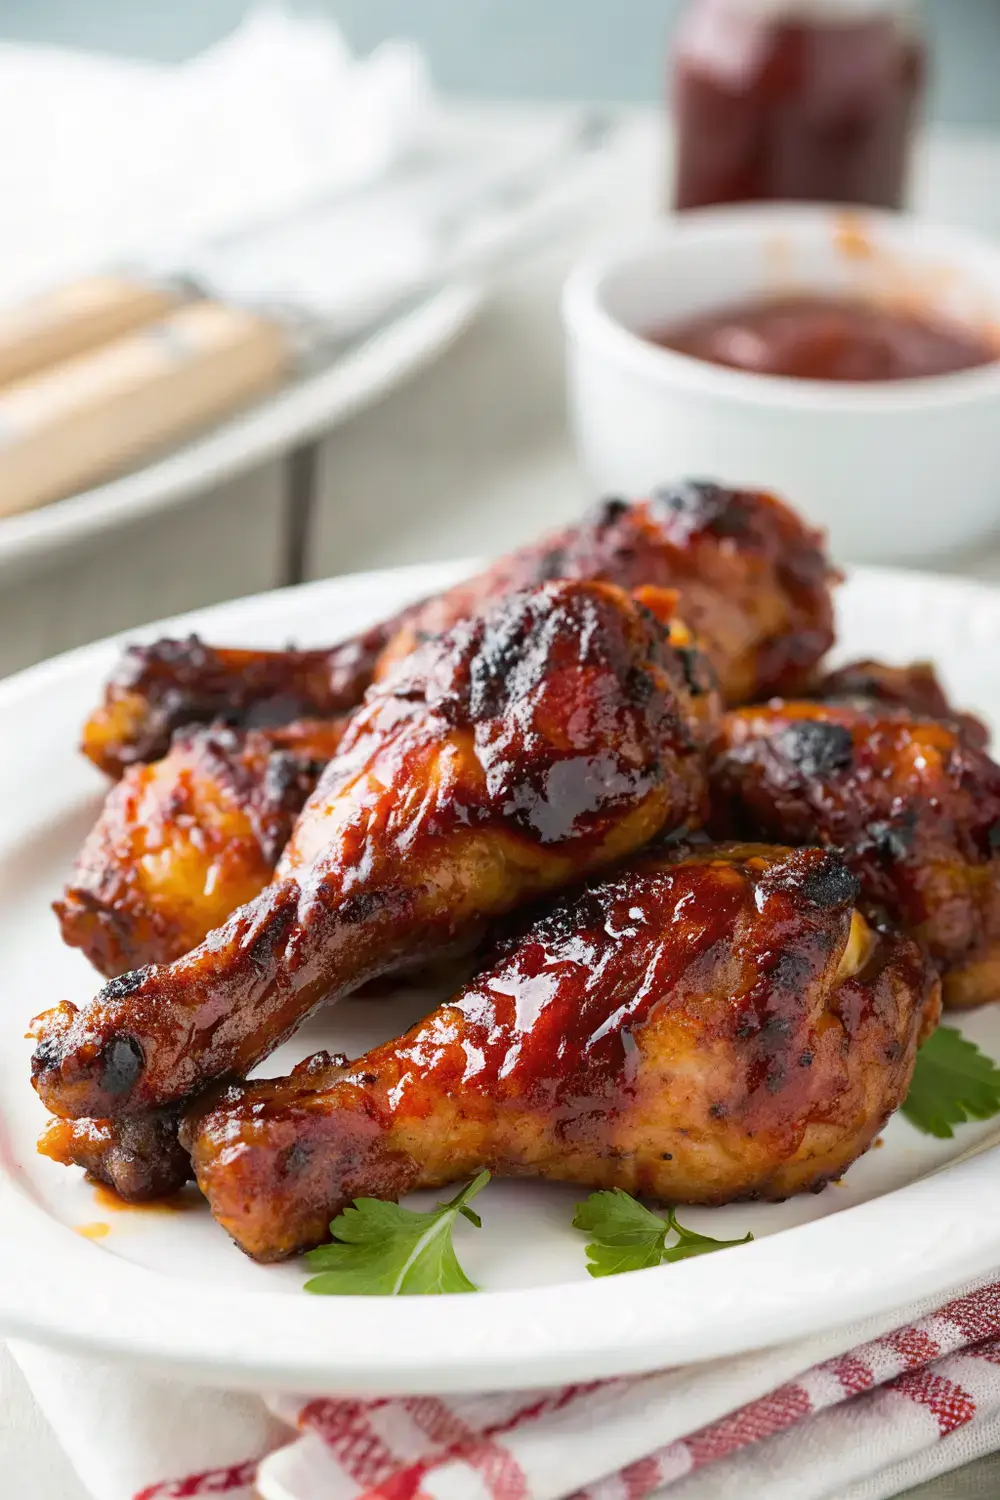
Place the drumsticks directly on the grill, spacing them out so each piece has room to breathe. Grill for about 6‑8 minutes on each side, turning only once before planning to baste. As the meat cooks, take a basting brush and generously coat each drumstick with the remaining glaze. Continue flipping and basting every few minutes, letting the sugars caramelize and form that coveted sticky crust. Keep an eye on the color; it should achieve a deep mahogany hue, not charred black.
5. Check for Doneness
The safest way to confirm the chicken is fully cooked is to insert an instant‑read thermometer into the thickest part of a drumstick, avoiding the bone. The temperature should read at least 165 °F (74 °C). If you don’t have a thermometer, pierce the meat with a fork; the juices should run clear, and the meat should feel firm yet tender. Once done, remove the drumsticks from the grill and let them rest for 5 minutes—this allows the juices to redistribute, keeping each bite succulent.
6. Serve and Enjoy
Arrange the drumsticks on a serving platter, perhaps sprinkling a little extra smoked paprika for visual appeal. Pair them with classic summer sides like buttery corn on the cob, crisp coleslaw, or a refreshing green salad. The sweet‑savory profile pairs wonderfully with a cold lemonade or iced tea, making it a perfect centerpiece for any gathering.
Cooking Variations and Substitutions
Different Heat Sources
If a charcoal grill isn’t available, a gas grill works just as well—just adjust the burners to maintain medium heat. For indoor cooking, you can use a grill pan on the stovetop or even the broiler. When using a broiler, set the oven rack about 6 inches from the heating element and watch the drumsticks closely; they brown quickly but can dry out if left too long.
Alternative Sweeteners
Dark maple syrup or honey can replace part of the brown sugar for a richer flavor. If you’re avoiding refined sugars, try coconut sugar or a small amount of agave nectar, keeping the proportion similar to preserve the glaze’s texture.
Herbal Twists
Mix in fresh thyme leaves, crushed rosemary, or even a pinch of dried oregano into the glaze for a garden‑fresh twist. These herbs add subtle earthiness that complements the smoky paprika beautifully.
Spicy Upgrade
For those who love heat, stir in a tablespoon of sriracha or a teaspoon of cayenne pepper into the original sauce. The heat will meld with the sweet base, creating a balanced spicy‑sweet profile that still stays family‑friendly.
Storage, Reheating, and Leftover Magic
Storing Leftovers
Allow the drumsticks to cool to room temperature before placing them in an airtight container. They’ll keep in the refrigerator for up to 3 days without losing their flavor. If you anticipate a longer stay, you can freeze them for up to 2 months. Lay the drumsticks on a baking sheet in a single layer before freezing; once solid, transfer them to a zipper‑top freezer bag to prevent clumping.
Reheating Tips
To retain juiciness, reheat the drumsticks in a preheated oven at 350 °F (175 °C) for about 10‑12 minutes, or until warmed through. Alternatively, a quick trip to the microwave works for a fast fix—just cover the drumsticks with a damp paper towel to trap steam. For an extra glossy finish, brush them lightly with a teaspoon of fresh glaze before reheating and finish under the broiler for a minute or two.
Repurposing Into New Dishes
Shred any leftover meat and toss it into a hearty chicken salad with mayo, celery, and grapes for a picnicking‑friendly sandwich. Or slice the drumsticks thinly and layer them over pizza dough with mozzarella and fresh herbs for a quick homemade pie.
Common Mistakes to Dodge
Skipping the Dry‑Pat
Moisture on the drumsticks can dilute the glaze, causing it to slide off during cooking. A quick pat with paper towels makes a huge difference in adhesion.
Over‑marinating
While longer marination can add depth, exceeding 12 hours can make the meat mushy because of the acid in the vinegar and Worcestershire sauce. Stick to the recommended 30‑minute minimum up to 8 hours.
Grilling Over Too‑High Heat
If the grill is too hot, the sugar in the glaze will burn before the meat cooks through, resulting in a bitter crust rather than a caramelized one. Medium heat offers the sweet spot for both browning and thorough cooking.
Forgetting to Rest
Cutting into the drumsticks immediately after grilling releases precious juices onto the plate, leaving the meat drier. A short 5‑minute rest preserves every drop of flavor inside.
Frequently Asked Questions
Can I make this recipe with boneless chicken thighs instead?
Absolutely! Thighs cook faster and stay juicy, though the flavor profile will be slightly richer. Adjust cooking time downward by about 3‑4 minutes per side and keep an eye on the glaze to prevent burning.
Is there a way to make this dish gluten‑free?
Yes—simply ensure the Worcestershire sauce you use is labeled gluten‑free, and check that any added seasonings don’t contain hidden wheat. The rest of the ingredients are naturally gluten‑free.
What side dishes complement these drumsticks without overpowering them?
Light, fresh sides work best. Consider grilled corn with a lime‑butter drizzle, a classic potato salad with a mustard‑vinegar dressing, or a simple cucumber‑mint salad. These add balance without competing with the glaze’s sweet‑tangy notes.
Can I prepare the glaze ahead of time and store it?
Definitely. Transfer the finished glaze to a sealed jar and refrigerate for up to a week. When you’re ready to use it, give it a good stir—sometimes the sugars settle at the bottom. You can also freeze the glaze in small ice‑cube trays for quick portions later.
How can I tell if the caramelization is done without over‑cooking?
Look for a deep amber gloss that clings to the meat rather than pooling on the grill grates. A light sheen combined with a slight crackle when you brush the glaze indicates the sugars have melted just enough to form a crust, but not yet burnt.
I’m serving guests with dietary restrictions; any serving suggestions?
For guests avoiding added sugars, consider reducing the brown sugar by half and replacing it with a natural sweetener like pureed dates. For low‑sodium diets, decrease the added salt and rely on the natural flavors of the spices and vinegar for depth.
Closing Thoughts: Make Every Summer Night Sizzle
Creating Easy BBQ Chicken Drumsticks is more than just a cooking task—it’s an invitation to gather, share, and savor the simple pleasures of summer. By following the steps outlined here, you’ll have a reliable, crowd‑pleasing dish that brings together sweet, tangy, and smoky flavors in every bite. Whether you’re lighting up the grill for a lively backyard bash or preparing a quick dinner after a busy day, these drumsticks promise juicy, tender meat wrapped in a glossy, caramelized glaze that’s hard to resist. Remember the tips, embrace the variations, and let your grill become the heart of your summer celebrations. Here’s to many more evenings filled with laughter, tasty bites, and the comforting aroma of backyard grilling. Enjoy!


