Table of Contents
The holiday season is all about celebration—colorful decorations, twinkling lights, and treats that taste decadent but feel joyful. This layered sugar cookie fudge hits the mark. Here’s what sets it apart:
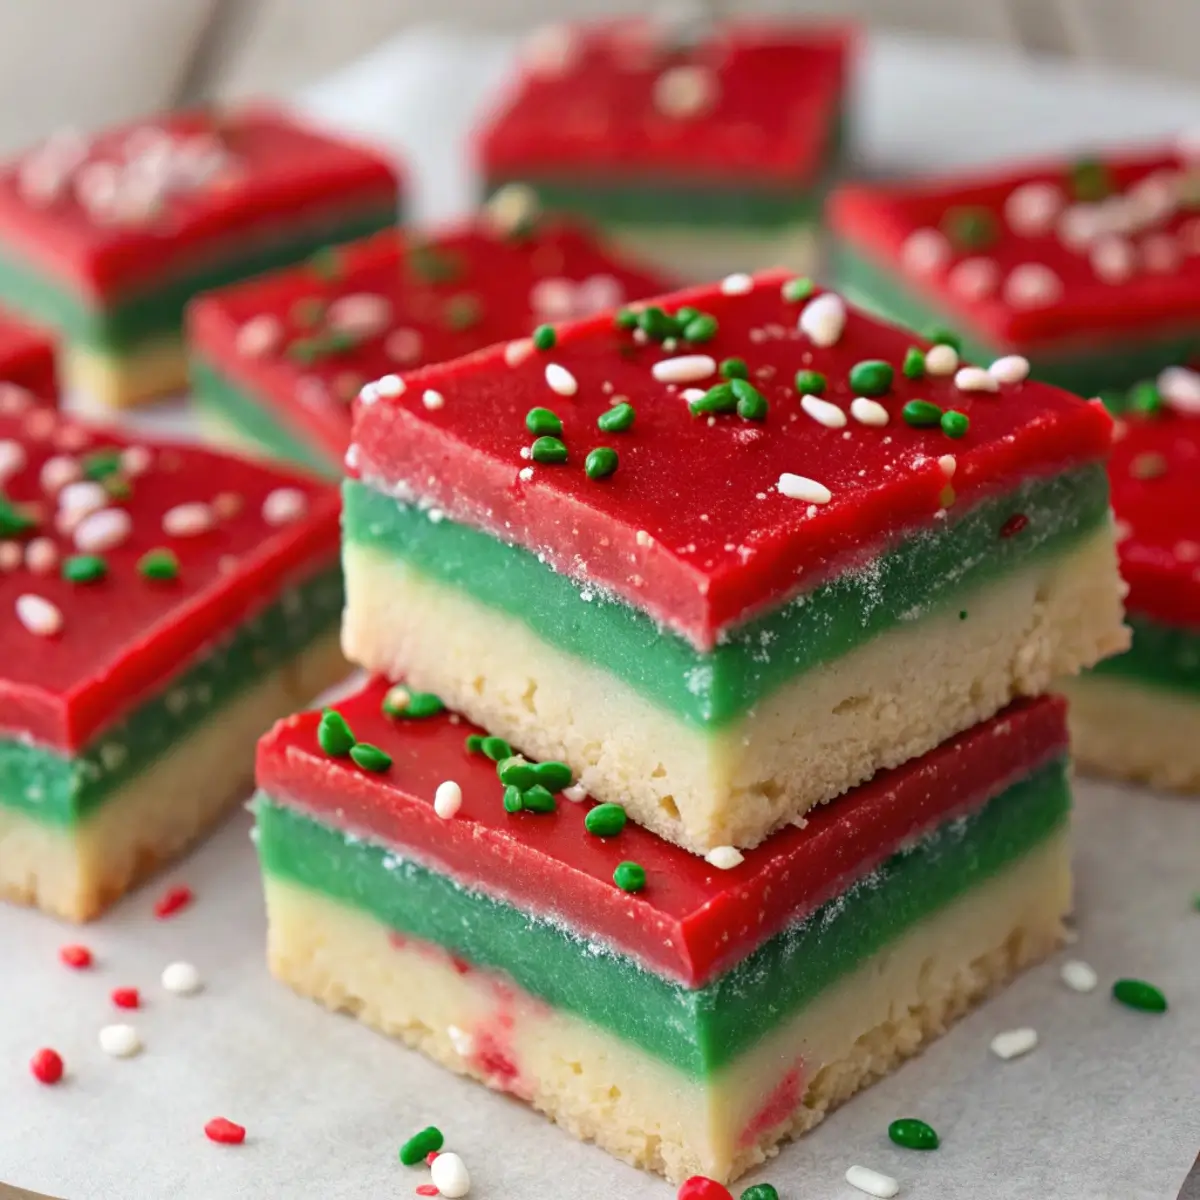
Festive layers: Two distinct colours (red and green) plus a creamy vanilla base make it visually stunning and holiday‑specific.
No baking required: Simple stovetop melting and layering—perfect when your oven is busy.
Familiar flavour, elevated look: The sugar‑cookie taste is comfortable and well‑loved; the layered format adds a gourmet twist.
Tops the dessert board: With its colours and theme, it stands out among cookies and brownies.
Great for sharing and gifting: Slice into squares, stack layers, wrap and give—everyone will ask for it.
If you want a candy‑inspired dessert that checks all the holiday boxes—colour, flavour, ease—this fudge recipe is your go‑to.
Ingredients & Notes
Below are the ingredients for making an 8″×8″ pan of fudge with two coloured layers, yielding about 20‑24 squares. Notes follow to ensure best results.
Ingredients
12 oz (≈340 g) white chocolate chips or finely chopped white chocolate
1 (14 oz) can sweetened condensed milk
¼ cup (56g) unsalted butter
2 teaspoons pure vanilla extract
¼ teaspoon almond extract (optional)
½ teaspoon salt
Gel food colouring: red and green (choose high‑quality gel colours)
1 cup finely crushed plain sugar cookies (about 8‑10 cookies)
¾ cup festive sprinkles (white, red, green)
Optional: extra crushed sugar cookies for texture or white chocolate drizzle
Ingredient Notes
White chocolate: Choose high‑quality for smooth texture; white chocolate is the flavour base here.
Sweetened condensed milk: This gives rich creaminess and sets without needing a candy thermometer.
Butter: Adds richness and supports the vanilla sugar‑cookie flavour.
Vanilla & almond extracts: Vanilla is essential. Almond adds subtle bakery‑style depth.
Salt: Balances sweetness and elevates flavour.
Gel food colouring: Necessary for vivid red and green layers without adding liquid.
Crushed sugar cookies: Adds extra texture and reinforces the sugar‑cookie theme.
Sprinkles: Adds holiday flair and visual pop; use good quality varieties.
Optional extras: Crushed cookies or white chocolate drizzle for added texture or layered appearance.
Tools & Prep Essentials
8″×8″ (or 9″×9″) square baking pan
Parchment paper or foil to line the pan with overhang
Medium saucepan
Heat‑proof spatula or wooden spoon
Measuring cups and spoons
Gel food colouring (red and green)
Sharp knife for cutting squares
Mixing bowls for colouring layers
Airtight container for storage or gifting
Step‑by‑Step Instructions
Step 1: Line the Pan
Line the baking pan with parchment or foil, leaving an overhang for easy removal later. Lightly grease the lining with butter or non‑stick spray.
Step 2: Melt the Base Mixture
In a medium saucepan over low to medium‑low heat:
Add the butter and melt gently.
Pour in the sweetened condensed milk and stir until warmed and gently steaming at the edges—do not boil vigorously.
Add the white chocolate chips or chopped white chocolate and stir continuously until melted and smooth.
Remove from heat.
Step 3: Add Flavour and Cookie Bits
Stir in vanilla extract, almond extract (if using), and salt. Fold in the crushed sugar cookies until fully distributed.
Step 4: Divide & Colour the Base
Divide the hot fudge mixture into three roughly equal portions (approximately one‑third each) in three separate bowls.
In one bowl leave the mixture plain (vanilla). In the second bowl add red gel food colouring and mix until a vibrant red. In the third add green gel food colouring and mix until vivid green.
Step 5: Layer the Fudge
Pour the first layer into the prepared pan—choose plain or red as your first layer. Smooth with a spatula.
Let the first layer set slightly (chill in fridge for 10–15 minutes) so it’s firm but still tacky.
Pour the second layer on top of the first—choose green or red next. Smooth carefully.
Repeat with the third layer if you’ve used all three colours. For two‑layer version you may omit the third layer or use plain top layer.
Immediately sprinkle the ¾ cup festive sprinkles over the top layer, pressing lightly so they adhere.
Step 6: Chill Until Firm
Cover the pan loosely with foil or plastic wrap and refrigerate for at least 3–4 hours, or better yet overnight, until the entire block is firm to the touch and holds shape for slicing.
Step 7: Cut and Serve
Use the parchment overhang to lift the fudge from the pan.
Use a sharp knife (warm the blade under hot water, dry it) to cut into squares—1¼‑ to 1½‑inch squares yield approx. 20–24 pieces. For small bite‑size, cut smaller squares.
Serve on a dessert board, layer in gift boxes, or wrap individually for sharing.
Tips for Best Results
Maintain low, gentle heat when melting chocolate and condensed milk so the mixture remains smooth.
Ensure all utensils and pans are dry; moisture in white chocolate causes grainy texture.
Use gel-based food colouring to keep consistency; avoid liquid colourings which add moisture.
Allow each layer to set slightly before pouring the next to keep sharp lines of colour.
Press sprinkles promptly after the final layer is poured to ensure adherence.
Chill thoroughly before cutting to maintain clean squares and layered effect.
Use a warm knife for slicing to get smooth edges.
Store in an airtight container; for best texture refrigerate and serve slightly cool.
For gifting: layer with parchment paper and decorative ribbon, keep chilled if warm environment.
Variation & Customisation Ideas
Three‑layer version: Vanilla (bottom), red (middle), green (top) for a tricolor effect.
Two‑layer version: Red bottom, green top or vice versa for simplicity.
Candy cane twist: Add peppermint extract and top with crushed candy canes + sprinkles.
Cookies & cream version: Replace sugar cookie bits with crushed chocolate sandwich cookies and use blue & white layers for a winter theme.
Nutty version: Fold in chopped toasted almonds or pistachios into one of the layers (check for allergy safety).
Gluten‑free version: Use certified gluten‑free sugar cookies and sprinkles.
Vegan version: Use vegan white chocolate, plant‑based condensed milk substitute, vegan butter, and vegan‑friendly sprinkles.
Mini fudge towers: Use mini loaf pans or silicone molds and alternate thin red/green layers for individual servings.
Presentation & Serving Ideas
Place squares on a white marble board with sprinkles scattered around for festive appeal.
Use clear cellophane bags tied with red or green ribbon for easy gifting or party favors.
Serve in tiered dessert stands to elevate buffet tables at holiday events.
Use small gift boxes or tins, layer fudge with parchment sheets and festive labels: “Layered Holiday Sugar Cookie Fudge”.
Provide a menu card: “Red & Green Sugar Cookie Fudge – no baking required” to inform guests.
Add a few whole sugar cookies next to the fudge squares for a “cookie meets fudge” display.
Serve with hot beverages such as spiced cider or hot chocolate—fudge pairs perfectly with warm drinks.
Frequently Asked Questions (FAQs)
Is this fudge truly no‑bake?
Yes. The recipe requires stovetop melting of white chocolate and condensed milk, then layering and chilling—no oven baking.
How long will the fudge stay fresh?
When stored in an airtight container in the refrigerator, it will stay fresh for up to 5–7 days. At room temperature (if in a cool room) it can last 2–3 days.
Can I freeze it?
Yes. Wrap the fudge block in plastic wrap then foil and freeze for up to 2–3 months. Thaw in the refrigerator for a few hours, then slice.
Why didn’t the layers stay distinct?
If the first layer isn’t given enough time to set before pouring the next, colours may bleed together. Chill 10‑15 minutes between layers for sharper division.
Can I skip the crushed sugar cookies?
You can—but you’ll lose the texture contrast and the sugar cookie theme. If omitted, consider adding another mix‑in like colored sugar or mini chips.
What size should I cut the squares?
1½‑inch squares yield approximately 20–24 pieces from an 8″×8″ pan. For a bake sale or larger event, you might cut smaller portions.
Does almond extract make the taste nutty?
At ¼ teaspoon, almond extract adds a subtle bakery‑style nuance without overtly nutty flavour. If nut allergies are a concern or you prefer pure vanilla, omit the almond extract.
Why This Recipe Will Shine on Your Holiday Table
When you’re preparing desserts for the holidays, visual impact and taste both count. This layered sugar cookie fudge gives you both:
Bold holiday colours that match seasonal décor.
Familiar sugar‑cookie flavour that everyone loves.
No‑bake convenience when oven time is limited.
Elegant presentation that works for potlucks, gifting, dessert boards.
Flexible serving options—cut into squares, mini portions, layered gift boxes.
Whether you’re hosting, gifting, or baking for an event, this fudge recipe will stand out. It blends classic cookie flavour with the richness of fudge and the festive look of red and green layers. Guests will see it, serve it, savor it—and likely ask for the recipe.


