Table of Contents
- 1 Why S’mores Dessert Cups Are an Ideal Labor Day Treat
- 2 Ingredients (Makes about 12–16 small cups)
- 3 Equipment Needed
- 4 Step‑by‑Step Instructions
- 5 Tips for Elevated Results
- 6 Flavor Variations & Creative Twists
- 7 Storage & Make‑Ahead Guide
- 8 Nutritional Overview (Approximate per cup)
- 9 Frequently Asked Questions (FAQs)
- 10 Why S’mores Dessert Cups Are a Labor Day Favorite
- 11 Final Thoughts
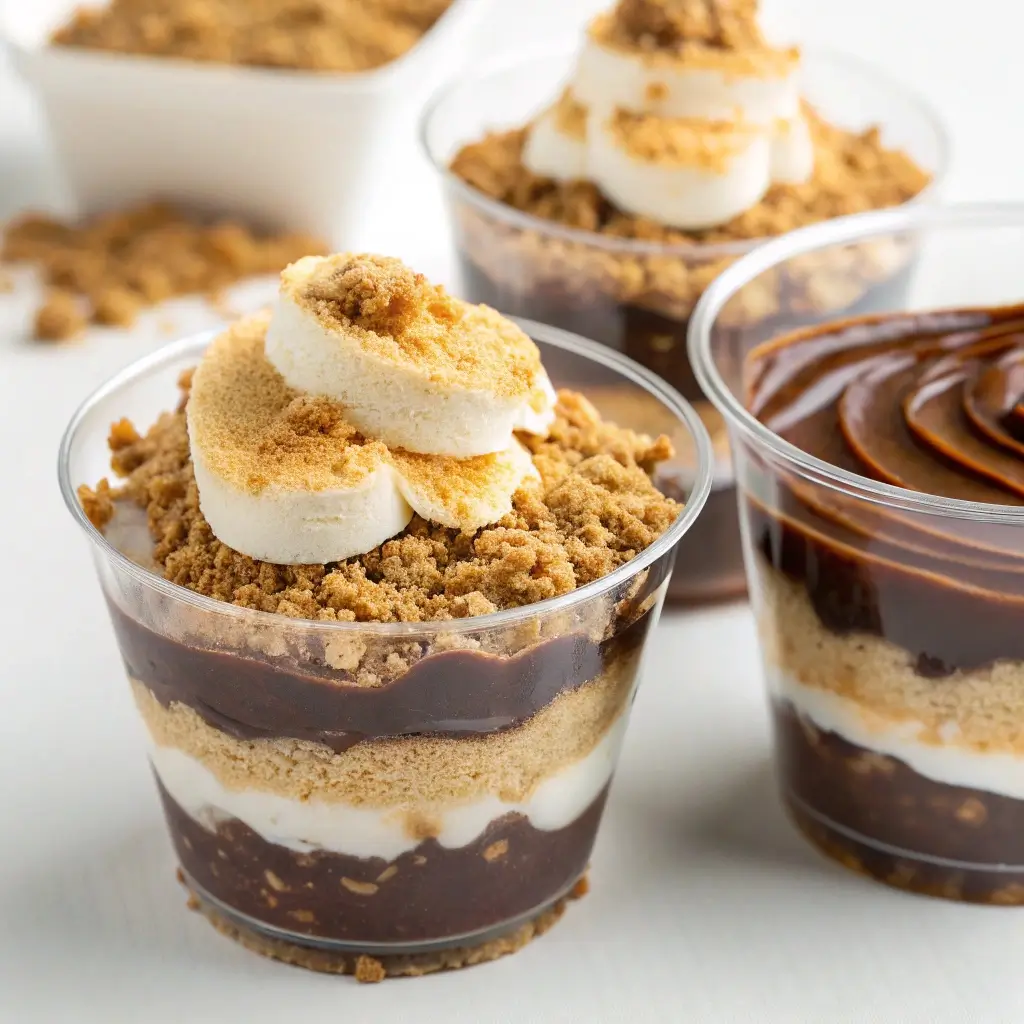
These S’mores Dessert Cups capture all the nostalgia of a campfire treat—without needing a flame. Layers of graham cracker crumbs, silky chocolate ganache, and toasted marshmallow cream are assembled in individual cups for a portable, crowd‑pleasing centerpiece on your Labor Day dessert table. Rich but balanced, creamy yet crunchy, and visually enticing with a toasted topping—perfect for summer parties, potlucks, and casual get‑togethers.
Why S’mores Dessert Cups Are an Ideal Labor Day Treat
-
No oven, no fire: Enjoy s’mores flavor indoors or in the heat, no cooking required.
-
Individual servings: No cutting or plating needed—guests grab and enjoy.
-
Layered textures: Crunch meets cream meets fluff in every bite.
-
Visual appeal: Toasted marshmallow topping and layered colors look upscale and festive.
-
Make‑ahead friendly: Assemble ahead and chill; torch or torch‑simulate topping before serving.
These dessert cups bring summer camp flavors into an elegant, no‑stress format—easy to prepare and easy to enjoy.
Ingredients (Makes about 12–16 small cups)
Base Layer – Graham Cracker Crumble
-
1½ cups graham cracker crumbs (about 10 full sheets)
-
3 tablespoons unsalted butter, melted
-
1–2 tablespoons granulated sugar (optional for sweetness)
Middle Layer – Chocolate Ganache
-
1 cup heavy cream
-
6 oz (170g) semisweet chocolate, finely chopped or chips
-
1 teaspoon vanilla extract
Top Layer – Toasted Marshmallow Cream
-
1 cup marshmallow fluff or crème
-
¼ cup heavy cream (for easier torching and stability)
-
Optional garnish: mini marshmallows, chocolate shavings, or graham cracker bits
Equipment Needed
-
12–16 small clear dessert cups or mini mason jars (~4 oz each)
-
Small saucepan and heatproof bowl for ganache
-
Mixing bowls
-
Mini torch (optional) or kitchen torch alternative
-
Whisk and spatula
-
Piping bag or spoon for layering
-
Baking sheet lined with parchment (if torching)
Step‑by‑Step Instructions
1. Make the Graham Cracker Base
-
Combine crumbs, melted butter, and sugar in a bowl.
-
Mix until evenly moistened—and the crumbs stick together when pressed.
-
Spoon about 2 heaping tablespoons of the crumb mixture into each cup, pressing gently to form a firm base.
2. Prepare the Chocolate Ganache
-
Heat cream in a small saucepan over medium until just simmering.
-
Remove from heat and pour over chopped chocolate in a heatproof bowl. Let rest for 1‑2 minutes.
-
Whisk gently until chocolate fully melts into a glossy ganache. Stir in vanilla.
-
Allow to cool slightly, then spoon or pipe a layer (about 2–3 tablespoons) of ganache over the graham base in each cup.
3. Add the Marshmallow Cream Layer
-
Whisk marshmallow fluff and cream together until smooth and slightly spreadable.
-
Spoon or pipe on top of the ganache layer. Try to level it smoothly.
4. Toast the Topping
-
With a mini kitchen torch: Hold the flame just above each cup’s surface and lightly toast until golden brown spots appear.
-
Without torch: Place cups on a baking sheet and use the oven’s broiler briefly—watch closely and remove as soon as marshmallow layer browns. Or use a small culinary blow torch alternative.
5. Chill & Serve
-
Chill cups in the fridge for at least 30 minutes to meld layers and firm the topping.
-
Serve straight from the fridge or slightly chilled. Add optional garnish if desired.
Tips for Elevated Results
-
For extra texture, toast a few mini marshmallows or sprinkle crushed graham crackers on top right before serving.
-
Use good‑quality chocolate for ganache to keep the flavor rich and smooth.
-
Let ganache cool slightly before layering to avoid melting through the crumb.
-
Pipe layers for neat, clean presentation—especially effective in clear cups.
-
If working ahead, keep cups covered; toast the marshmallow layer just before guests arrive for best look.
Flavor Variations & Creative Twists
-
Peanut Butter Swirl: Fold a swirl of peanut butter into the ganache before layering.
-
Salted Caramel S’mores: Add a teaspoon of caramel sauce atop the ganache before adding the marshmallow. Finish with a few flakes of sea salt.
-
Mint Chocolate: Add a drop of peppermint extract to ganache and garnish with crushed peppermint candy.
-
Dark Chocolate Raspberry: Mix raspberry puree into the ganache layer for fruity brightness.
-
Vegan Version: Use dairy‑free chocolate, coconut cream, and vegan marshmallow fluff with plant‑based butter.
Storage & Make‑Ahead Guide
-
Assemble cups a few hours ahead and store covered in the fridge.
-
Ganache may firm up—allow at room temperature before serving.
-
Toast just before serving if possible; toasted topping fades if stored long.
-
Store leftovers (if any) covered in fridge for up to 2 days. Eat chilled.
Nutritional Overview (Approximate per cup)
-
Calories: ~300 kcal
-
Fat: ~18 g
-
Carbohydrates: ~30 g
-
Sugars: ~22 g
-
Protein: ~3 g
Frequently Asked Questions (FAQs)
Can I skip the torch method?
Yes, you can serve these without toasting the top—it still tastes great. But toasting adds aroma and visual appeal.
How do I toast without a torch or broiler?
Use a culinary blow‑torch substitute if safe; otherwise broiling briefly works. Always watch closely to avoid burning.
Can these be made gluten‑free?
Yes! Use gluten‑free graham cracker crumbs or gluten‑free cookie crumbs, and confirm all other ingredients are certified gluten‑free.
Are these suitable for kids?
Definitely! No restricted ingredients—just marshmallow, chocolate, and crumbs.
How tall should each layer be?
About ¼ cup crumbs, 2–3 tablespoons ganache, and topped with 2–3 tablespoons marshmallow layer. Proportions can be adjusted to your taste.
Can I use flavored ganache?
Yes—a splash of coffee or mint extract enhances flavor, or use milk or dark chocolate for variation.
Why S’mores Dessert Cups Are a Labor Day Favorite
These dessert cups meld classic flavors with modern presentation. They’re nostalgic and elegant, easy to personalize, and portable enough for outdoor settings. Perfect for transitioning from summer into early fall, they balance the usual BBQ spread with a sweet finale that’s sure to get smiles.
Final Thoughts
Celebrate the spirit of Labor Day with these S’mores Dessert Cups—miniature layered delights that bring the campfire experience to your kitchen, no flames needed. Rich chocolate, crisp crumb, and fluffy toasted marshmallow combine into a creamy-crowd favorite. Easy to prep, simple to serve, and undeniably delicious, they’re the perfect sweet treat for your patriotic table or backyard bash.
