Table of Contents
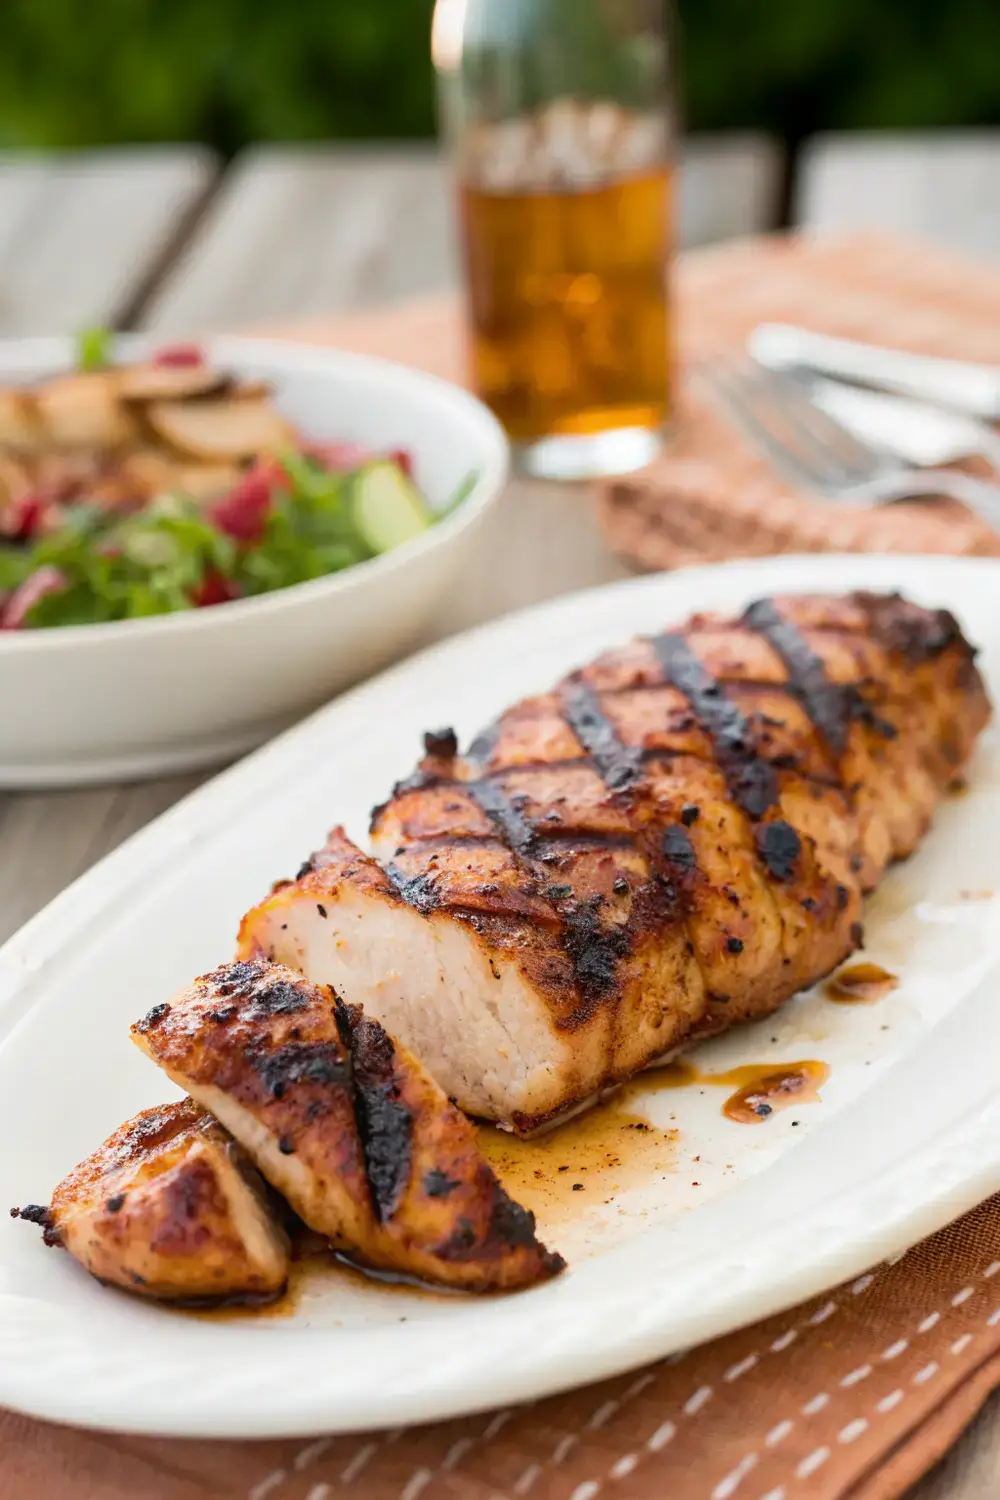
There’s something undeniably satisfying about the smell of chicken sizzling on a hot grill, the faint crackle of the flames, and the promise of a juicy bite that’s both simple and spectacular. When you’re hosting a backyard gathering, you want a dish that feels special without demanding hours of prep or a pantry full of exotic ingredients. Grilled chicken tenderloins hit that sweet spot: they cook quickly, stay remarkably tender, and absorb marinades and rubs like a dream. Whether you’re serving them alongside a crisp summer salad, a heaping bowl of coleslaw, or warm corn‑on‑the‑cob, these tenderloins become the centerpiece of a relaxed, flavor‑filled meal.
This guide walks you through every step, from selecting the best cut of meat to mastering the grill, adding flavor boosters, and storing leftovers safely. Even if you’ve never fired up a grill before, the instructions are written with beginners in mind, offering clear explanations, helpful tips, and common pitfalls to avoid. By the time you finish reading, you’ll feel confident turning a handful of tenderloins into a crowd‑pleasing centerpiece that’s perfect for any outdoor occasion.
Why Chicken Tenderloins Work So Well for Grilling
Chicken tenderloins, also known as the inner pectoral muscle of the breast, are a thin, narrow strip of meat that runs along the underside of each breast. Because they are relatively small and have a uniform thickness, they cook through in just a few minutes per side, reducing the risk of drying out—a common complaint with thicker breast pieces. Their natural tenderness means they need little mechanical tenderizing, and their mild flavor acts as a blank canvas for a wide variety of marinades, dry rubs, and sauces.
From a nutritional standpoint, tenderloins are a lean source of protein, providing essential amino acids without a lot of fat. When you grill them without added sugars or heavy creams, you keep the dish light yet satisfying, making it a great fit for families watching their calorie intake or anyone aiming for a balanced plate. Moreover, because they contain no pork, bacon, wine, beer, whisky, vodka, or any other alcohol, they comfortably meet dietary restrictions that exclude those ingredients.
Ingredients List with Simple Explanations
Below is a complete ingredient list for a classic, versatile marinade that highlights the chicken’s natural flavor while adding a touch of sweetness, acidity, and herbaceous notes. Feel free to adjust the quantities based on your taste preferences or the number of servings you need.
Main Protein
- 2 pounds (about 900 g) chicken tenderloins – Look for fresh, pinkish meat with no gray spots. If you can only find frozen tenderloins, thaw them completely in the refrigerator before marinating.
Marinade Base
- ¼ cup olive oil – A good-quality extra‑virgin olive oil helps the seasonings adhere to the meat and promotes a nice sear on the grill.
- 2 tablespoons lemon juice – Freshly squeezed lemon juice adds brightness and a mild acidity that helps tenderize the meat.
- 2 tablespoons apple cider vinegar – This vinegar contributes a subtle tang without overwhelming the dish; it also works well with the lemon juice.
- 1 tablespoon honey – A touch of natural sweetness balances the acidity and encourages caramelization on the grill.
- 2 teaspoons Dijon mustard – Adds depth and a slight sharpness that complements the herbs.
Herbs and Spices
- 2 teaspoons kosher salt – Enhances flavor and helps the meat retain moisture during cooking.
- 1 teaspoon freshly ground black pepper – Provides a gentle heat and aromatic backbone.
- 1 teaspoon smoked paprika – Gives a subtle smoky note that mimics the flavor of a traditional BBQ without needing actual smoke.
- 1 teaspoon garlic powder – Convenient and evenly distributes garlic flavor throughout the marinade.
- 1 teaspoon onion powder – Adds a savory undertone that pairs well with the garlic.
- ½ teaspoon dried oregano – Brings a hint of Mediterranean earthiness.
- ½ teaspoon dried thyme – Complements the oregano and adds a floral nuance.
Optional Finishing Touches
- Fresh parsley, chopped – For a pop of color and fresh herbaceousness just before serving.
- Lemon wedges – Serve on the side for an extra squeeze of brightness.
Step‑by‑Step Preparation Guide
Follow these instructions carefully, and you’ll end up with tender, flavorful chicken that’s ready to impress. Each step includes tips to help beginners avoid common mishaps.
1. Prepare the Marinade
In a medium-sized bowl, whisk together the olive oil, lemon juice, apple cider vinegar, honey, and Dijon mustard until the mixture looks emulsified. Add the salt, pepper, smoked paprika, garlic powder, onion powder, oregano, and thyme. Whisk again until the spices are evenly distributed. Taste the marinade; it should be tangy, slightly sweet, and well‑seasoned. If you prefer more acidity, add an extra teaspoon of lemon juice; if you like it sweeter, drizzle in a bit more honey.
2. Marinate the Chicken
Place the chicken tenderloins in a large resealable plastic bag or a shallow glass dish. Pour the marinade over the meat, ensuring each piece is coated. Seal the bag or cover the dish with plastic wrap, then refrigerate for at least 30 minutes. For maximum flavor, let the chicken sit for up to 4 hours. Avoid marinating longer than 8 hours, as the acid in the lemon juice and vinegar can start to break down the meat’s texture, making it mushy.
3. Preheat the Grill
While the chicken is marinating, prepare your grill. If you’re using a charcoal grill, light the coals and let them burn until they’re covered with a thin layer of gray ash—this usually takes about 15‑20 minutes. Spread the coals evenly for direct heat. For a gas grill, turn all burners to high and close the lid; let it heat up for 10‑15 minutes. Aim for a grill surface temperature of around 400‑425°F (200‑220°C). You can test the heat by holding your hand about five inches above the grate; you should feel comfortable keeping it there for only 4‑5 seconds.
4. Oil the Grill Grates
To prevent sticking, dip a folded paper towel in a little oil, grip it with tongs, and rub it over the hot grates. Be careful—the grill will be very hot. This step creates a non‑stick surface and helps those beautiful grill marks form.
5. Remove Excess Marinade
Take the chicken out of the refrigerator and let it sit at room temperature for about 10 minutes. This brings the meat closer to cooking temperature, promoting even doneness. Then, lift each tenderloin out of the marinade, letting any excess drip off. You don’t need to pat them dry; a thin coating of marinade will help with flavor and browning.
6. Grill the Chicken
Place the tenderloins on the hot grill, arranging them in a single layer with a little space between each piece. Close the lid and let them cook undisturbed for 3‑4 minutes. You’ll know it’s time to flip when the edges look opaque and you see nice grill marks forming. Using tongs, flip each piece and grill for another 2‑3 minutes on the second side. The internal temperature should reach 165°F (74°C) when measured with an instant‑read thermometer inserted into the thickest part of the tenderloin. If you don’t have a thermometer, cut into the thickest piece; the juices should run clear, and the meat should be white throughout with no pink.
7. Rest the Meat
Transfer the grilled tenderloins to a clean plate and loosely cover them with foil. Let them rest for 5 minutes. Resting allows the juices to redistribute, ensuring each bite stays moist and flavorful.
8. Finish and Serve
Sprinkle the chopped fresh parsley over the chicken for a bright finish. Serve with lemon wedges on the side so guests can add an extra squeeze of citrus if they like. Pair the tenderloins with your favorite BBQ sides—think grilled vegetables, potato salad, corn on the cob, or a fresh green salad—and enjoy!
Cooking Variations and Substitutions
One of the joys of cooking is making a recipe your own. Below are several ways to tweak the basic grilled chicken tenderloins to suit different tastes, dietary needs, or what you have on hand.
Flavor Profile Swaps
- Asian‑Inspired – Replace the lemon juice and apple cider vinegar with equal parts rice vinegar and low‑sodium soy sauce. Add a teaspoon of grated fresh ginger, a clove of minced garlic, and a sprinkle of toasted sesame seeds after grilling.
- Mediterranean Herb – Increase the oregano to 2 teaspoons, add 1 teaspoon of dried rosemary, and mix in the zest of one lemon along with the juice. Finish with a drizzle of extra‑virgin olive oil and a handful of chopped kalamata olives.
- Spicy Kick – Add ½ teaspoon of cayenne pepper or a finely chopped fresh chili (like jalapeño) to the marinade. For extra heat, serve with a side of hot sauce or a drizzle of sriracha.
- Sweet and Smoky – Boost the honey to 1 tablespoon and add ½ teaspoon of chipotle powder in place of regular smoked paprika for a deeper, smoky sweetness.
Ingredient Substitutions
- Oil Alternatives – If you don’t have olive oil, avocado oil or grapeseed oil works well because they have high smoke points and neutral flavors.
- Acid Options – White wine vinegar (ensure it’s alcohol‑free if that’s a concern) or lime juice can replace apple cider vinegar or lemon juice.
- Sweetener Swaps – Maple syrup or agave nectar can be used instead of honey for a different flavor note.
- Mustard Alternatives – Dijon mustard adds a subtle tang; if you prefer milder flavor, use yellow mustard. For a whole‑grain texture, try coarse‑ground mustard.
Cooking Method Adjustments
- Indirect Grilling – For thicker pieces or if you’re worried about overcooking, sear the tenderloins over direct heat for 1‑2 minutes per side, then move them to a cooler part of the grill (indirect heat) and close the lid. Cook for another 4‑5 minutes, checking temperature frequently.
- Grill Pan or Cast‑Iron Skillet – If outdoor grilling isn’t an option, a heavy grill pan on the stovetop works nicely. Preheat the pan over medium‑high heat, add a touch of oil, and follow the same timing as the grill.
- Oven Broil – Place the marinated tenderloins on a broiler pan and broil on high for 4‑5 minutes per side, watching closely to prevent burning.
Storage and Reheating Tips
Proper storage keeps your grilled chicken tenderloins safe to eat and maintains their texture and flavor.
Refrigeration
Allow the chicken to cool to room temperature (no longer than 2 hours after cooking). Place the tenderloins in an airtight container or wrap them tightly in aluminum foil or plastic wrap. Store in the refrigerator for up to 4 days.
Freezing
For longer storage, lay the cooled tenderloins on a baking sheet in a single layer and freeze until solid (about 1‑2 hours). Then transfer them to a freezer‑safe bag or container, removing as much air as possible. Label with the date and use within 2‑3 months for best quality.
Reheating
To reheat without drying out the meat, use a gentle method:
- Oven – Preheat to 300°F (150°C). Place the chicken on a baking sheet, drizzle with a teaspoon of water or broth, and cover loosely with foil. Heat for 10‑15 minutes, or until warmed through.
- Stovetop – Add a splash of broth or water to a skillet over medium‑low heat. Add the chicken, cover, and heat for 4‑5 minutes, turning once.
- Microwave – Place the chicken on a microwave‑safe plate, cover with a damp paper towel, and heat on medium power in 30‑second intervals, checking after each interval to avoid overcooking.
Avoid reheating at high temperatures for extended periods, as this can make the meat tough.
Common Mistakes to Avoid
Even seasoned cooks can slip up when grilling chicken. Being aware of these frequent pitfalls will help you achieve consistently great results.
1. Skipping the Rest
Cutting into the chicken immediately after grilling releases the juices, leaving the meat dry. Always let it rest for at least 5 minutes.
2. Over‑Marinating
While a good marinade adds flavor, leaving the chicken in an acidic mixture for too long can break down the proteins, resulting in a mushy texture. Stick to the 30‑minute to 4‑hour window.
3. Grilling on a Cold Grate
If the grill isn’t hot enough, the chicken will stick and won’t develop those desirable grill marks. Ensure the grates are properly preheated and oiled.
4. Flipping Too Often
Constantly moving the meat prevents a proper sear. Let each side cook undisturbed for the recommended time before flipping.
5. Relying Solely on Time
Grill times can vary based on the thickness of the tenderloins, the exact grill temperature, and even weather conditions. Use an instant‑read thermometer to confirm doneness rather than guessing by the clock.
6. Using Too Much Sauce While Grilling
If you like to baste with a sugary barbecue sauce, apply it only during the last minute of cooking. Sugar burns quickly and can cause the exterior to char before the interior is done.
Frequently Asked Questions
Below are answers to common questions about preparing, cooking, and serving grilled chicken tenderloins. Feel free to refer back to this section whenever you need a quick refresher.
Q1: Can I use chicken breasts instead of tenderloins?
Yes, you can substitute boneless, skinless chicken breasts. However, breasts are thicker and may require a longer cooking time—about 6‑8 minutes per side, depending on thickness. To keep them juicy, consider pounding them to an even thickness of about ½ inch before marinating.
Q2: Is it necessary to marinate the chicken?
Marinating adds flavor and can help tenderize the meat, but it’s not strictly required. If you’re short on time, you can season the tenderloins directly with salt, pepper, and your preferred spices, then grill them as described. The meat will still be delicious, especially if you serve it with a flavorful sauce or salsa on the side.
Q3: How do I know if the chicken is done without a thermometer?
Check the color and texture: the meat should be opaque throughout, with no pink in the center. The juices that run out when you cut into the thickest part should be clear, not pink or bloody. The texture should feel firm yet springy to the touch.
Q4: Can I prepare the marinade ahead of time?
Absolutely. The marinade can be made up to 2 days in advance and stored in a sealed container in the refrigerator. Give it a quick stir before using, as some ingredients may settle.
Q5: What sides pair well with grilled chicken tenderloins?
Classic BBQ sides like corn on the cob, coleslaw, potato salad, grilled zucchini or bell peppers, watermelon feta salad, or a simple green salad with vinaigrette all complement the chicken nicely. For a heartier meal, consider serving the tenderloins over a bed of quinoa, couscous, or mixed greens.
Q6: Is it safe to reuse the leftover marinade as a sauce?
If the marinade has come into contact with raw chicken, it should not be used as a sauce unless you bring it to a boil for at least 1 minute to kill any bacteria. A safer approach is to set aside a portion of the marinade before adding the chicken, then use that reserved portion for basting or as a finishing sauce.
Conclusion
Grilling chicken tenderloins for a backyard BBQ is a rewarding experience that brings together ease, flavor, and versatility. With a simple marinade, a hot grill, and a few mindful techniques, you can produce tender, juicy meat that pleases both kids and adults alike. The recipe’s flexibility lets you experiment with different herbs, spices, and global flavors, ensuring you never get bored of the same old dish.
Remember to marinate for the right amount of time, preheat your grill properly, avoid over‑flipping, and always let the meat rest before serving. Keep an eye on the internal temperature, and you’ll avoid the common pitfalls that lead to dry or unevenly cooked chicken. Store any leftovers safely, and enjoy them reheated in a way that preserves their moist texture.
Whether you’re hosting a weekend gathering, preparing a quick weekday dinner, or simply craving the smoky aroma of grilled food, these chicken tenderloins are a reliable go‑to. Fire up the grill, gather your favorite sides, and savor the satisfaction of a meal that’s both homemade and heart‑healthy. Happy grilling!


