Table of Contents
- 1 Ingredients: Fresh Flavors, Thoughtful Choices
- 2 Step-by-Step Instructions: A Labor of Love
- 3 Variations and Substitutions: Making It Your Own
- 4 Storage and Reheating Tips: Keeping It Fresh
- 5 Common Mistakes to Avoid: Perfect Every Time
- 6 Frequently Asked Questions: Your Pie Queries Answered
- 7 A Slice of Heaven
The smell of fresh berries, the sound of laughter around a backyard grill, and the sight of red, white, and blue decorations filling the air—this is what July 4th means to me. There’s something undeniably magical about creating a dessert that not only tastes like summer but also looks like a celebration on a plate. That’s why this Patriotic Homemade Mixed Berry Pie has become my go-to recipe for Independence Day gatherings. It’s a showstopper that’s surprisingly approachable, even for novice bakers, and it captures the essence of American tradition in every flaky, juicy bite.
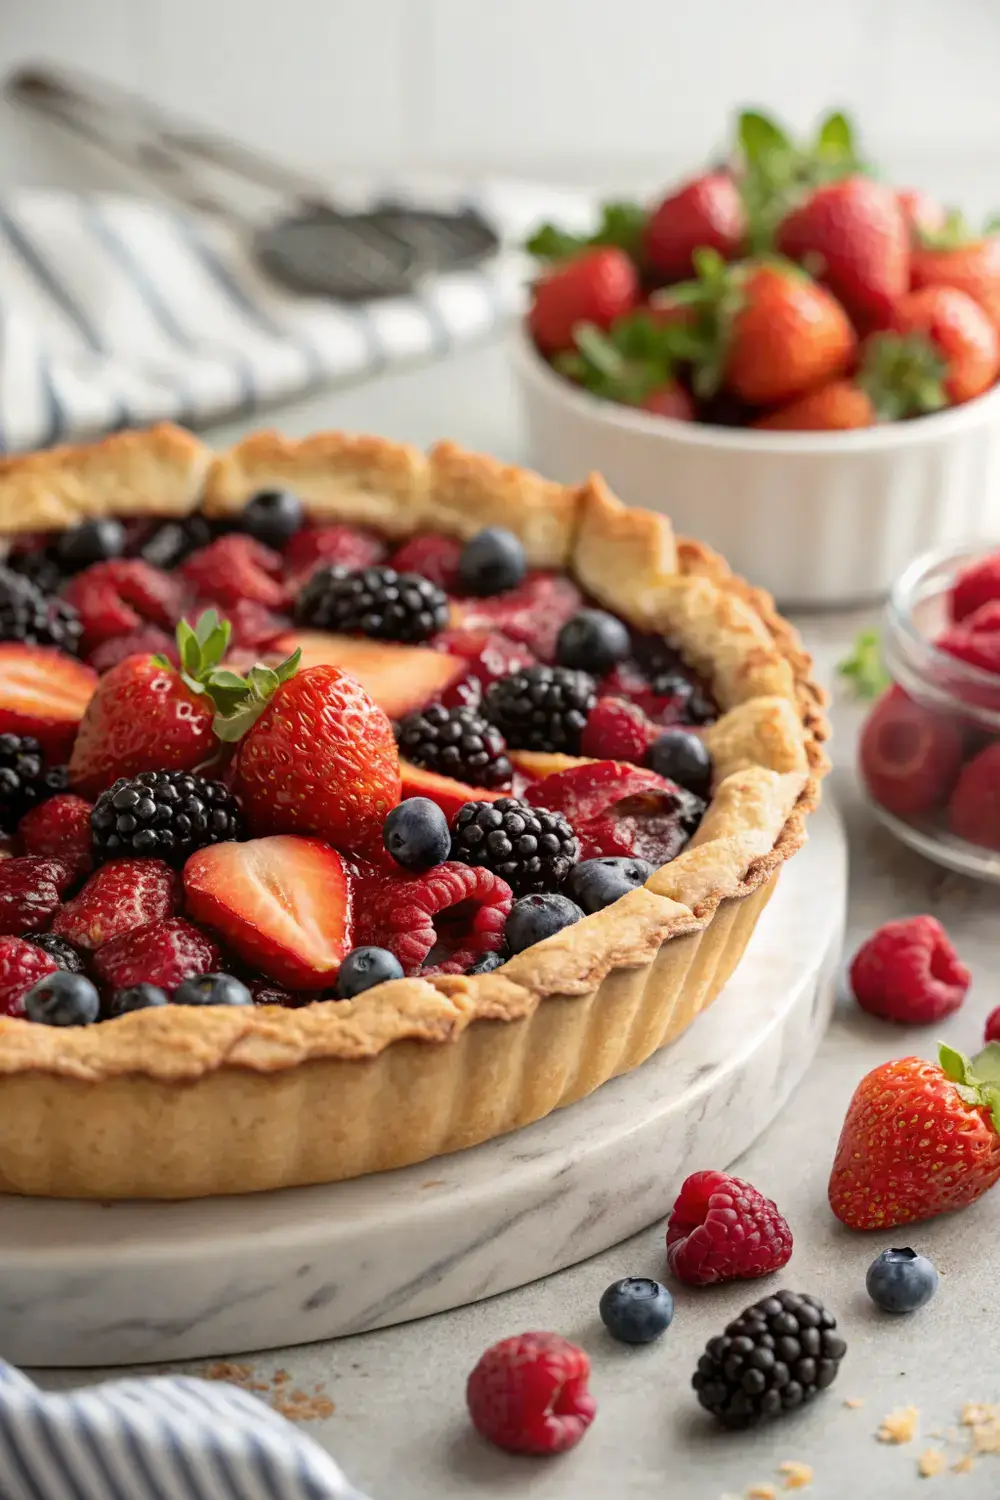
This isn’t just any berry pie. The star of this recipe is a vibrant mix of fresh strawberries, blueberries, raspberries, and blackberries, each contributing its own unique texture and flavor. Sweetened gently with honey and brightened with a touch of lemon zest, the filling strikes the perfect balance between sweet and tangy. The real masterpiece, though, is the golden, buttery crust crowned with a decorative lattice top that mimics the stars and stripes of the American flag. It’s a pie that invites you to gather around the table, share stories, and savor the flavors of freedom and family.
Whether you’re hosting a backyard barbecue, attending a local parade, or simply want to bring a little extra joy to your summer celebrations, this pie delivers. Best of all, it’s completely free of pork, alcohol, and any other restricted ingredients, making it suitable for every dietary need at your festive gathering. Let’s dive in and make this spectacular dessert together.
Ingredients: Fresh Flavors, Thoughtful Choices
To create this Patriotic Mixed Berry Pie, you’ll need a combination of pantry staples and fresh ingredients. Each component plays a crucial role in building layers of flavor and texture, so let’s take a closer look at what goes into this beloved dessert.
For the Crust:
– 2 and 1/2 cups all-purpose flour: This provides the structure for your crust. I recommend using a high-quality flour with a moderate protein content for the perfect tender-yet-sturdy texture.
– 1 teaspoon salt: Salt enhances the flavors and helps to strengthen the gluten slightly, giving your crust a better structure.
– 1 tablespoon granulated sugar: Just a pinch of sugar in the crust balances the flavors and encourages a golden brown color during baking.
– 1 cup (2 sticks) unsalted butter, chilled: The key to a flaky crust is cold, high-quality butter. Cut it into small cubes before mixing to ensure even distribution.
– 1/4 to 1/2 cup ice water: You’ll need just enough ice water to bring the dough together. Start with 1/4 cup and add more as needed to avoid a tough crust.
For the Filling:
– 4 cups mixed fresh berries: A combination of 1 cup hulled and quartered strawberries, 1 cup blueberries, 1 cup fresh raspberries, and 1 cup blackberries creates the perfect color gradient. If fresh berries aren’t available, you can use frozen, but be sure to thaw and drain them well.
– 1/2 cup granulated sugar: This sweetens the filling, but the amount can be adjusted based on the sweetness of your berries. Taste your fruit first and reduce the sugar if needed.
– 2 tablespoons honey: Honey adds a delicate floral sweetness that complements the berries beautifully. It also helps to thicken the filling slightly.
– 2 tablespoons cornstarch: This is essential for thickening the juices and preventing a runny pie. Make sure to mix it thoroughly with the sugar before adding to the berries.
– 1 tablespoon lemon juice: Fresh lemon juice brightens the flavors and balances the sweetness. Always use fresh-squeezed for the best taste.
– 1 teaspoon lemon zest: The zest adds an intense citrus aroma that makes the filling pop. Be careful to only zest the yellow part of the lemon, avoiding the bitter white pith.
– 1/4 teaspoon ground cinnamon: Just a hint of cinnamon warms up the flavors and pairs beautifully with the berries.
Optional Topping:
– 1 tablespoon coarse sugar: For sprinkling on the crust before baking, this adds a delightful crunch and sparkle to your finished pie.
Step-by-Step Instructions: A Labor of Love
Creating this Patriotic Mixed Berry Pie is a labor of love, but trust me, it’s worth every minute. The process is divided into three main parts: preparing the crust, making the filling, and assembling the pie. Take your time with each step, and don’t hesitate to make the crust ahead of time—store it in the refrigerator for up to 2 days or freeze for up to 3 months.
Making the Crust:
1. Combine dry ingredients: In a large mixing bowl, whisk together the flour, salt, and sugar. This ensures even distribution and eliminates any lumps.
2. Cut in the butter: Add the chilled butter cubes to the flour mixture. Using a pastry cutter or your fingertips, work the butter into the flour until the mixture resembles coarse crumbs with some pea-sized pieces of butter remaining. The visible butter pieces are crucial for creating flaky layers.
3. Add ice water gradually: Drizzle in the ice water, one tablespoon at a time, mixing gently with a fork after each addition. Stop adding water once the dough begins to hold together when pressed. You may not need all of it.
4. Form and chill: Divide the dough into two equal portions, shape each into a disk, wrap in plastic wrap, and refrigerate for at least 1 hour or up to overnight. Chilling the dough relaxes the gluten and makes it easier to roll out.
Preparing the Filling:
1. Prepare the berries: Wash and dry all berries thoroughly. Hulled and quarter the strawberries, leaving smaller berries whole. Place all berries in a large bowl.
2. Make the thickening mixture: In a separate bowl, whisk together the sugar, cornstarch, and cinnamon. Pour this over the berries and toss gently to coat evenly.
3. Add the finishing touches: Drizzle in the honey and lemon juice, then add the lemon zest. Gently fold everything together until the berries are evenly coated. Let this mixture sit for about 15 minutes to allow the cornstarch to start absorbing the juices.
Assembling the Pie:
1. Preheat and prepare: Preheat your oven to 425°F (220°C). Roll out one disk of dough on a lightly floured surface to about 1/8-inch thickness. Transfer it to a 9-inch pie dish, gently pressing it into the bottom and up the sides without stretching the dough.
2. Add the filling: Pour the berry mixture into the crust, including all the delicious juices that have collected in the bowl.
3. Create the lattice top: Roll out the second disk of dough and cut strips about 1/2-inch wide. Arrange half of the strips vertically across the pie. Fold back every other strip halfway, place a horizontal strip of dough, then unfold the vertical strips. Repeat this folding and weaving process with the remaining strips, alternating which strips are folded back each time to create a perfect lattice pattern.
4. Finish the edges: Trim any excess dough and crimp the edges to seal. You can use the tines of a fork for a simple crimp or pinch with your fingers for a more decorative edge.
5. Final touches: Cut a few small slits in the top of the lattice to allow steam to escape. If desired, sprinkle the top with coarse sugar for extra sparkle and crunch.
Baking:
1. Initial bake: Place the pie on a baking sheet lined with parchment paper to catch any drips. Bake for 15 minutes in the preheated oven.
2. Lower and continue: After 15 minutes, reduce the oven temperature to 375°F (190°C) and continue baking for 35-45 minutes, or until the crust is a deep golden brown and the filling is bubbling through the lattice.
3. Cool completely: Allow the pie to cool on a wire rack for at least 2 hours before slicing. This allows the filling to set properly and makes for cleaner slices.
Variations and Substitutions: Making It Your Own
While this mixed berry pie is absolutely divine as written, there are countless ways to customize it to suit your preferences or what you have on hand. Here are some ideas to inspire your creativity:
Berry Variations:
Feel free to swap out any of the berries based on seasonality or personal preference. Blackberries and raspberries can be harder to find fresh, so using frozen is perfectly acceptable—just make sure to drain them well. For a seasonal twist, try incorporating some chopped peaches or nectarines in the summer, or swap in some apples and a touch of nutmeg in the fall.
Sweetener Swaps:
Honey gives this pie its characteristic depth, but maple syrup makes a wonderful alternative with its own distinct flavor profile. If you prefer to keep it traditional, granulated sugar works just as well. For a healthier option, coconut sugar can be used, though it will darken the filling slightly.
Crust Alternatives:
For a different texture, try using a graham cracker crust instead of the flaky pie dough. This creates a more cookie-like base that pairs especially well with the berries. Alternatively, a pre-made refrigerated pie crust from the grocery store is perfectly fine for a time-saving shortcut, though homemade always tastes best.
Spice It Up:
If you love warm spices, consider adding a pinch of ground ginger or cardamom to the filling. Vanilla extract, either the seeds from a pod or a teaspoon of pure extract, also enhances the flavors beautifully.
Booze-Free Flavor Boosters:
While this recipe is completely alcohol-free, you can still add depth to your filling with non-alcoholic extracts. A splash of pure vanilla extract or a teaspoon of almond extract complements the berries wonderfully.
Storage and Reheating Tips: Keeping It Fresh
Leftovers are rare in our house, but if you happen to have some of this Patriotic Mixed Berry Pie remaining, here’s how to store and enjoy it:
Room Temperature:
If you plan to eat the pie within two days, cover it loosely with plastic wrap or a cake dome and store it at room temperature. This keeps the crust nice and crispy while preventing the filling from drying out.
Refrigeration:
For longer storage, cover the pie tightly with plastic wrap or transfer slices to an airtight container and refrigerate. The pie will keep in the fridge for up to 3 days. Note that the crust may become slightly softer when refrigerated due to the moisture from the filling.
Freezing:
This pie freezes well, making it a great make-ahead option for busy holiday planners. Wrap individual slices in plastic wrap, then in aluminum foil, and freeze for up to 2 months. Thaw overnight in the refrigerator before reheating.
Reheating:
To reheat a slice of pie, place it on a microwave-safe plate and warm it in the microwave for 20-30 seconds, or until heated through. For a crispier crust, reheat in a 350°F (175°C) oven for 10-15 minutes.
Common Mistakes to Avoid: Perfect Every Time
Even experienced bakers can run into issues with pie-making. Here are some common pitfalls and how to avoid them:
Tough Crust:
The most common mistake is overworking the dough. Once you add the ice water, mix just until the dough comes together. Overmixing develops gluten, leading to a tough crust. Also, ensure your butter is cold and cut into small pieces for maximum flakiness.
Runny Filling:
Not cooking the cornstarch thoroughly or using too little can result in a soupy filling. Make sure to mix the cornstarch with the sugar and spices completely before adding to the berries. Letting the berry mixture sit for 15 minutes before baking helps the cornstarch start to thicken the juices.
Soggy Bottom Crust:
To prevent a soggy bottom, make sure your pie dish is properly greased, and don’t overfill the pie. The filling should be slightly mounded in the center but not packed down tightly. Baking on a preheated baking sheet can also help crisp the bottom crust.
Uneven Baking:
Placing the pie on the lowest rack of your oven ensures even browning. If the edges of your crust are browning too quickly, cover them loosely with aluminum foil for the last 20 minutes of baking.
Cutting Too Soon:
Resist the urge to slice into your pie immediately after it comes out of the oven. Waiting at least 2 hours allows the filling to set, making for cleaner slices and preventing a runny mess.
Frequently Asked Questions: Your Pie Queries Answered
Q: Can I make this pie ahead of time?
A: Absolutely! You can prepare the crust and filling a day in advance. Keep the dough wrapped in the refrigerator, and store the prepared filling in an airtight container in the fridge. Assemble and bake the pie on the day you plan to serve it for the best results.
Q: How do I prevent my lattice top from being too brown?
A: If your lattice is browning too quickly, tent the pie loosely with aluminum foil for the final 20 minutes of baking. You can also brush the lattice with a little milk or cream before baking to encourage even browning.
Q: What if I don’t have cornstarch?
A: Cornstarch is crucial for thickening the filling, but arrowroot powder or tapioca starch can be used as substitutes in a 1:1 ratio. Flour can also work, but you’ll need to use about twice the amount and bake a bit longer.
Q: Can I use frozen berries?
A: Yes, frozen berries work well in this recipe. There’s no need to thaw them completely, but you should drain off any excess juice to prevent a runny filling. You may need to bake the pie a bit longer to ensure the filling sets properly.
Q: How do I get my crust to seal properly?
A: To seal the edges, you can use a bit of water or egg wash (1 egg beaten with 1 tablespoon water) as “glue” between the top and bottom crusts. Press firmly to adhere, then crimp or flute the edges as desired.
Q: Why did my pie crust shrink during baking?
A: Pie crust can shrink if it’s overworked or if the dough isn’t given enough time to rest in the refrigerator. Make sure to chill the dough for at least an hour before rolling it out, and handle it gently when placing it in the pie dish.
A Slice of Heaven
There you have it—a Patriotic Homemade Mixed Berry Pie that’s sure to become a beloved addition to your Fourth of July repertoire. This recipe isn’t just about following steps; it’s about creating memories, sharing stories, and celebrating the freedoms we cherish. Each bite is a tribute to the beauty of American tradition, where simple ingredients come together to create something extraordinary.
As you slice into that first piece, with the lattice catching the sunlight and the filling glistening with jewel-toned berries, take a moment to appreciate what you’ve created. Whether you’re serving it alongside grilled burgers, sharing it with friends and family, or simply enjoying a quiet moment with a cup of coffee, this pie is a symbol of home, heritage, and happiness.
So roll up your sleeves, dust off your rolling pin, and let’s make this summer’s celebrations a little more delicious. Happy baking, and Happy Fourth of July!


