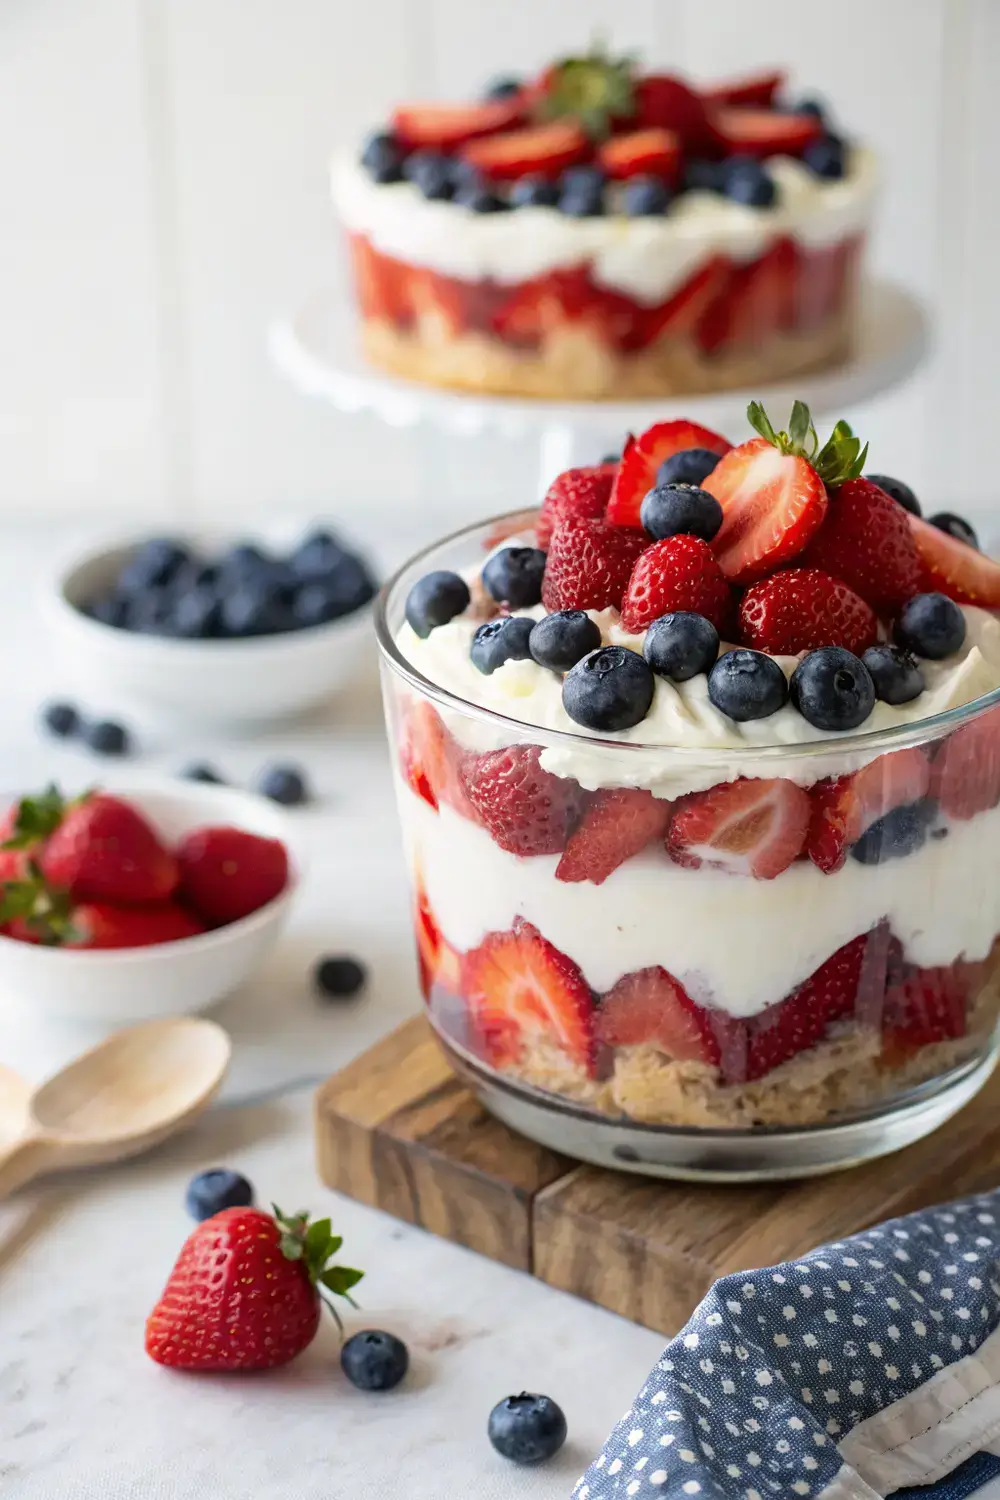
There’s something undeniably magical about a dessert that looks as spectacular as it tastes, especially when it’s designed for a celebration as vibrant as the Fourth of July. This Patriotic Berry Trifle is more than just a sweet treat; it’s a stunning centerpiece that captures the very essence of summer and national pride. Imagine a clear glass bowl, layers upon layers of brilliant ruby-red strawberries, deep indigo blueberries, and fluffy white clouds of vanilla custard and whipped cream, all nestled between soft, liqueur-free cake cubes. It’s a dessert that promises a symphony of textures—from the juicy pop of fresh berries to the creamy richness of custard and the tender crumb of cake—all in one perfect spoonful.
The beauty of this trifle lies in its elegant simplicity. It requires no oven time, making it an ideal choice for hot July days when you’d rather be outside enjoying a barbecue than stuck in a steamy kitchen. It’s a forgiving, no-bake wonder that comes together with just a bit of layering and chilling. Whether you’re hosting a sprawling backyard bash or contributing to a quiet family potluck, this dessert is guaranteed to draw smiles and compliments. It’s a celebration of fresh, wholesome ingredients and the joy of sharing something beautiful and delicious with the people you love. Let’s create a dessert that’s as easy to make as it is unforgettable.
Why This Trifle is the Star of Your 4th of July
This isn’t just another berry dessert; it’s a purposefully crafted, flag-inspired masterpiece. The classic red, white, and blue color scheme is achieved entirely with nature’s candy—vibrant strawberries and blueberries—making it a naturally festive and healthy option. Unlike some elaborate desserts that demand professional pastry skills, this trifle is wonderfully democratic. If you can slice fruit and whisk cream, you can assemble this showstopper. Its make-ahead nature is a colossal advantage for any host; you can build it hours before your guests arrive, freeing you up to enjoy the party. It’s cool, refreshing, and perfectly portioned for a crowd, ensuring every guest gets a taste of the holiday spirit.
Ingredients You’ll Need & Why They Work
Here’s a detailed breakdown of each component, with explanations and substitution ideas to suit your preferences and dietary needs.
For the Cake Layer
- 1 (10-12 ounce) store-bought or homemade pound cake, angel food cake, or vanilla sponge cake: This is the foundational structure. Pound cake offers a rich, dense crumb that holds up well to moisture. Angel food cake is lighter and airier, soaking up fruit juices beautifully. A simple vanilla sponge works perfectly too. Why it works: A slightly stale or day-old cake is actually ideal, as it absorbs the berry juices without becoming overly soggy.
- Substitution: For a gluten-free version, use your favorite gluten-free pound cake or sponge recipe. You can also use ladyfinger cookies (like savoiardi) for a tiramisu-like texture.
For the Red Layer
- 1 pound (about 4 cups) fresh strawberries, hulled and sliced: The star of the red layer. Look for bright red, fragrant berries. Slicing them allows their juices to mingle with the other layers.
- 2 tablespoons granulated sugar (optional): If your strawberries aren’t perfectly sweet, a sprinkle of sugar macerates them, drawing out their natural juices and creating a light syrup. Taste your berries first; you may not need it.
- Substitution: In a pinch, you can use thawed, frozen sliced strawberries (drain excess liquid) or a mix of strawberries and raspberries for a deeper red hue.
For the Blue Layer
- 1 pint (about 2 cups) fresh blueberries, rinsed and patted dry: The deep blue jewels. Choose plump, firm berries with a silvery bloom.
- Substitution: Blackberries can be used for a darker, more purple-blue tone, or a mix of blueberries and blackberries.
For the White Layers
- 1 (3.4 ounce) package instant vanilla pudding mix: This is the secret to a quick, stable, and creamy custard layer without cooking. It sets up firmly, making slicing easy.
- 2 cups cold whole milk: Whole milk yields the richest, creamiest pudding. You can use 2% in a pinch, but avoid skim.
- 1 (8 ounce) tub frozen whipped topping (like Cool Whip), thawed, or 2 cups freshly whipped heavy cream:
* Frozen Whipped Topping: Provides a stable, sweet, and fluffy layer that holds its shape well for days. This is the most reliable choice for a trifle that needs to sit.
* Freshly Whipped Cream: For a more luxurious, less sweet option, whip 1 cup of heavy cream with 2 tablespoons of powdered sugar and 1 teaspoon of vanilla extract until stiff peaks form. This version is best served within 6-8 hours, as it can deflate.
- Substitution: For a dairy-free version, use a dairy-free vanilla pudding mix (like Simply Delish) prepared with almond or oat milk, and a dairy-free whipped topping (like So Delicious CocoWhip).
For Assembly & Garnish
- 1-2 tablespoons powdered sugar (for dusting, optional)
- Extra fresh berries for garnish
- Small American flag picks or star-shaped sprinkles (optional, for extra festivity)
Step-by-Step Instructions with Pro Tips
Follow these detailed steps for trifle perfection.
Step 1: Prepare the Cake
1. If using a frozen pound cake, let it thaw completely. Using a serrated knife, slice the cake into 1-inch cubes. You should have about 4-5 cups of cubes.
2. Pro Tip: For an extra layer of flavor without alcohol, lightly sprinkle the cake cubes with a few tablespoons of apple juice, white grape juice, or a simple syrup (1/4 cup sugar dissolved in 1/4 cup water, cooled). This adds moisture and a subtle sweetness.
Step 2: Prepare the Fruit
1. Strawberries: Hull and slice the strawberries. Place them in a medium bowl. If using, sprinkle with 2 tablespoons of sugar, toss gently, and let them sit for 15-20 minutes. This process, called maceration, will create a beautiful, glossy syrup.
2. Blueberries: Rinse the blueberries and spread them on a clean kitchen towel or paper towels to dry thoroughly. Excess water will water down your trifle.
Step 3: Make the Vanilla Custard
1. In a large bowl, combine the instant vanilla pudding mix and 2 cups of cold milk.
2. Whisk vigorously for 2 minutes until the mixture is smooth and begins to thicken.
3. Let it stand for 5 minutes. It will set into a soft, spoonable custard.
4. Pro Tip: For an ultra-rich custard, fold in 1/2 cup of the thawed whipped topping or 1/4 cup of sour cream into the set pudding.
Step 4: Prepare the Whipped Cream (if using fresh)
1. In a chilled bowl, combine the heavy cream, powdered sugar, and vanilla extract.
2. Using a hand mixer or stand mixer, beat on medium-high speed until stiff peaks form. Be careful not to over-whip.
3. Pro Tip: Chill your bowl and beaters in the freezer for 10 minutes before whipping. This helps the cream whip up faster and hold its shape better.
Step 5: Assemble the Trifle (The Fun Part!)
You’ll need a clear glass trifle bowl (about 3-quart capacity) or a large glass serving bowl to show off the layers.
1. Layer 1 (Cake): Place half of the cake cubes in the bottom of the bowl, fitting them together snugly to form an even base.
2. Layer 2 (Red): Spoon half of the macerated strawberries and their juices evenly over the cake. Use the back of the spoon to gently press them against the glass so the red layer is visible from the outside.
3. Layer 3 (White – Custard): Dollop half of the vanilla pudding over the strawberries and spread it gently to the edges with a spatula or spoon.
4. Layer 4 (Blue): Sprinkle half of the blueberries evenly over the custard.
5. Layer 5 (White – Cream): Spread half of the whipped topping or whipped cream over the blueberries.
6. Repeat: Create a second set of identical layers: remaining cake, remaining strawberries, remaining custard, remaining blueberries, and finally, the remaining whipped cream.
7. Smooth the Top: Use a spatula to smooth the final layer of cream into a beautiful, billowy dome.
Step 6: Chill and Garnish
1. Cover the trifle bowl tightly with plastic wrap, ensuring the wrap touches the surface of the cream to prevent a skin from forming.
2. Refrigerate for at least 4 hours, or ideally, overnight. This chilling time is crucial—it allows all the flavors to meld and the cake to soften to a perfect, spoonable consistency.
3. Just before serving, garnish with extra fresh berries, a light dusting of powdered sugar, and festive picks if desired.
Delicious Variations & Smart Substitutions
Make this recipe your own with these creative ideas.
- Tropical Trifle: Use cubed coconut cake or pound cake. Substitute the vanilla pudding with coconut cream instant pudding. Use a mix of mango, pineapple, and kiwi for the fruit layers, and garnish with toasted coconut flakes.
- Lemon-Berry Trifle: Add the zest of one lemon to the vanilla pudding. Use a lemon pound cake. The bright citrus flavor pairs beautifully with the sweet berries.
- Chocolate Lover’s Trifle: Use chocolate pound cake or brownies (cut into small cubes). Substitute the vanilla pudding with chocolate instant pudding. Add a layer of chocolate shavings between the berries and cream.
- For a Less Sweet Trifle: Use unsweetened whipped cream (just heavy cream, whipped) instead of sweetened whipped topping. Reduce or omit the sugar when macerating the strawberries.
- Individual Servings: Assemble the trifle in mason jars, clear plastic cups, or dessert glasses for perfect single-serve portions. This is great for picnics or buffets.
Storage, Make-Ahead, and Reheating Tips
- Storage: Cover the assembled trifle tightly with plastic wrap and store it in the refrigerator. It will keep well for up to 3 days. The cake will continue to soften, and the flavors will deepen, but after 3 days, the texture may become too soft for some preferences.
- Make-Ahead: This is the ultimate make-ahead dessert. You can assemble it up to 24 hours in advance. In fact, it’s often better when made a day ahead. Store it covered in the fridge. Add fresh garnishes just before serving.
- Freezing: Freezing is not recommended. The high water content in the berries and the creamy custard will separate and become grainy upon thawing, ruining the texture.
- Reheating: There is no need to reheat this dessert. It is designed to be served chilled.
Common Mistakes to Avoid
1. Using Soggy Fruit: Ensure your blueberries are completely dry after rinsing. Wet berries will introduce excess liquid into the trifle, leading to a soupy mess.
2. Assembling Too Far in Advance (with Fresh Cream): If you use freshly whipped cream, assembling more than 8 hours ahead can cause it to weep and deflate. For the most stable, long-lasting trifle, use the frozen whipped topping.
3. Not Letting it Chill Long Enough: Patience is key! The 4-hour (or longer) chill time allows the cake to absorb moisture and flavors, transforming the dessert from a stack of ingredients into a cohesive, dreamy treat.
4. Overfilling the Bowl: Leave about 1/2 inch of space at the top of your trifle bowl. The cream layer will settle slightly as it chills, and you need room for the garnish.
5. Skipping the Maceration: If your strawberries lack sweetness, macerating them is non-negotiable. It’s the difference between a good trifle and a great one, as it creates a natural, flavorful syrup that permeates the cake.
Frequently Asked Questions (FAQs)
1. Can I make this trifle gluten-free?
Absolutely. Simply use a gluten-free pound cake, angel food cake, or a batch of gluten-free vanilla cupcakes (cubed) as your base. All other ingredients in the recipe are naturally gluten-free, but always check the labels on your pudding mix and whipped topping to be safe.
2. I don’t have a trifle bowl. What else can I use?
A large, clear glass salad bowl, a punch bowl, or even a 9×13-inch glass baking dish will work. The key is to use something clear so you can see the beautiful layers. If using a baking dish, you can create shorter, more rustic layers.
3. Can I use other berries?
Yes! Raspberries and blackberries make excellent additions or substitutions. For a purely red, white, and blue theme, stick to strawberries, blueberries, and perhaps a few blackberries for a darker blue accent. Avoid very juicy berries like marionberries unless you drain them well.
4. How do I prevent the cake from getting too soggy?
Use day-old cake, don’t over-macerate the strawberries (especially if they are very ripe), and ensure your blueberries are dry. The frozen whipped topping layer also acts as a barrier, protecting the cake from excess moisture.
5. Is there a way to make this lower in sugar?
Yes. Use a sugar-free instant vanilla pudding mix and a sugar-free frozen whipped topping. Omit the sugar when macerating the strawberries, or use a sugar substitute like monk fruit sweetener. Choose a pound cake with lower sugar content.
6. Can I add a layer of something else for crunch?
For added texture, sprinkle a layer of crushed graham crackers, vanilla wafers, or toasted, chopped pecans or almonds between the fruit and cream layers. Add this layer just before serving to maintain crispness.
Conclusion
This Patriotic Berry Trifle is more than just a recipe; it’s a festive tradition waiting to happen. It embodies the spirit of easy, joyful entertaining, proving that you don’t need to spend hours in the kitchen to create something spectacular. With its stunning red, white, and blue layers, luscious combination of textures, and make-ahead convenience, it’s the ideal dessert to cap off your Fourth of July celebration. It’s a dish that invites sharing, sparks conversation, and leaves everyone reaching for just one more spoonful.
So, gather your fresh berries, your favorite cake, and get layering. Whether you’re watching fireworks from your backyard or sharing a meal with loved ones, this trifle brings a sweet, creamy, and colorful finale to your Independence Day. Here’s to a holiday filled with fun, freedom, and fantastic food! Don’t forget to pin this recipe for next year—it’s sure to become a beloved staple in your summer dessert rotation.


