Table of Contents
- 1 Why You’ll Love These Pull-Apart Garlic Butter Rolls
- 2 Ingredients
- 3 Equipment You’ll Need
- 4 Step-by-Step Instructions
- 5 The Secret to Soft, Fluffy Rolls
- 6 Flavor Profile
- 7 Tips for Success
- 8 Variations
- 9 Make-Ahead and Storage
- 10 Serving Suggestions
- 11 Troubleshooting
- 12 Nutritional Information (Per Roll)
- 13 FAQs
- 14 Why These Rolls Belong on Your Christmas Table
There’s something undeniably comforting about warm, freshly baked bread emerging from the oven — especially during the holidays. These Pull-Apart Garlic Butter Dinner Rolls are the ultimate homemade bread to serve at your Christmas dinner, family feast, or cozy winter meal.
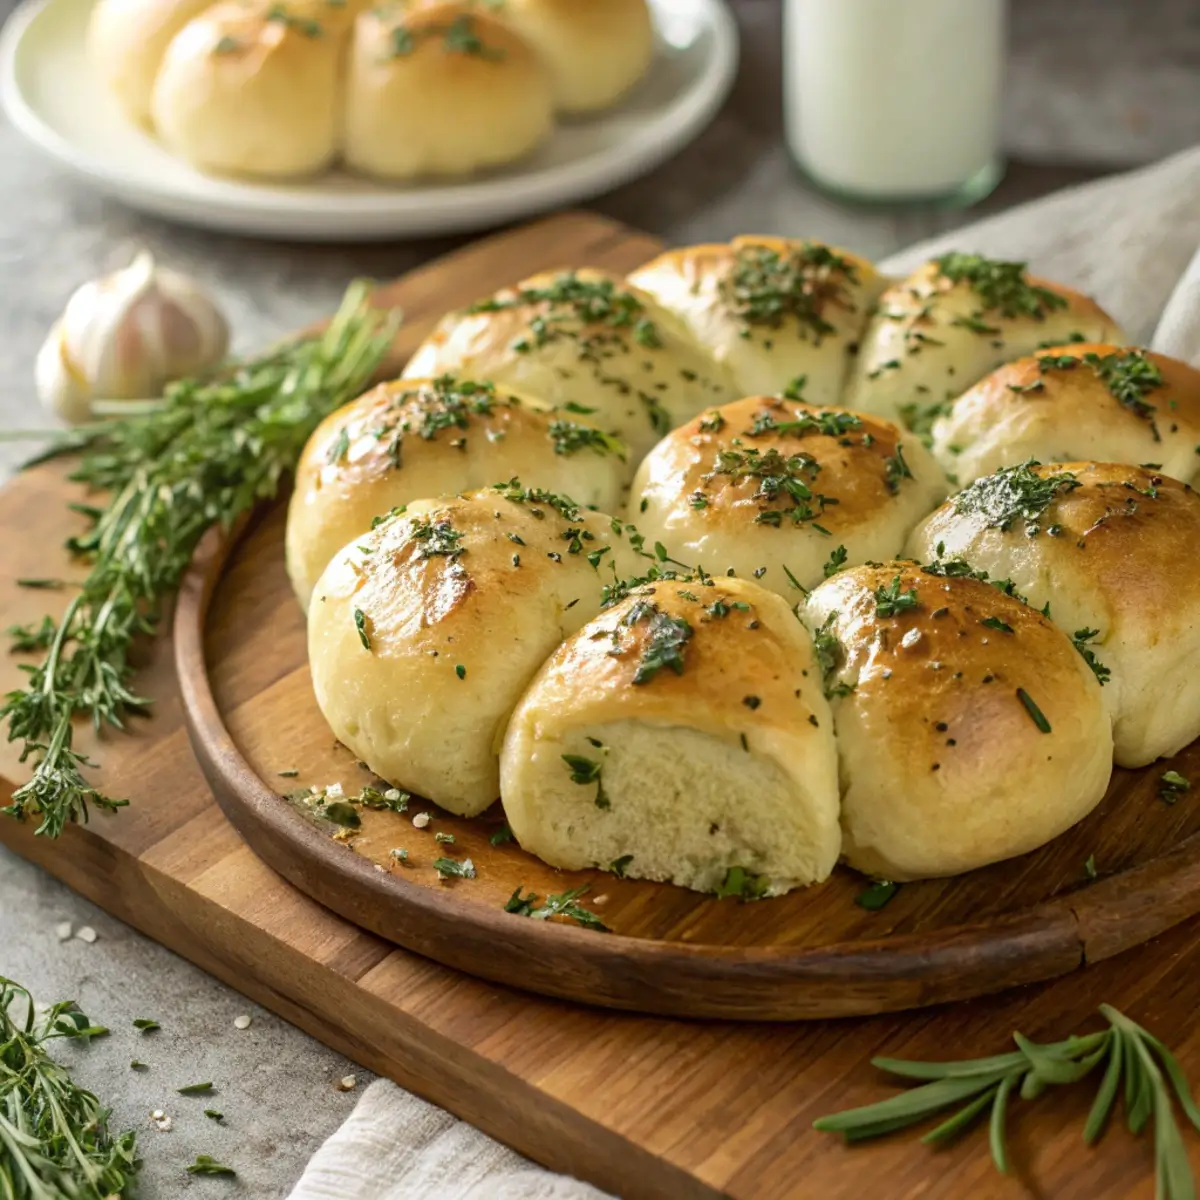
Each roll is soft, airy, and perfectly golden, with a buttery garlic glaze that fills your kitchen with the most irresistible aroma. The pull-apart style means everyone can grab one (or two!) straight from the pan — no slicing required. They’re as beautiful as they are delicious, arranged like a golden wreath of holiday goodness.
Despite their bakery-quality flavor and texture, these rolls are surprisingly easy to make. With just a few simple pantry ingredients, some patience for rising, and a little butter magic, you’ll have the most tender, flavorful rolls your guests will rave about.
Why You’ll Love These Pull-Apart Garlic Butter Rolls
-
Soft and pillowy: Perfect texture from the first bite to the last.
-
Garlic butter glaze: Adds depth, aroma, and that irresistible shine.
-
Holiday perfection: Pairs beautifully with Christmas mains, soups, and gravies.
-
Make-ahead friendly: Ideal for prepping in advance during busy holidays.
-
Homemade simplicity: A straightforward dough anyone can master.
Ingredients
You’ll only need a few common baking staples to create these festive garlic rolls.
For the Dough
-
4 cups all-purpose flour (plus extra for kneading)
-
2¼ teaspoons active dry yeast (1 packet)
-
1 cup warm milk (around 110°F / 43°C)
-
¼ cup granulated sugar
-
1 teaspoon salt
-
1 large egg
-
¼ cup unsalted butter, softened
For the Garlic Butter Glaze
-
¼ cup unsalted butter (melted)
-
2 cloves garlic, finely minced
-
1 tablespoon fresh parsley, chopped
-
Pinch of salt
-
Optional: 1 tablespoon grated Parmesan cheese for extra flavor
Equipment You’ll Need
-
Large mixing bowl
-
Wooden spoon or dough hook (if using stand mixer)
-
Clean kitchen towel or plastic wrap
-
9×13-inch baking pan or round cake pan
-
Pastry brush
-
Small saucepan or microwave-safe bowl for garlic butter
Step-by-Step Instructions
Step 1: Activate the Yeast
In a large bowl, combine warm milk, sugar, and yeast. Let it sit for 5–10 minutes until it becomes frothy and bubbly on top. This step ensures your yeast is alive and ready to help the dough rise.
Step 2: Mix the Dough
Once the yeast is activated, add the softened butter, egg, and salt. Stir to combine. Gradually mix in the flour, one cup at a time, until a soft dough begins to form.
If using a stand mixer, use the dough hook attachment on medium speed for 6–8 minutes. If kneading by hand, turn the dough out onto a lightly floured surface and knead for about 10 minutes until it’s smooth, elastic, and slightly tacky but not sticky.
Step 3: First Rise
Place the dough in a lightly greased bowl, cover it with a damp towel or plastic wrap, and let it rise in a warm, draft-free spot for 1 to 1½ hours, or until it doubles in size.
Tip: If your kitchen is cool, place the covered bowl in a turned-off oven with the light on for gentle warmth.
Step 4: Shape the Rolls
Once risen, punch down the dough gently to release air. Divide it into 16 equal portions (use a kitchen scale for precision if you like).
Roll each portion into a smooth ball by tucking the dough edges underneath and rolling gently between your palms. Arrange the balls in a greased baking pan — either in neat rows or a circular “wreath” pattern for a festive look.
Cover again and let them rise for another 30–45 minutes, until puffy and nearly doubled in size.
Step 5: Preheat and Prepare
While the rolls rise, preheat your oven to 375°F (190°C).
Step 6: Bake
Bake the rolls for 18–22 minutes, or until the tops are golden brown and sound hollow when tapped.
Keep an eye on them — if the tops brown too quickly, loosely cover with foil for the final few minutes of baking.
Step 7: Make the Garlic Butter Glaze
While the rolls bake, melt the butter in a small saucepan or microwave-safe bowl. Stir in the minced garlic, parsley, and a pinch of salt. Let it rest for a few minutes so the garlic infuses the butter.
For an extra indulgent touch, stir in a tablespoon of grated Parmesan cheese.
Step 8: Brush and Serve
As soon as the rolls come out of the oven, brush them generously with the warm garlic butter. The butter will melt into every crevice, creating a glossy, flavorful finish.
Sprinkle with extra herbs if desired and serve immediately. These rolls are best enjoyed warm, straight from the pan — they practically melt in your mouth.
The Secret to Soft, Fluffy Rolls
The key to achieving bakery-soft dinner rolls lies in:
-
Proper kneading: Develops gluten, giving the rolls structure and elasticity.
-
Warm milk: Activates yeast gently and adds richness to the dough.
-
Enough rise time: Allowing the dough to double ensures airy texture.
-
Don’t overbake: Removing them at golden perfection keeps them tender inside.
Flavor Profile
Every bite of these rolls brings together a perfect harmony of:
-
Buttery richness from the dough and glaze,
-
Subtle sweetness that enhances the savory garlic,
-
Herbal freshness from parsley, and
-
Golden, pillowy softness that melts in your mouth.
The aroma of freshly baked bread mingled with garlic butter instantly evokes the warmth of the holidays.
Tips for Success
-
Use fresh yeast: Expired yeast won’t rise properly — check the date before starting.
-
Measure flour carefully: Spoon it into the cup and level it off rather than scooping directly.
-
Avoid over-flouring: Too much flour can make rolls dense. Add just enough for manageable dough.
-
Let them cool slightly: Waiting 5 minutes before serving makes them easier to pull apart.
-
Freeze extras: These rolls freeze beautifully — perfect for future dinners.
Variations
-
Cheesy Garlic Rolls: Add shredded cheddar or mozzarella between dough balls before baking.
-
Herb-Infused Dough: Mix dried rosemary, thyme, or Italian herbs into the dough.
-
Sweet Version: Skip the garlic and brush with honey butter instead.
-
Whole Wheat Rolls: Substitute half the flour with whole wheat flour for a nuttier flavor.
-
Mini Slider Rolls: Make smaller rolls for sandwich sliders at holiday gatherings.
Make-Ahead and Storage
Make Ahead:
Prepare the dough, shape the rolls, and refrigerate (covered) overnight. Before baking, remove from the fridge and let them come to room temperature and rise again (about 1 hour).
Storage:
Store cooled rolls in an airtight container at room temperature for up to 3 days.
Reheating:
Wrap in foil and warm in a 300°F (150°C) oven for 8–10 minutes, or microwave briefly until soft.
Freezing:
Freeze baked rolls for up to 2 months. Reheat in the oven until warmed through.
Serving Suggestions
These pull-apart rolls pair perfectly with holiday classics such as:
-
Christmas roasts: Turkey, beef tenderloin, or chicken.
-
Comfort sides: Mashed potatoes, green bean casserole, or mac and cheese.
-
Soups and stews: Especially creamy or tomato-based ones.
-
Appetizer boards: Serve warm with herbed butter or soft cheese spreads.
They’re versatile enough for weeknight dinners yet impressive enough for the most elegant Christmas feast.
Troubleshooting
My dough didn’t rise. What went wrong?
The yeast may have been expired, or your milk was too hot. It should be warm (not hot) — about 110°F.
Why are my rolls dense instead of fluffy?
They may not have risen long enough or the dough was over-floured. Always check that the dough doubles in size before shaping.
Can I use instant yeast instead of active dry?
Yes! Skip the proofing step and mix it directly with dry ingredients. Adjust rise time slightly as instant yeast works faster.
Can I use plant-based milk?
Absolutely. Use unsweetened almond, oat, or soy milk for a dairy-free option (flavor may vary slightly).
Can I make them smaller or larger?
Yes, just adjust baking time — smaller rolls bake faster, larger ones need an extra few minutes.
Nutritional Information (Per Roll)
| Nutrient | Amount |
|---|---|
| Calories | 180 |
| Fat | 7g |
| Carbohydrates | 25g |
| Protein | 4g |
| Fiber | 1g |
| Sodium | 140mg |
(Approximate values depending on ingredients and portion size.)
FAQs
Can I make these rolls ahead of Christmas dinner?
Yes! Prepare and refrigerate the shaped rolls the night before. Bake fresh before serving.
Do I have to use a stand mixer?
No, this recipe works perfectly by hand — just knead a few extra minutes.
What’s the best way to keep rolls soft after baking?
Cover them with a clean towel as they cool to trap steam and maintain moisture.
Can I add garlic directly into the dough?
You can, but roasted or sautéed garlic works best to avoid bitterness.
Can I double the recipe for a large crowd?
Definitely! Use two pans and rotate them halfway through baking for even browning.
Why These Rolls Belong on Your Christmas Table
Bread brings people together — and these Pull-Apart Garlic Butter Dinner Rolls are no exception. They’re not just a side dish; they’re a moment of warmth and togetherness shared at the table.
From the first buttery aroma to the golden crust and soft, fluffy interior, these rolls deliver a comforting, festive experience. They look stunning on your Christmas spread and taste even better fresh from the oven, brushed with melted garlic butter.
Whether you’re serving an elegant roast dinner, hosting a holiday potluck, or enjoying a cozy family gathering, these rolls are guaranteed to steal the spotlight — and maybe even replace the bread basket tradition altogether.
So, this holiday season, roll up your sleeves, preheat the oven, and bake some joy into your celebration with these Homemade Pull-Apart Garlic Butter Dinner Rolls — the golden, garlicky touch your Christmas table deserves.
