Table of Contents
There’s something magical about summer evenings when the grill is fired up and the air fills with that irresistible smoky aroma. While burgers and hot dogs often steal the spotlight at backyard cookouts, the humble corn on the cob deserves just as much attention. When you pair perfectly grilled corn with a rich, creamy garlic herb butter, you create a side dish that transforms any meal into something truly special.
This grilled corn recipe has become my go-to for everything from casual weeknight dinners to weekend fishing trips, summer picnics, and Fourth of July celebrations. The beauty lies in its simplicity—you don’t need any fancy equipment or culinary expertise to pull this off. With just a handful of ingredients and about 15 minutes of your time, you can serve up corn that’s caramelized, charred in all the right places, and coated in a buttery garlic herb sauce that keeps people coming back for seconds.
What makes this recipe particularly wonderful is its versatility. Whether you’re hosting a backyard BBQ, packing up food for a lakeside fishing trip, or looking for a quick side to accompany your Sunday chicken dinner, this grilled corn fits seamlessly into any scenario. The butter mixture can be prepared ahead of time, the corn grills quickly over medium-high heat, and the result is consistently delicious every single time.
In this article, I’ll walk you through everything you need to know to make the best grilled corn on the cob you’ve ever tasted. From selecting the perfect ears of corn to avoiding common mistakes that can turn your BBQ side into a disappointment, we’ve got it all covered. Let’s fire up that grill and get started.
Why This Recipe Works Every Time
Before we dive into the specifics, let’s talk about why this grilled corn recipe consistently delivers such outstanding results. The secret lies in the combination of two cooking techniques: direct grilling and compound butter.
When you place corn directly on a hot grill, the high heat causes the natural sugars in the corn to caramelize while creating those beautiful char marks we all love. This Maillard reaction develops complex flavors that simply can’t be achieved through boiling or steaming. The husk protects the corn from burning while still allowing that smoky grill flavor to penetrate.
The garlic herb butter serves multiple purposes. First, it adds an incredible layer of flavor that complements the natural sweetness of the corn. Second, the fat content helps keep the corn moist during grilling, preventing it from drying out. Third, when you slather that creamy butter over the hot grilled corn, it melts into every kernel, creating a luscious coating that’s absolutely irresistible.
The timing is also crucial here. Grilling the corn for about 10-15 minutes, turning occasionally, ensures that each side gets equal exposure to the heat. This creates even charring without burning, and the kernels cook through perfectly while retaining their satisfying crunch.
Selecting the Best Corn
The foundation of any great grilled corn dish starts at the grocery store or farmers market. Choosing fresh, high-quality corn makes all the difference between a good result and an extraordinary one.
When shopping for corn, look for ears that feel heavy for their size. This indicates that the kernels are plump and full of moisture. The husks should be fresh green and tightly wrapped around the cob—not dried out, brown, or peeling away from the corn. If you can see the kernels through the husk, they should appear bright yellow (or white, depending on the variety) and evenly sized.
Another telltale sign of freshness is the silk at the top. Fresh corn has soft, slightly sticky silk that feels moist to the touch. If the silk is dry, brittle, or dark in color, the corn has likely been sitting for a while and won’t be as sweet.
I always recommend buying corn the same day you plan to cook it, or at most the day before. Corn begins losing its sweetness almost immediately after being picked because the sugars convert to starch. For the sweetest, most flavorful corn, get it as fresh as possible and use it right away.
If you’re shopping at a farmers market, ask your vendor when the corn was harvested. Local, freshly picked corn often tastes noticeably sweeter than corn that’s been shipped long distances. Don’t be afraid to peel back a small section of the husk at the store to check the kernels—just be courteous and put it back neatly if you decide not to purchase that particular ear.
Ingredients You’ll Need
One of the best things about this recipe is its simplicity. You likely have most of these ingredients in your kitchen already, and the ones you don’t have are inexpensive and widely available.
For the Garlic Herb Butter
The compound butter is where much of the magic happens. Each ingredient plays an important role in creating that perfect balance of flavors.
Unsalted butter forms the base of this sauce. Using unsalted gives you control over the overall saltiness of the dish. You’ll want to use real butter, not margarine, for the best flavor and texture. The fat content in real butter also helps create those beautiful grill marks without sticking.
Garlic brings that savory, aromatic quality that pairs perfectly with sweet corn. I recommend using fresh garlic cloves and mincing them finely, rather than using pre-minced garlic from a jar. Fresh garlic has a more vibrant, pungent flavor that really shines through.
Parsley adds a fresh, herbaceous note that brightens the entire dish. Flat-leaf Italian parsley has more flavor than the curly variety, so that’s what I prefer to use. The green color also makes the butter look more appetizing.
Salt enhances all the other flavors and helps draw out the natural sweetness of the corn. You can adjust the amount to your personal preference, but don’t skip it entirely—salt is essential for balanced flavor.
Black pepper adds a subtle kick and complexity. Freshly ground black pepper has more flavor than the pre-ground variety, so if you have a pepper grinder, now’s the time to use it.
For the Grilled Corn
Fresh corn on the cob is, of course, the star of the show. Plan on one to two ears per person, depending on appetites and what else you’re serving. Corn is so delicious that most people happily eat more than one ear.
Olive oil or melted butter for brushing the corn before grilling. This helps prevent sticking and adds another layer of flavor. Some people prefer oil because it has a higher smoke point, but melted butter works beautifully too and adds richer flavor.
Optional toppings include a squeeze of fresh lime juice, extra pats of herb butter, or a sprinkle of grated Parmesan cheese. These aren’t necessary, but they can add nice finishing touches.
Step-by-Step Instructions
Now let’s get to the fun part—actually making this grilled corn. Follow these steps carefully, and you’ll have perfect results every time.
Preparing the Garlic Herb Butter
Start by making the compound butter ahead of time. This allows the flavors to meld together and makes the actual grilling process much smoother.
Step 1: Measure out a half cup of unsalted butter and let it sit at room temperature for about 15-20 minutes. You want it softened but not melted—about the consistency of cream cheese. This makes it much easier to mix and ensures the garlic and herbs distribute evenly.
Step 2: While the butter softens, peel and finely mince two to three cloves of fresh garlic. The finer you chop the garlic, the more evenly it will distribute throughout the butter, and the less likely you’ll get a sudden burst of raw garlic flavor in one bite.
Step 3: Finely chop about two tablespoons of fresh parsley. Remove any thick stems first, as they can be tough and unpleasant to bite into.
Step 4: In a medium bowl, combine the softened butter with the minced garlic, chopped parsley, a quarter teaspoon of salt, and a pinch of black pepper. Mix everything together thoroughly with a fork or small spatula until the ingredients are evenly distributed.
Step 5: Transfer the garlic herb butter to a piece of plastic wrap or parchment paper. Roll it into a log shape, twisting the ends to seal. Place it in the refrigerator for at least 30 minutes to firm up, or you can make it a day ahead and keep it refrigerated until ready to use.
This butter keeps well in the refrigerator for about a week and can also be frozen for several months. Having some extra butter on hand is always a good idea because it tastes incredible on other things too—steak, bread, vegetables, you name it.
Preparing the Corn
While your butter is chilling, get the corn ready for the grill.
Step 6: Pull back the husks from each ear of corn, but don’t remove them entirely. Strip them down to the base of the cob, leaving the husks attached so you can use them as a handle later. This also makes for a more attractive presentation.
Step 7: Remove the silk—the thin, stringy threads—from the corn. This can be a bit tedious, but taking your time here pays off. A soft brush or your fingers work well for removing the silk. Some people recommend rubbing the corn with a paper towel, which can help grab the silk strands.
Step 8: Once the corn is cleaned, fold the husks back up around the ears to protect them during the initial part of grilling. This creates steam that cooks the corn evenly while preventing the outside from burning before the inside is done.
Grilling the Corn
Now comes the main event—getting that corn onto the grill and cooking it to perfection.
Step 9: Preheat your grill to medium-high heat, around 400-450°F. If you’re using a charcoal grill, you want medium coals with a few hotter spots. For gas grills, set the burners to medium-high. The grill is ready when you can hold your hand about six inches above the grates for three to four seconds before it becomes too hot to bear.
Step 10: Place the corn on the grill with the husks still attached. Close the lid and cook for about 10-12 minutes, turning the corn every few minutes to ensure even cooking. You’ll hear some sizzling and might see some smoke—that’s a good sign.
Step 11: After 10-12 minutes, carefully peel back a husk to check the corn. The kernels should be tender when pierced with a fork and have developed some nice char marks. If you want more char, you can pull the husks down more and grill for a few minutes longer.
Step 12: Remove the corn from the grill and let it rest for a minute or two. Carefully peel off the husks and silk—they should come off easily now. Brush each ear lightly with olive oil or melted butter to keep them moist and add flavor.
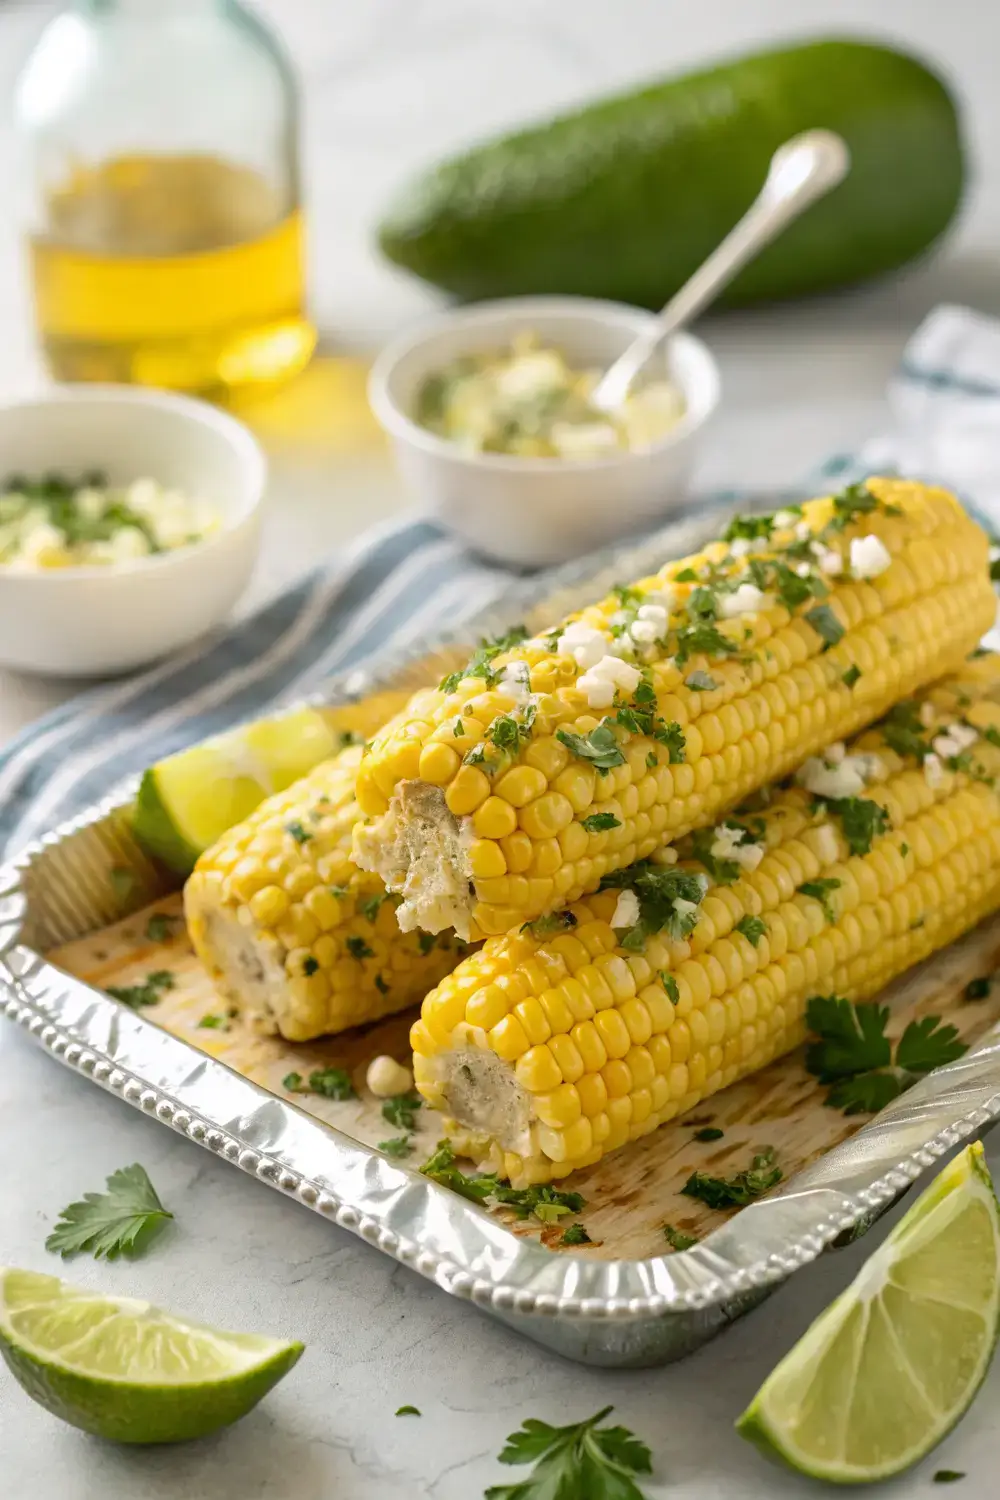
Step 13: Slice the chilled garlic herb butter into pats, about one tablespoon each. Place two or three pats on each ear of hot grilled corn. As the butter hits the warm corn, it will begin to melt immediately. Use a knife or brush to spread the melted butter evenly over all the kernels, making sure to get into all the nooks and crannies.
Step 14: Serve immediately while the corn is still hot and the butter is nicely melted. The corn is best enjoyed right away while it’s at its peak—warm, juicy, and coated in that delicious garlic herb butter.
Tips for Perfect Grilled Corn Every Time
Through years of making grilled corn, I’ve learned a few tricks that consistently produce excellent results. Here are some tips to help you elevate your grilled corn game.
Don’t skip the soak. Some grill masters recommend soaking corn in water (husks and all) for 20-30 minutes before grilling. This adds moisture and can help prevent the husks from burning. If you try this method, just make sure to shake off excess water before placing the corn on the grill.
Turn frequently. Leaving corn in one position too long leads to uneven cooking and potential burning. Turn your corn every three to four minutes for the most consistent results.
Use a grill basket for smaller ears. If you’re working with smaller or more delicate ears of corn, a grill basket or mesh screen can prevent them from falling through the grates and make turning easier.
Don’t overcrowd the grill. Give each ear of corn plenty of space. Overcrowding traps steam and can lead to steaming instead of grilling, which defeats the purpose of cooking corn on the BBQ.
Let the butter do its work. Once you add the garlic herb butter to the hot corn, give it a minute or two to melt completely before spreading. This ensures even coverage and lets the garlic flavor infuse into the corn.
Experiment with heat zones. If your grill has multiple burners, create a hot zone and a cooler zone. Start the corn over high heat to get those char marks, then move it to a cooler area to finish cooking through without burning.
Cooking Variations and Substitutions
One of the wonderful things about this recipe is how adaptable it is. Here are some variations you can try to customize the dish to your preferences.
Butter Variations
The garlic herb butter recipe is wonderfully flexible. You can customize it based on what you have available or your personal taste preferences.
Lemon zest butter adds a bright, citrusy note that pairs exceptionally well with grilled foods. Add the zest of one lemon along with a tablespoon of fresh lemon juice to your butter mixture.
Cilantro lime butter gives a Mexican-inspired twist that’s perfect for taco nights. Substitute cilantro for the parsley and add lime zest and a pinch of cumin.
Spicy chipotle butter brings some heat to the party. Add a teaspoon of chipotle powder or a small amount of minced chipotle in adobo sauce to the butter mixture.
Roma herb butter uses a combination of dried Italian herbs like oregano, basil, and thyme. This works especially well if you don’t have fresh parsley on hand.
Everything bagel butter might sound unusual, but it’s absolutely delicious. Add sesame seeds, poppy seeds, dried garlic, dried onion, and a pinch of salt to your butter for a fun twist.
Cheese Additions
For an extra indulgent version, add some cheese to your grilled corn.
Parmesan corn involves sprinkling freshly grated Parmesan cheese over the corn immediately after adding the butter. The residual heat melts the cheese into a savory coating.
Mexican street corn style (also known as elote) is a popular variation where you roll the grilled corn in mayo, then coat it with crumbled cotija cheese, chili powder, and lime juice. This is incredibly delicious but strays from the simple butter version.
Cheddar jalapeño corn adds shredded cheddar cheese and minced jalapeño to the butter for a spicy, cheesy twist.
Alternative Cooking Methods
Don’t have access to a grill? No problem. You can still achieve delicious results using these alternative methods.
Grill pan or cast iron skillet: Heat a grill pan or cast iron skillet over high heat and cook the corn, turning frequently, until charred and tender. This works great for indoor cooking.
Oven roasting: Place corn on a baking sheet and roast at 425°F for 25-30 minutes, turning halfway through. The results won’t have the same smoky flavor, but the corn will still be delicious.
Boiling: While not my preferred method, you can boil corn for 5-7 minutes, then drain and coat with the garlic herb butter. This produces softer corn without the char, but it’s a viable option.
Storage and Reheating Tips
Sometimes you might find yourself with leftover grilled corn, or perhaps you want to prepare ahead for a party. Here’s how to handle storage and reheating.
Storing Leftover Cooked Corn
If you have leftover grilled corn, remove any remaining butter and place the corn in an airtight container. Store it in the refrigerator for up to three to four days. The corn will soften in the refrigerator as it cools, which is normal.
You can also store the garlic herb butter separately. Keep it wrapped in plastic wrap or in a small container in the refrigerator for up to a week, or freeze it for several months.
Reheating Grilled Corn
The best way to reheat grilled corn is on the grill itself. Preheat your grill to medium heat and place the corn directly on the grates for a few minutes, turning occasionally, until heated through. This helps restore some of that smoky flavor and char that makes grilled corn so delicious.
For a quicker option, you can reheat corn in the microwave. Place the corn on a microwave-safe plate, cover with a damp paper towel, and heat for one to two minutes. The corn won’t have the same texture, but it will be warm and edible.
Alternatively, wrap the corn in foil and heat in a 350°F oven for about 10-15 minutes. This method helps retain more moisture than microwaving.
Preparing Ahead of Time
If you want to get a head start on your BBQ side dish, you can prepare the garlic herb butter up to a week in advance. The corn is best grilled fresh, but you can shuck it and have it ready to go on the grill whenever you need it.
For parties or large gatherings, I often grill the corn in advance and then reheat it on a cooler part of the grill when guests are ready to eat. This allows me to spend time with my guests rather than being stuck by the grill.
Common Mistakes to Avoid
Even the simplest recipes can go wrong if you make certain mistakes. Here are the most common pitfalls and how to avoid them.
Using Old or Stale Corn
The biggest mistake you can make is using corn that’s past its prime. Old corn has starchy, tough kernels that lack the sweet, juicy flavor that makes grilled corn so delicious. Always buy fresh corn and use it the same day if possible.
Overcooking the Corn
Leaving corn on the grill too long results in dry, tough kernels that are unpleasant to eat. Keep a close eye on your corn and turn it frequently. The corn is done when the kernels are tender when pierced with a fork and have nice char marks. Undercooked corn is much better than overcooked—you can always put it back on for a few more minutes.
Burning the Butter on the Grill
Some recipes call for putting butter directly on the corn while it’s still on the grill. This can work, but it’s easy to burn the butter, which creates a bitter, unpleasant flavor. The method I’ve outlined—grilling the corn first, then adding butter—produces better results with less risk.
Not Seasoning Enough
Don’t be shy with the salt and pepper. Corn needs seasoning to bring out its natural sweetness. Taste as you go and adjust the seasoning to your preference.
Skipping the Pre-Grill Butter/Oil
Brushing the corn with oil or melted butter before grilling prevents sticking and adds flavor. Don’t skip this step, especially if you’re using a grill with exposed grates.
Using Too High Heat
While you want a hot grill, excessive heat will char the outside before the inside cooks through. Medium-high heat is ideal—it provides enough heat for charring while allowing the corn to cook evenly.
Not Letting the Butter Melt
When you add the garlic herb butter to hot corn, give it time to melt completely before spreading. If you try to spread cold butter, it won’t coat the kernels evenly and you’ll have clumps instead of a smooth, flavorful coating.
Frequently Asked Questions
After sharing this recipe with friends and family, I’ve heard many of the same questions come up. Here are answers to the most common ones.
How long does it take to grill corn on the cob?
Grilling corn on the cob typically takes 10-15 minutes total. You’ll want to grill it for about 10-12 minutes with the husks on, then peel back the husks and grill for an additional 2-3 minutes for more direct charring. The exact time depends on your grill’s temperature and the size of the corn.
Do I need to soak corn before grilling?
Soaking corn before grilling is optional but can be helpful. Soaking the corn (husks and all) in water for 20-30 minutes adds moisture and can help prevent the husks from burning. If you choose to soak, just make sure to shake off excess water before placing it on the grill. Many people skip this step and still get excellent results.
Can I use frozen corn for this recipe?
Fresh corn definitely produces the best results, but you can use frozen corn in a pinch. Thaw the frozen corn completely and pat it dry before grilling. The texture will be slightly different—frozen corn tends to be softer—but it can still be delicious. Just note that frozen corn won’t have the same sweet flavor as fresh summer corn.
What’s the best way to remove corn silk?
Removing corn silk can be tedious, but taking your time pays off. Gently pull back the husks and use your fingers or a soft brush to remove the silk strands. A paper towel can help grab the slippery threads. Some people recommend using a vegetable brush or even a toothbrush for this task.
Can I make this recipe without a grill?
Yes! You can use a grill pan, cast iron skillet, or even roast the corn in the oven. While you won’t get the same smoky flavor, you can still achieve tasty results. For a grill pan, cook the corn over high heat, turning frequently, until charred and tender. Roast in a 425°F oven for 25-30 minutes, turning halfway through.
How do I know when corn is done?
The corn is done when the kernels are tender when pierced with a fork and have developed nice char marks. You can also peel back a husk to check the kernels—they should be plump and cooked through. Another test is that the husks should pull off easily without tearing.
Can I use dried herbs instead of fresh?
While fresh herbs produce the best flavor, you can substitute dried herbs in a pinch. Use about one-third of the amount of dried herbs as you would fresh (so one tablespoon of fresh parsley becomes about one teaspoon of dried). Dried herbs can sometimes be a bit more potent and less vibrant in flavor.
What can I serve with grilled corn?
Grilled corn is incredibly versatile and pairs well with many dishes. It’s a classic BBQ side for burgers, hot dogs, and steaks. It complements chicken dishes beautifully—think grilled chicken dinners, fried chicken, or chicken kebabs. It’s also perfect for summer picnics, fishing trips, and outdoor gatherings alongside other salads and sides.
Final Thoughts
There’s a reason grilled corn on the cob remains a summer staple at cookouts across America. It’s simple to make, requires minimal ingredients, and delivers incredible flavor that appeals to just about everyone. When you add a homemade garlic herb butter into the mix, you elevate this humble vegetable into something truly special.
This recipe has become my secret weapon for summer entertaining. It comes together quickly, doesn’t require any fancy equipment, and always gets rave reviews. Whether I’m hosting a Fourth of July party, packing up food for a day at the lake, or simply making a weeknight dinner feel a little more special, this grilled corn never disappoints.
The beauty of this recipe lies in its flexibility. You can stick to the classic garlic herb butter I’ve outlined, or you can get creative with variations that suit your taste preferences. Add some heat with jalapeño, brighten it with lemon, or go all out with a cheesy Mexican street corn variation. The base recipe is solid enough to stand on its own, but flexible enough to accommodate whatever you’re in the mood for.
So fire up that grill, grab some fresh corn, and get cooking. There’s nothing quite like the taste of summer—sweet corn, smoky char, and rich garlic herb butter melting into every kernel. Once you’ve tried this recipe, it’ll become a regular part of your summer rotation, just like it has for me.
Remember, the best grilled corn is made with fresh ingredients, a hot grill, and a little bit of love. Don’t overthink it—just get out there and grill. Your taste buds will thank you.


