Table of Contents
- 1 Dreamy Marshmallow Cereal Treats That’ll Make You Feel Like a Kid Again
- 2 Choosing Ingredients for Maximum Flavor and Fun
- 3 Essential Tools for Cereal Treat Success
- 4 Step-by-Step: Creating Marshmallow Magic
- 5 Creative Variations to Spark Joy
- 6 Smart Substitutions for Dietary Needs
- 7 Avoid These Common Cereal Treat Disasters
- 8 Pro Storage Tips for Freshness That Lasts
- 9 Your Cereal Treat Questions—Answered!
- 10 The Sweet Conclusion: Your New Go-To Treat
Dreamy Marshmallow Cereal Treats That’ll Make You Feel Like a Kid Again
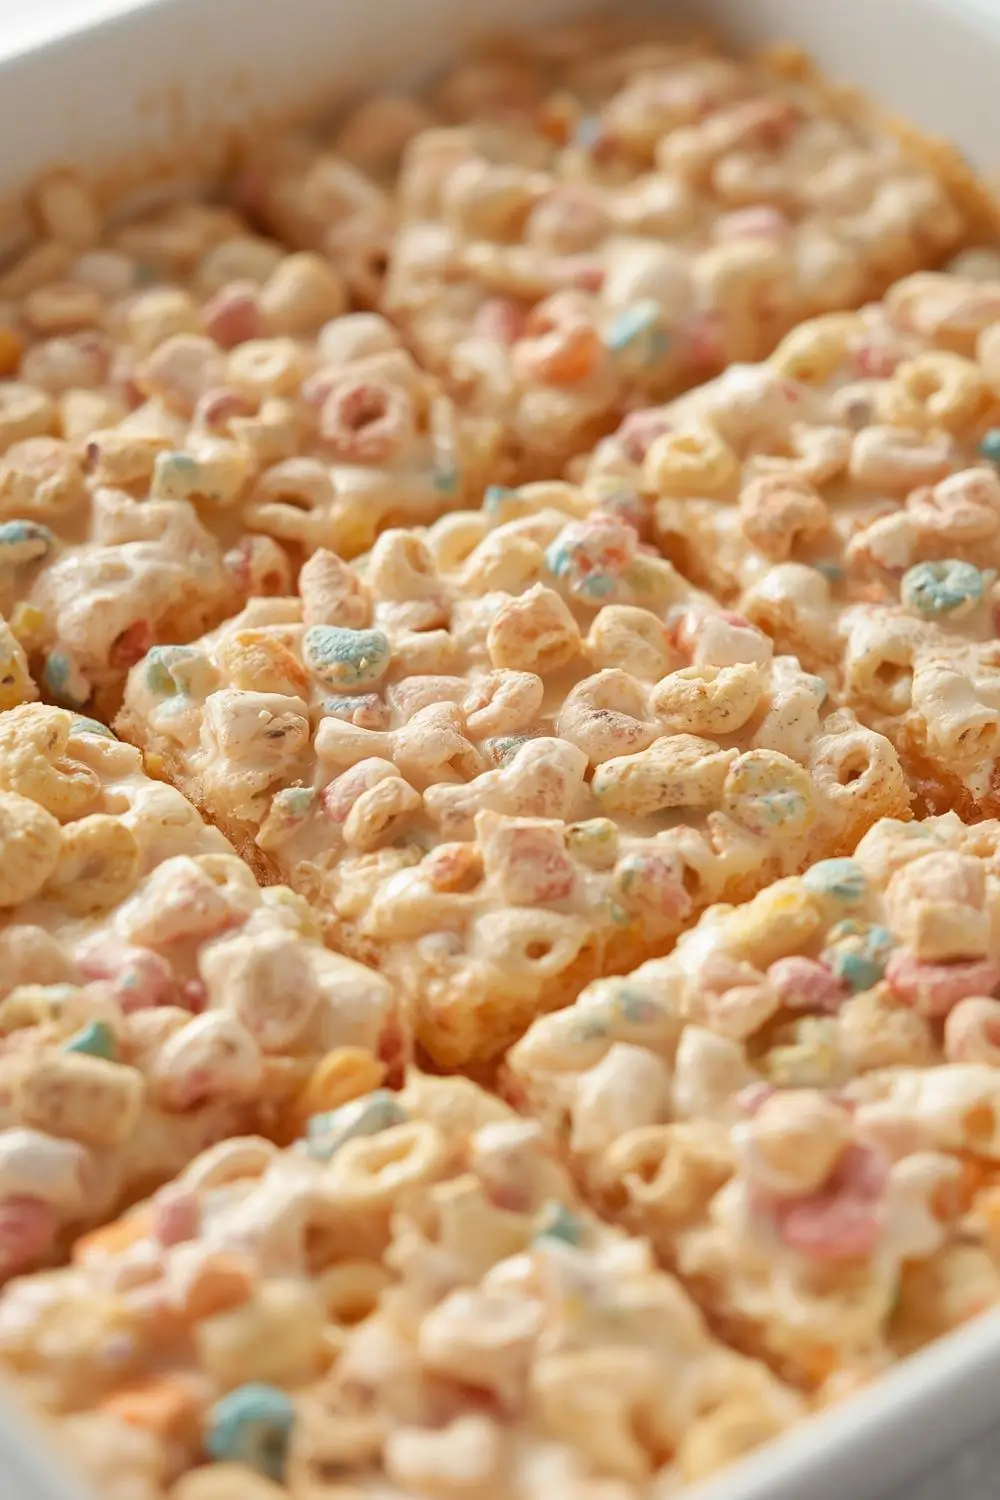
There’s something magical about the simple combination of melted marshmallows and crispy cereal that transports us back to childhood kitchens. These dreamy marshmallow cereal treats aren’t just another dessert—they’re edible nostalgia in perfect squares. Unlike traditional recipes that can turn hard or sticky, our foolproof method creates treats with that ideal balance of gooey-chewy goodness and satisfying crunch. Whether you’re packing lunchboxes, hosting a birthday party, or satisfying a late-night craving, these no-bake wonders come together in 15 minutes using just five pantry staples. Let’s create some sweet magic!
Why These Treats Will Become Your New Favorite
What makes these cereal squares stand out from standard recipes?
- The 3:2 marshmallow-to-cereal ratio creates perfect structural integrity without being too dense
- A touch of extra butter prevents that annoying hardening as treats cool
- Special mixing technique ensures every cereal piece gets coated evenly
- Innovative pressing method creates those picture-perfect sharp edges
- Customizable with endless flavor combinations for exciting variations
The Science Behind Perfect Texture
Understanding how ingredients interact helps avoid those common cereal treat pitfalls:
“When marshmallows melt completely but don’t overcook, they create a stable sugar matrix that holds cereal in place without becoming tooth-pulling tough. The fat from butter interrupts sugar crystallization—that’s why our extra tablespoon makes such a difference in texture.”
Choosing Ingredients for Maximum Flavor and Fun
While these treats are famously simple, ingredient selection makes all the difference in your final results.
The Marshmallow Matters (More Than You Think)
Fresh mini marshmallows (6 cups): The small size melts faster and more evenly than large marshmallows. Don’t substitute with marshmallow cream—the stabilizers alter the texture. Check expiration dates, as stale marshmallows lose their stretchy quality.
Butter (4 tablespoons): Use unsalted to control sweetness. The extra tablespoon beyond most recipes keeps treats softer longer. European-style cultured butter adds a delightful complexity if you want to get fancy.
Cereal Selection Secrets
Crispy rice cereal (5 generous cups): Look for the crispest variety available—generic brands often stay crunchier longer. For gluten-free versions, ensure packaging specifies this. Measure cereal just before mixing to prevent staleness.
The Flavor Enhancer
Pure vanilla extract (1½ teaspoons): Optional but highly recommended—the alcohol cooks off during mixing. Adds depth that balances the sweetness beautifully.
Pinch of fine sea salt: Don’t skip this! It amplifies all the flavors without making treats taste salty.
Essential Tools for Cereal Treat Success
Gather these kitchen helpers before you begin:
- Large Dutch oven or heavy-bottomed pot (avoid thin pans)
- Silicone spatula with sharp edges
- 9×13-inch baking pan (light metal works best)
- Parchment paper strips for easy removal
- Butter for hands and utensil prep
- Large bowl for cereal measuring
Step-by-Step: Creating Marshmallow Magic
Follow these foolproof instructions for picture-perfect cereal treats every time:
1. Prep Your Pan (This Step is Crucial!)
Lightly butter only the bottom of your baking dish—don’t coat sides. Cut two parchment paper strips: one to line the pan lengthwise (with overhang), another widthwise. This creates handles for easy lifting once treats set. The butter anchors paper without greasy residue.
2. Melt it Right: The Marshmallow Method
Using medium-low heat, melt butter first to create a protective layer against scorching. Add all marshmallows at once—resist the urge to add cereal too early. Stir constantly with a silicone spatula using folding motions rather than vigorous stirring. Properly melted marshmallows should form a completely smooth, glossy lava-like consistency with no lumps—about 4-5 minutes.
Pro tip: Remove from heat just before you think they’re done—carryover cooking completes the process.
3. The Perfect Mix: Science Meets Technique
Off heat, stir in vanilla and salt. Immediately pour cereal over marshmallow mixture—don’t reverse this! Gently fold using a cutting motion across the bottom, then folding over the top (like making soufflé). Stop when cereal is 90% coated—those last few unmixed pieces will incorporate as you press.
4. Pressing Protocol: Getting Sharp Edges
Butter your hands lightly. Turn mixture into prepped pan—don’t pour, actually turn it out in one mass. Use buttered fingertips to gently press outward toward corners first, working quickly before mixture cools. Avoid compacting—just level the surface. For professional edges, place a buttered sheet of parchment over treats and press sides with a flat measuring cup.
5. The Waiting Game (Yes, This Matters)
Let treats rest uncovered at room temperature—refrigeration makes them hard. The perfect curing time is exactly 90 minutes. Don’t cut earlier (they’ll tear) or much later (crust forms). Use a plastic knife in a gentle sawing motion for clean cuts without sticking.
Creative Variations to Spark Joy
Customize your cereal treats for any occasion with these fun twists:
Rainbow Birthday Bash Version
Use frosted cereal shapes mixed with rainbow sprinkles. Divide marshmallow mixture into batches, tint with food coloring gels, then layer colors in pan for a tie-dye effect.
Chocolate Lover’s Dream
Replace 1 cup cereal with cocoa puffs. Stir ½ cup mini chocolate chips into warm mixture after folding. Top with melted chocolate drizzle before cutting.
Cinnamon Toast Crunch Delight
Swap rice cereal for cinnamon squares. Add ½ teaspoon cinnamon to melted butter. Dust finished treats with cinnamon sugar.
Fruity Explosion
Use berry-flavored cereal. Mix in freeze-dried strawberry pieces. Add ¼ teaspoon citric acid for tangy punch.
Salted Caramel Pretzel Crunch
Add ½ cup crushed pretzels with cereal. Swirl in ¼ cup salted caramel sauce during mixing. Top with flaky sea salt.
Smart Substitutions for Dietary Needs
Need to adapt the recipe? These swaps maintain integrity while accommodating restrictions:
Vegan option: Use Dandies brand marshmallows and plant-based butter. Ensure cereal has no honey.
Gluten-free: Verify both cereal and marshmallows are certified GF (some brands use wheat-starch marshmallows).
Reduced sugar: Substitute half marshmallows with sugar-free variety (results will be less stretchy).
Corn-free: Some marshmallows use tapioca starch instead of corn syrup—look for specialty brands.
Avoid These Common Cereal Treat Disasters
Learn from others’ mistakes! Protect your treats from these pitfalls:
Cement-hard texture: Usually caused by overheating marshmallows or using cold butter. Marshmallows should never bubble vigorously—keep heat low.
Crumbly squares: Happens when marshmallows are under-melted. Test by lifting spatula—mixture should fall in thick ribbons.
Sticky fingers syndrome: Press too firmly or cut too soon. Let treats cure fully, and always coat cutting tools with cooking spray.
Soggy cereal: Marshmallow mixture too cool before mixing. Fold when still hot but not bubbling.
Burnt bottom: Using too thin of pan or high heat. Double up pans or use heat diffuser.
Pro Storage Tips for Freshness That Lasts
Make ahead with these preserving techniques:
Store completely cooled treats in airtight container layered with parchment between stacks. Room temperature keeps them soft 3-4 days. In humid climates, add a silica pack to container.
Freezing: Individually wrap squares in plastic, then place in freezer bag. Thaw overnight at room temp—never microwave.
Reviving stale treats: Place in 300°F oven for 3 minutes—just until slightly warm, not melted. Let reset before serving.
Your Cereal Treat Questions—Answered!
Why do my cereal treats always stick to the pan?
You’re likely pressing them directly into an unlined pan. The parchment handles are non-negotiable! Oil sprays can create a greasy residue—butter just the bottom before placing paper.
Can I make these treats in shapes?
Absolutely! Press mixture into greased cookie cutters set on parchment. Chill 15 minutes before carefully pushing out. Mini muffin tins work great too—grease them well.
What’s the best way to package these for gifts?
Wrap individual squares in cellophane topped with curling ribbon. For classy presentation, stand upright in mini bakery boxes with tissue paper. Surprisingly, shipping works well—pack tightly in tins with crinkled paper to prevent shifting.
Why does my mixture look lumpy?
Your heat was too high, causing butter and marshmallows to separate. Next time, maintain low steady heat. If lumps appear, add 1 teaspoon hot water and stir vigorously.
Can I add peanut butter?
Yes! Stir ¼ cup creamy peanut butter into melted butter before adding marshmallows. This lowers melting temp slightly—keep heat extra low. The result? Incredibly rich, fudgy treats.
Is it safe to let kids help with this recipe?
Perfect for children ages 6+ to participate! Assign safe tasks: measuring cereal, sprinkling add-ins, pressing mixture into pan (with buttered hands). Reserve the hot pot duties for adults only.
The Sweet Conclusion: Your New Go-To Treat
Mastering these dreamy marshmallow cereal treats means you’ll always have a crowd-pleasing dessert ready at a moment’s notice. The beauty lies in their simplicity—these inexpensive ingredients transform into something truly special with just a few smart techniques. Whether you stick with classic crispy rice or venture into creative variations, each batch offers endless opportunities for joy. That’s the magic of childhood favorites—they still taste like happiness, no matter how grown up we get. So grab that spatula and let the marshmallow therapy begin! Your kitchen (and everyone lucky enough to try these treats) will thank you.