Table of Contents
- 1 Why You’ll Love This Holiday Baked Mac and Cheese
- 2 Ingredients
- 3 Equipment You’ll Need
- 4 Step-by-Step Instructions
- 5 Flavor Profile
- 6 Tips for Perfect Holiday Mac and Cheese
- 7 Variations
- 8 Make-Ahead and Storage
- 9 Serving Suggestions
- 10 Troubleshooting
- 11 Nutritional Information (Per Serving)
- 12 FAQs
- 13 Why This Baked Mac and Cheese Belongs on Your Holiday Table
Few dishes embody pure comfort quite like baked mac and cheese — creamy, golden, and deeply satisfying with every forkful. For the holidays, it transforms from a simple weeknight favorite into a show-stopping Christmas side dish that complements everything from roast turkey to glazed vegetables.
This Creamy Baked Mac and Cheese (Holiday Pan Style) is the kind of dish that disappears first from the table. The secret lies in the luxurious cheese sauce — a velvety blend of cheddar, mozzarella, and a hint of Parmesan — layered over tender elbow macaroni and baked to bubbly perfection. The top becomes golden and slightly crisp while the inside stays creamy, smooth, and indulgently rich.
Whether you’re planning a festive Christmas dinner, a cozy family gathering, or a holiday potluck, this baked mac and cheese fits right in. It’s simple to prepare, easy to transport, and loved by both kids and adults alike. One bite and you’ll understand why it’s a timeless holiday favorite.
Why You’ll Love This Holiday Baked Mac and Cheese
Ultra-creamy texture: No dryness here — just velvety smooth, cheesy goodness.
Golden, bubbly top: Perfectly baked for that irresistible contrast of creamy and crisp.
Make-ahead friendly: Assemble ahead and bake fresh when guests arrive.
Crowd-pleaser: A classic that appeals to everyone at the table.
Perfect holiday balance: Pairs beautifully with rich mains and festive sides.
Ingredients
For this recipe, simple pantry staples come together to create something extraordinary.
For the Pasta
1 pound elbow macaroni (or cavatappi for a fancier twist)
1 tablespoon salt (for boiling water)
For the Cheese Sauce
4 tablespoons unsalted butter
4 tablespoons all-purpose flour
4 cups whole milk (warm, not cold)
1 cup heavy cream (for richness)
2 cups sharp cheddar cheese, shredded
1 cup mozzarella cheese, shredded
½ cup Parmesan cheese, finely grated
½ teaspoon garlic powder
½ teaspoon mustard powder (optional for depth)
1 teaspoon salt
½ teaspoon black pepper
For the Topping
1 cup panko breadcrumbs (optional for crispiness)
2 tablespoons melted butter
¼ cup Parmesan cheese, grated
Optional garnish: fresh parsley or chives
Equipment You’ll Need
Large pot for boiling pasta
Whisk and wooden spoon
Saucepan for the cheese sauce
9×13-inch baking dish (or similar casserole pan)
Mixing bowls
Oven-safe spatula or spoon
Step-by-Step Instructions
Step 1: Cook the Pasta
Preheat your oven to 350°F (175°C).
Bring a large pot of salted water to a boil. Add the elbow macaroni and cook 1–2 minutes less than the package directions (you want it slightly firm, or al dente).
Drain the pasta and drizzle with a touch of olive oil to prevent sticking. Set aside while you prepare the sauce.
Step 2: Make the Roux
In a large saucepan, melt the butter over medium heat. Once melted, whisk in the flour and cook for about 1 minute, stirring constantly to remove the raw flour taste. The mixture should look like a smooth paste (this is your roux).
Step 3: Add Milk and Cream
Slowly pour in the warm milk, whisking continuously to avoid lumps. Once combined, add the heavy cream. Continue whisking until the mixture thickens slightly and coats the back of a spoon — about 5–7 minutes.
Step 4: Melt in the Cheese
Reduce the heat to low. Gradually stir in the cheddar, mozzarella, and Parmesan, one handful at a time. Stir until completely melted and smooth.
Season with salt, pepper, garlic powder, and mustard powder (if using). Taste and adjust seasoning as needed.
The sauce should be thick, creamy, and beautifully glossy.
Step 5: Combine Pasta and Cheese Sauce
Pour the drained macaroni into the cheese sauce and stir until every piece is coated. The mixture should be creamy but not runny — it will thicken further as it bakes.
Step 6: Prepare the Topping
In a small bowl, combine panko breadcrumbs, melted butter, and Parmesan cheese. Mix until the crumbs are evenly coated.
Step 7: Assemble and Bake
Pour the mac and cheese mixture into your greased baking dish. Spread it evenly, then sprinkle the breadcrumb topping over the surface.
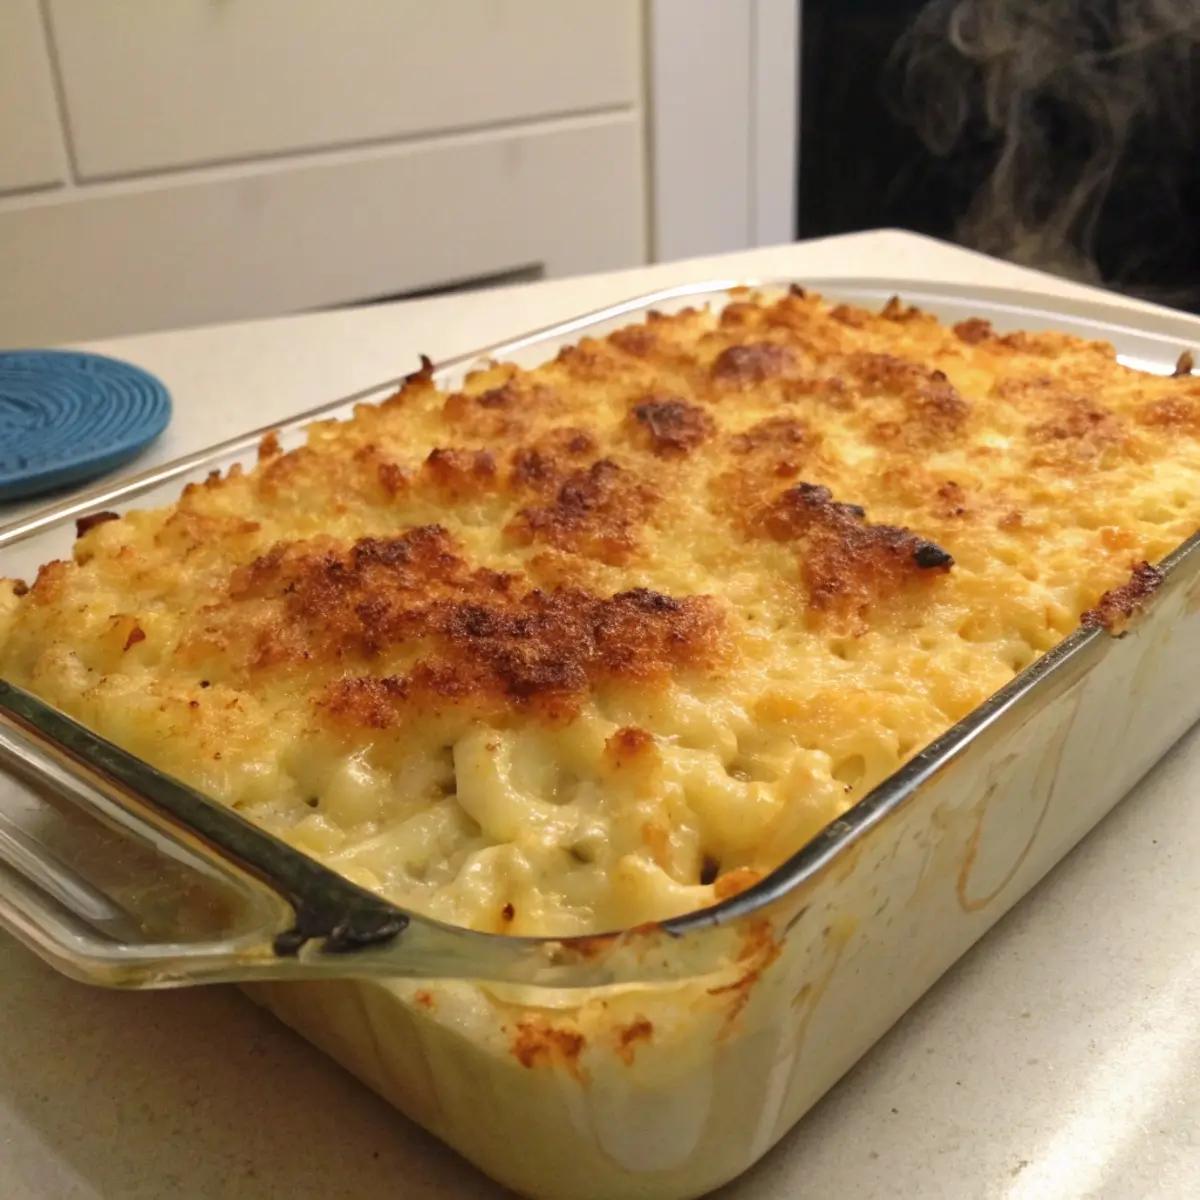
Bake in the preheated oven for 25–30 minutes, or until the top is golden brown and the edges are bubbling.
For an extra-crispy topping, broil for the last 1–2 minutes — but watch closely to prevent burning.
Step 8: Rest and Serve
Let the dish rest for 5–10 minutes before serving. This allows the sauce to set slightly, ensuring creamy, scoopable portions.
Garnish with fresh parsley or chives, and serve warm.
Flavor Profile
This creamy baked mac and cheese strikes a perfect harmony between rich, savory, and slightly nutty flavors. The cheddar adds sharpness, mozzarella gives a silky stretch, and Parmesan lends a subtle saltiness that deepens the flavor.
The topping adds a delicate crunch that balances the creaminess below. Every spoonful delivers the ultimate comfort — warm, cheesy, and unforgettable.
Tips for Perfect Holiday Mac and Cheese
Don’t overcook the pasta: Slightly undercooked macaroni ensures it doesn’t become mushy after baking.
Warm your milk: Adding cold milk to a roux can create lumps. Warm milk keeps the sauce silky.
Shred your own cheese: Pre-shredded cheeses often contain anti-caking agents that affect texture and melting.
Layer the cheese: For extra cheesiness, sprinkle a handful of cheddar between layers before baking.
Let it rest: Allowing the casserole to cool briefly before serving helps it hold its shape.
Variations
Four-Cheese Blend: Mix in Gruyère, fontina, or Monterey Jack for a gourmet twist.
Spicy Kick: Add a pinch of cayenne pepper or diced jalapeños for a subtle heat.
Vegetable Boost: Fold in roasted broccoli, peas, or spinach for a colorful holiday version.
Gluten-Free Option: Use gluten-free pasta and a gluten-free flour blend for the roux.
Cracker Topping: Replace breadcrumbs with crushed butter crackers for a nostalgic flavor.
Make-Ahead and Storage
Make-Ahead:
Assemble the mac and cheese up to 24 hours in advance, cover tightly, and refrigerate. Bake straight from the fridge, adding an extra 10 minutes to the bake time.
Storage:
Store leftovers in an airtight container in the refrigerator for up to 4 days.
Reheating:
Reheat in the oven at 350°F (175°C), covered with foil to retain moisture. Add a splash of milk before reheating to restore creaminess.
Freezing:
Freeze baked mac and cheese for up to 2 months. Thaw overnight in the fridge before reheating.
Serving Suggestions
This baked mac and cheese is wonderfully versatile and pairs with a variety of holiday mains:
Roast turkey or chicken
Beef tenderloin or prime rib
Herb-crusted salmon
Vegetarian mains like stuffed peppers or mushroom Wellington
It also pairs beautifully with sides like:
Honey-glazed carrots
Green bean almondine
Creamed spinach
Fresh Christmas salad with pears and pomegranate
For a festive presentation, serve it in your favorite ceramic baking dish with a sprinkle of fresh herbs or a dusting of extra Parmesan just before serving.
Troubleshooting
Why is my sauce grainy?
The heat may have been too high when adding cheese. Always lower the heat and add cheese gradually.
Why did my mac and cheese turn out dry?
It may have been baked too long or used too little sauce. Keep the sauce generous and watch baking time carefully.
Can I skip the topping?
Yes, it’s optional. The dish is just as creamy and delicious without it, though the crunch adds texture.
Can I double this recipe?
Absolutely! Double all ingredients and bake in two pans or a large deep casserole for big gatherings.
Nutritional Information (Per Serving)
| Nutrient | Amount |
|---|---|
| Calories | 480 |
| Fat | 28g |
| Carbohydrates | 34g |
| Protein | 22g |
| Fiber | 1g |
| Sodium | 580mg |
(Approximate values; vary with ingredients.)
FAQs
Can I use a different type of pasta?
Yes! Cavatappi, shells, or penne work well since they hold the sauce beautifully.
What’s the best cheese combination for baked mac and cheese?
Sharp cheddar is classic, but blending it with mozzarella and Parmesan creates the ultimate creamy balance.
Can I make this recipe without heavy cream?
You can replace it with more milk, but the heavy cream adds an extra level of richness.
How do I keep mac and cheese creamy when reheating?
Stir in a splash of milk or cream before reheating and cover with foil to prevent drying out.
Can I add toppings besides breadcrumbs?
Yes! Try crushed crackers, fried onions, or even a sprinkle of crushed pretzels for something unique.
Why This Baked Mac and Cheese Belongs on Your Holiday Table
The holidays are all about comfort, warmth, and indulgence — and few dishes capture that better than creamy baked mac and cheese. Its golden crust and velvety interior make it not just a side dish, but a statement of love and tradition.
Every spoonful brings together nostalgia and celebration, offering both familiarity and richness. It pairs beautifully with festive roasts, bright vegetables, and every flavor of Christmas.
This is the dish that unites generations — the one everyone remembers long after the plates are cleared. Whether served as a comforting companion to your Christmas main course or as a star at a holiday potluck, Creamy Baked Mac and Cheese (Holiday Pan Style) is guaranteed to earn a permanent spot in your festive lineup.