Table of Contents
- 1 Why Gift-Ready Desserts Matter
- 2 What Makes Chocolate Covered Strawberries Look Polished
- 3 Ingredients for Gift-Ready Chocolate Covered Strawberries
- 4 Selecting Strawberries That Look Their Best
- 5 Preparing Strawberries for a Clean Finish
- 6 Melting Chocolate for a Glossy, Smooth Coating
- 7 Dipping Strawberries with Precision
- 8 Keeping the Look Clean and Simple
- 9 Optional Minimal Decorations
- 10 Letting the Chocolate Set Properly
- 11 Arranging Strawberries to Look Gift-Ready
- 12 Packaging Ideas for Gifting
- 13 Perfect Occasions for Gift-Ready Strawberries
- 14 Pairing with Other Gift-Friendly Treats
- 15 Scaling the Recipe Without Losing Quality
- 16 Common Mistakes That Affect Appearance
- 17 Storage Tips for Best Presentation
- 18 Why This Recipe Works So Well
- 19 Frequently Asked Questions
- 20 Making Simple Desserts Feel Thoughtful
- 21 Final Thoughts
Some desserts feel personal the moment you see them. Chocolate covered strawberries are one of those treats, especially when they’re finished with a clean, glossy coating and arranged with care. They don’t need elaborate decorations or complex techniques to feel special. When done thoughtfully, they look polished, elegant, and completely gift-ready.
These chocolate covered strawberries are designed to look beautiful straight out of your kitchen. Whether you’re preparing a small homemade gift, contributing to a dessert table, or creating something thoughtful for a quiet celebration, this recipe focuses on smooth chocolate, neat presentation, and simple steps that deliver professional-looking results.
This guide walks you through everything you need to know to make chocolate covered strawberries that look intentional and elevated while remaining easy enough for everyday home preparation.
Why Gift-Ready Desserts Matter
Gift-ready desserts communicate care. They say someone took time to make something by hand, even when the process itself is simple. Chocolate covered strawberries strike that balance perfectly.
They work so well as gifts because they are:
Visually appealing without needing decoration overload
Easy to portion and share
Universally liked
Fresh and vibrant in color
Elegant but approachable
A neat row of glossy strawberries feels thoughtful before the first bite is even taken.
What Makes Chocolate Covered Strawberries Look Polished
The difference between everyday chocolate covered strawberries and gift-ready ones comes down to a few key details:
Smooth, even chocolate coating
Minimal dripping or pooling
Clean edges near the stem
Consistent size and spacing
Simple presentation
This recipe emphasizes those details without adding complexity, so the final result looks refined but still homemade.
Ingredients for Gift-Ready Chocolate Covered Strawberries
Keeping the ingredient list short allows quality and technique to shine.
Main Ingredients
1 pound fresh strawberries
8 to 10 ounces semi-sweet chocolate
Optional Enhancements
White or milk chocolate for light drizzling
A very small pinch of flaky salt for contrast
Optional additions are subtle and should never overpower the clean look.
Selecting Strawberries That Look Their Best
Strawberries are the foundation of this dessert’s appearance. Choosing the right ones makes a noticeable difference.
Look for strawberries that are:
Firm and evenly shaped
Bright red with no pale areas
Free from bruises or soft spots
Medium to large in size
Fresh with green stems intact
Uniform strawberries create a cohesive, gift-ready appearance when arranged together.
Preparing Strawberries for a Clean Finish
Preparation is simple but essential for a polished result.
Gently rinse strawberries under cool water.
Pat completely dry with paper towels, paying close attention to the stem area.
Leave stems on to act as natural handles and visual accents.
Allow strawberries to rest at room temperature for several minutes before dipping.
Dry, room-temperature strawberries help the chocolate adhere smoothly and evenly.
Melting Chocolate for a Glossy, Smooth Coating
The chocolate finish is what gives these strawberries their gift-ready appearance. Gentle melting is key.
Microwave Method
Chop chocolate into small, even pieces.
Place chocolate in a microwave-safe bowl.
Heat in 20–30 second intervals, stirring between each round.
Stop heating once most of the chocolate is melted and stir until fully smooth.
Stovetop Method
Place chocolate in a heatproof bowl over simmering water.
Stir constantly until melted and glossy.
Remove from heat and stir gently to maintain smoothness.
Avoid overheating, which can dull the finish and affect texture.
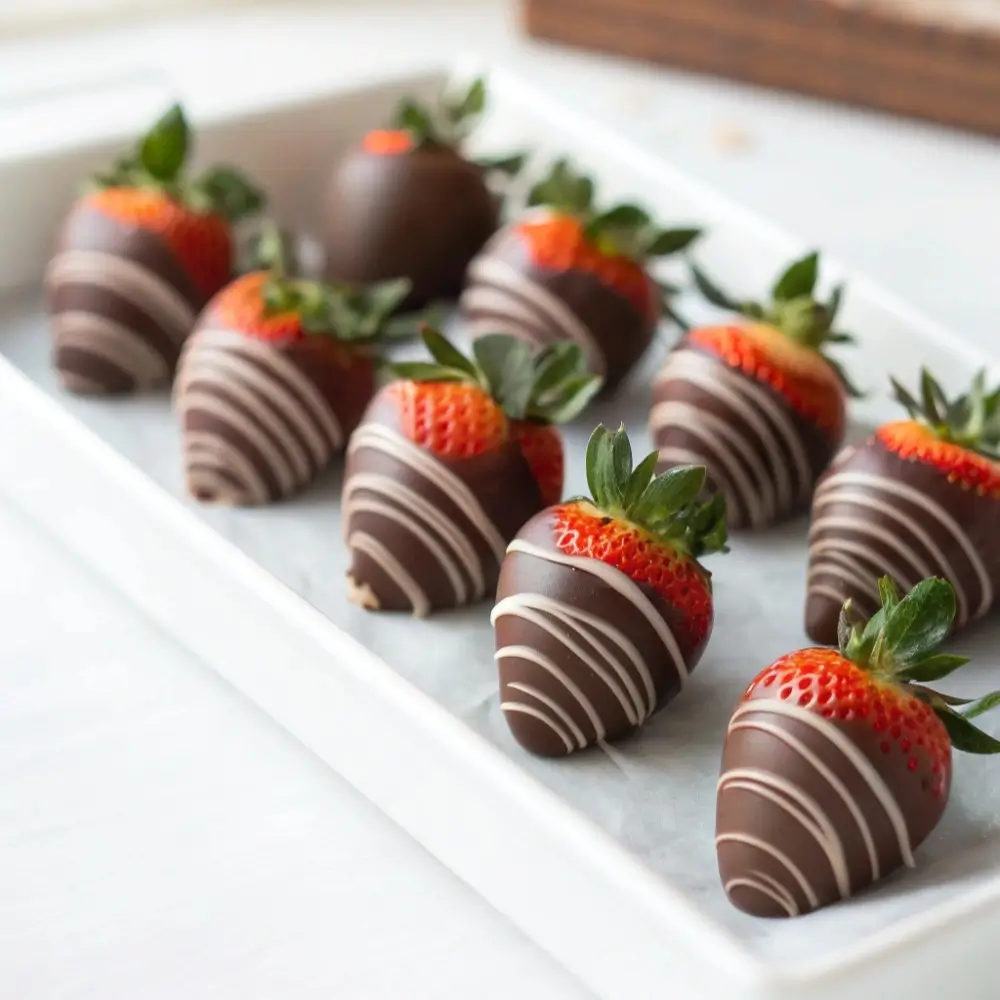
Dipping Strawberries with Precision
Dipping technique plays a major role in achieving a neat appearance.
Hold each strawberry by the stem.
Dip into the melted chocolate, rotating gently to coat evenly.
Lift the strawberry and let excess chocolate drip back into the bowl.
Place on parchment paper with enough space between each berry.
The goal is an even coating that highlights the strawberry’s shape.
Keeping the Look Clean and Simple
To maintain a gift-ready appearance:
Avoid thick chocolate layers
Do not tap strawberries aggressively to remove excess chocolate
Let chocolate settle naturally
Skip heavy toppings or decorations
Restraint is what creates elegance here.
Optional Minimal Decorations
If you want a slight visual accent without clutter:
Add a thin drizzle of white chocolate
Sprinkle a very light pinch of flaky salt
Leave some strawberries plain for contrast
Minimal variation keeps the overall presentation cohesive.
Letting the Chocolate Set Properly
Proper setting ensures strawberries stay neat and glossy.
Let strawberries rest at room temperature for 15 minutes
For quicker results, refrigerate for 5–10 minutes
Avoid touching until the chocolate is fully set
Once set, the chocolate should look smooth and clean, not streaked or dull.
Arranging Strawberries to Look Gift-Ready
Presentation matters just as much as preparation.
Try these simple arrangement ideas:
Line strawberries in a single row on a platter
Arrange in a circular pattern with stems facing outward
Place in small groups with space between each berry
Use neutral-colored plates or trays
Clean spacing makes each strawberry feel intentional.
Packaging Ideas for Gifting
These strawberries look gift-ready with very minimal packaging.
Place them in a small box lined with parchment paper
Arrange in a single layer to avoid smudging
Keep packaging simple and neutral
Avoid stacking strawberries directly on top of each other
Simple packaging highlights the strawberries rather than distracting from them.
Perfect Occasions for Gift-Ready Strawberries
These chocolate covered strawberries work beautifully for:
Homemade thank-you gifts
Small celebrations
Thoughtful surprises
Dessert tables
Casual hosting
They adapt easily to many settings while always feeling special.
Pairing with Other Gift-Friendly Treats
If you’re building a small dessert box or table, pair these strawberries with:
Simple cookies or biscuits
Fresh fruit
Small chocolates or truffles
Light pastries
The strawberries often become the visual centerpiece.
Scaling the Recipe Without Losing Quality
Chocolate covered strawberries scale easily.
Small gift: 6–8 strawberries
Medium gift or gathering: 12–20 strawberries
Dessert table: 3–4 strawberries per guest
Work in batches if needed to maintain a smooth dipping process.
Common Mistakes That Affect Appearance
Avoid these mistakes to keep strawberries gift-ready:
Using damp strawberries
Overheating chocolate
Crowding strawberries while setting
Touching chocolate before it hardens
Overdecorating
Attention to small details preserves the clean, polished look.
Storage Tips for Best Presentation
For short-term storage:
Store strawberries in a single layer in an airtight container
Refrigerate until ready to serve or gift
Remove a few minutes before serving to soften slightly
Chocolate covered strawberries are best enjoyed fresh.
Why This Recipe Works So Well
This recipe works because it focuses on technique, not complexity. By choosing good strawberries, melting chocolate gently, and keeping decoration minimal, you create a dessert that looks intentional and refined without stress.
The result is a treat that feels thoughtful, polished, and ready to share.
Frequently Asked Questions
How far in advance can I make these?
They can be made up to 24 hours ahead when stored properly.
Do I need special tools to make them look professional?
No. Simple kitchen tools are enough.
What type of chocolate works best?
Semi-sweet chocolate provides the best balance of flavor and appearance.
How do I keep the chocolate shiny?
Use dry strawberries and avoid overheating the chocolate.
Are these suitable for gifting?
Yes. Their clean finish makes them ideal for homemade gifts.
Making Simple Desserts Feel Thoughtful
Chocolate covered strawberries show how small details can transform a simple recipe into something meaningful. Smooth chocolate, fresh fruit, and careful presentation create a dessert that feels personal without being complicated.
They remind us that homemade gifts don’t need to be extravagant to be appreciated.
Final Thoughts
Chocolate covered strawberries that look gift-ready are proof that elegance can be simple. With a smooth, glossy coating and clean presentation, they feel polished, thoughtful, and perfect for sharing.
Whether you’re gifting them, serving them at a gathering, or enjoying them yourself, this recipe delivers beauty and flavor with minimal effort. A timeless treat that always feels just right.


