Table of Contents
Why These BBQ Grilled Chicken Thighs Are a Summer Must
When the sun climbs higher and the grill fires up, many of us start dreaming of tender meat that practically falls off the bone with every bite. The secret to achieving that coveted juiciness often lies in the choice of cut, the balance of seasoning, and a coating that locks in moisture while delivering a deep, smoky flavor. Bone‑in, skin‑on chicken thighs have earned a reputation for being forgiving—they stay moist even if you linger a few extra minutes on the grill, and their natural fat renders into the meat, creating a buttery richness that makes every forkful satisfying. Pair that with a well‑crafted rub and a brush of sticky, caramelized BBQ sauce, and you have a dish that not only looks impressive on a picnic table but also delivers a depth of flavor that keeps neighbors coming back for seconds. Whether you’re hosting a backyard barbecue, planning an intimate family dinner, or simply craving a comforting meal after a long day, these grilled thighs promise a sensory experience that feels both familiar and exciting.
Understanding the Ingredients
Before you gather everything you need, it helps to understand what each component brings to the final dish. This knowledge empowers you to tweak flavors confidently without fearing you’ll lose the essence of the recipe.
Chicken Thighs
Chicken thighs are richer in fat and connective tissue compared to breasts, which translates to more moisture and flavor when grilled. Look for bone‑in pieces if you enjoy a hearty bite; the bone conducts heat evenly, ensuring the meat cooks consistently. If you prefer a completely boneless experience, you can still use boneless thighs—just adjust cooking time slightly, as they cook faster.
Brown Sugar
A modest amount of brown sugar is the backbone of a caramelized glaze. It adds a light, molasses‑like sweetness that complements the savory spices while helping the sauce adhere to the meat. Too much sugar can cause burning on a hot grill, so balance it with acids and herbs to keep the flavor in harmony.
Paprika
A good quality smoked paprika imparts a deep, earthy smokiness that mimics the taste of a wood‑fired pit. It also contributes a vibrant red‑orange hue, making the finished marinade visually appealing. Choose sweet paprika if you enjoy a milder flavor or go for hot smoked paprika for a subtle kick.
Garlic and Onion Powder
These two pantry staples provide savory depth without overpowering the delicate chicken flavor. Garlic offers a pungent, aromatic note, while onion powder adds a subtle sweetness that rounds out the seasoning profile.
Ground Black Pepper
Freshly cracked black pepper delivers a gentle heat that awakens the palate. It works synergistically with the other spices, enhancing the overall taste without dominating it.
Salt
A pinch of kosher salt is essential. It not only seasons the meat from the inside out but also assists in drawing out surface moisture, allowing the rub to cling better and creating a better crust when grilled.
Olive Oil
Oil acts as a carrier for the spices, ensuring they coat each piece of chicken evenly. It also helps conduct heat during grilling, facilitating an even sear. If you’re sensitive to strong flavors, a neutral oil like canola works just as well.
Barbecue Sauce
A thick, tangy BBQ sauce acts as the final brush of flavor. Look for a sauce with a balance of sweetness, acidity, and a hint of spice. If you’d rather control the flavor yourself, you can blend tomato paste, apple cider vinegar, molasses, and a splash of Worcestershire‑style seasoning (ensure it’s alcohol‑free) to craft a personalized glaze.
Fresh Herbs for Garnish
A sprinkle of chopped parsley or cilantro adds a fresh pop of color that makes the dish visually appealing on a serving platter. It also introduces a subtle herbal note that lifts the richness of the chicken.
Optional Heat Elements
If you like a little fire, consider adding a pinch of cayenne pepper or a few dashes of hot sauce to the rub. This can give the chicken a lively bite that pairs beautifully with the smoky undertones.
Step‑by‑Step Preparation
Ready to bring this mouth‑watering vision to life? Follow these clear, beginner‑friendly steps, and you’ll have succulent, flavorful chicken thighs ready for the grill in no time.
1. Gather and Prep Your Materials
Start by preheating your grill to medium‑high heat, around 375–400°F. If you’re using a charcoal grill, arrange the coals for indirect heat to prevent flare‑ups. Set up a clean cutting board, a large mixing bowl, tongs, and a basting brush. Having everything within arm’s reach keeps the process smooth and enjoyable.
2. Combine the Dry Rub
In the mixing bowl, whisk together the brown sugar, smoked paprika, garlic powder, onion powder, ground black pepper, and salt. Make sure the mixture is uniform—any clumps could cause uneven seasoning. If you’re adding cayenne for heat, now is the moment to stir it in.
3. Coat the Chicken
Pat the chicken thighs dry with paper towels. This step is crucial; dry skin allows the rub to adhere better and helps the skin crisp up. Drizzle a thin layer of olive oil over the thighs, then sprinkle the dry rub generously on both sides. Use your hands to massage the seasoning into the meat, ensuring every crevice is covered. Let the seasoned chicken rest for about 15 minutes. This short pause allows the salt to penetrate the meat, enhancing flavor and moisture retention.
4. Craft the BBQ Glaze
In a separate small saucepan, combine your chosen BBQ sauce with a splash of apple cider vinegar and a tablespoon of brown sugar. Warm the mixture over low heat, stirring occasionally, until it becomes glossy and slightly thickened. This gentle heating helps the sugar caramelize without burning, giving the glaze a richer texture. Remove from heat and set aside for basting.
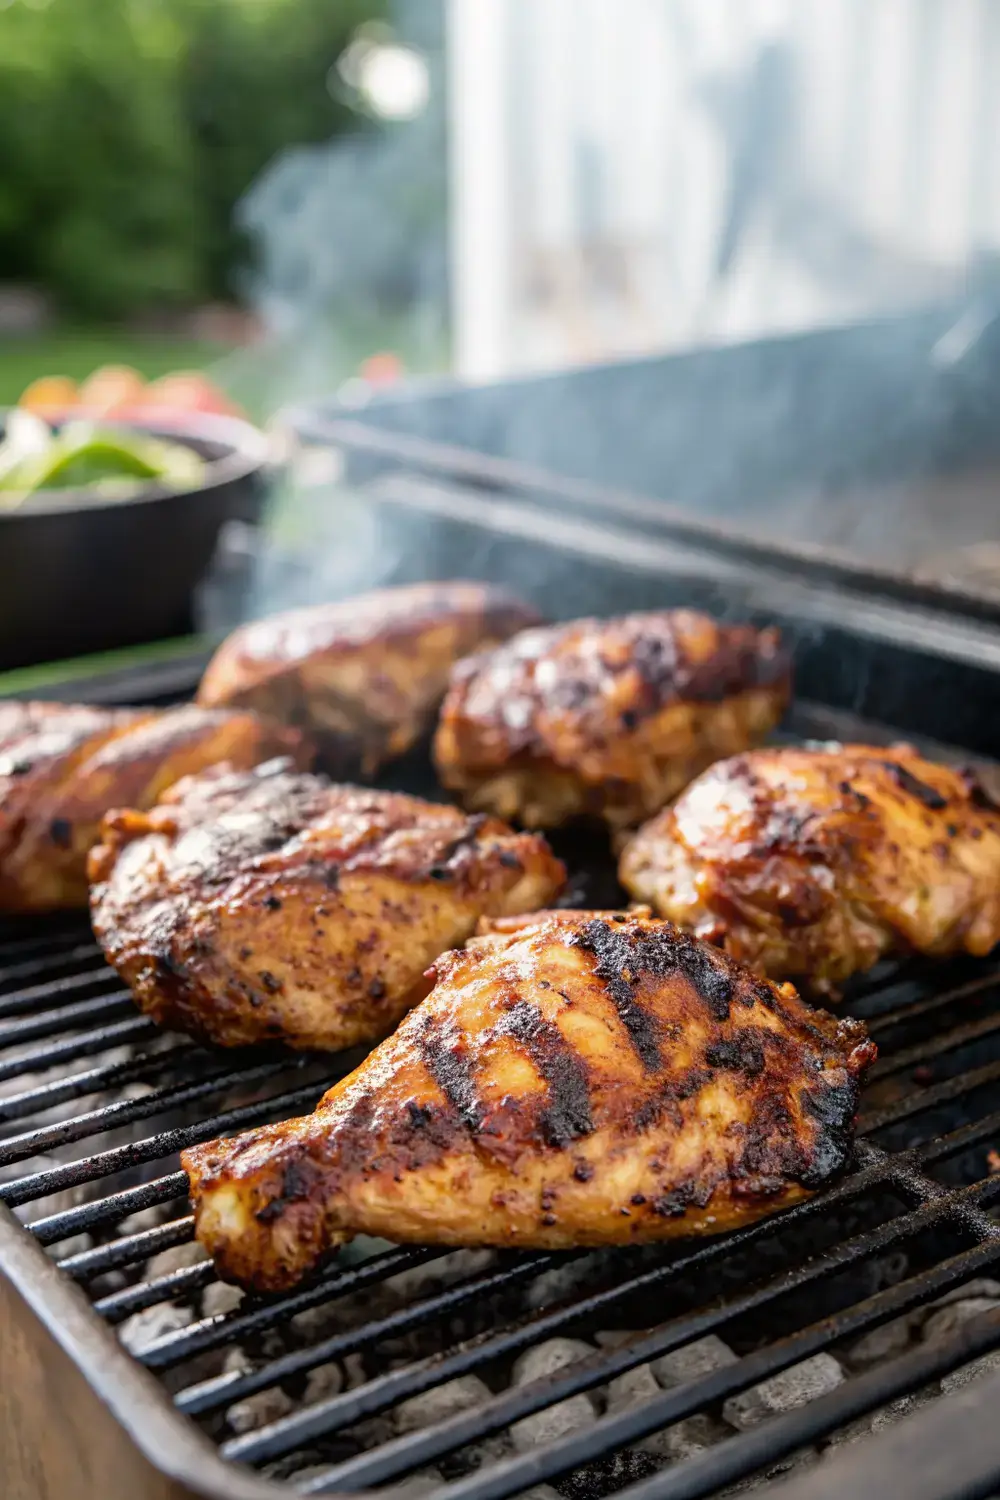
5. Grill Time – The First Side
Place the chicken thighs, skin side down, directly over the grill’s hottest zone. Close the lid and let them sear for about 5–6 minutes. You’ll hear a satisfying sizzle as the heat hits the skin. Resist the urge to move the pieces; a good sear forms a caramelized crust that locks in juices. Flip the thighs using tongs and move them to a cooler part of the grill, creating an indirect cooking zone.
6. Apply the Glaze and Finish Cooking
Begin basting the chicken every 3–4 minutes, brushing on a thin layer of the BBQ glaze each time. This gradual layering builds depth without overwhelming the meat. Continue cooking on indirect heat for another 15–20 minutes, or until the internal temperature reaches 165°F on a meat thermometer. The skin should be beautifully charred, and the glaze will have thickened into a sticky, amber coating.
7. Rest Before Serving
Transfer the cooked thighs to a clean plate and let them rest for five minutes. Resting allows the juices to redistribute, ensuring each bite stays moist. While the meat rests, you can sprinkle a handful of fresh herbs over the top for a burst of color and freshness.
8. Serve and Enjoy
Arrange the thighs on a serving platter, perhaps alongside grilled vegetables or a crisp coleslaw for balance. Watch as guests indulge in the tender, flavorful meat, and feel proud knowing you crafted a dish that captures the spirit of summer grilling.
Flavor Variations and Smart Substitutions
Even seasoned cooks love to experiment, and these thighs provide a flexible canvas for creative twists.
Citrus‑Infused Twist
Add zest from a lemon or orange to the dry rub for a bright, aromatic lift. The citrus notes balance the richness of the chicken and complement the smoky paprika beautifully.
Herb‑Heavy Profile
Mix in dried thyme, rosemary, and oregano with the rub for a Mediterranean flair. These herbs introduce earthy undertones that pair well with grilled vegetables and rustic breads.
Spicy Kick
Stir in a teaspoon of chipotle chili powder into the rub for a deep, smoky heat. If you’re sensitive to heat, start with a pinch and adjust gradually.
Southern‑Style Sweetness
Replace half the brown sugar with honey or maple syrup in the glaze. This creates a sweeter, richer coating that caramelizes beautifully on the grill.
Allergy‑Friendly Adjustments
If you’re avoiding certain ingredients, you can swap olive oil for avocado oil, use a gluten‑free BBQ sauce, or replace brown sugar with coconut sugar. The recipe remains robust and flavorful regardless of these changes.
Storing Leftovers and Reheating Like a Pro
One of the best parts of making a big batch of these chicken thighs is having leftovers for future meals. Proper storage preserves flavor and safety.
Refrigeration
Place cooled thighs in an airtight container and store them in the refrigerator for up to four days. To keep the meat moist, consider adding a thin drizzle of extra BBQ sauce before sealing the container.
Freezing
If you need to store them longer, wrap each thigh tightly in plastic wrap followed by aluminum foil before putting them in a freezer‑safe bag. This method prevents freezer burn and extends shelf life to three months. Label the bag with the date for easy tracking.
Reheating on the Stovetop
When reheating, avoid the microwave, which can dry out the meat. Instead, place the thighs in a skillet over medium heat, add a splash of water or broth, and cover with a lid. Heat for a few minutes, turning occasionally, until the internal temperature reaches 165°F again.
Reheating in the Oven
Preheat the oven to 300°F, arrange the thighs on a baking sheet, and add a thin layer of sauce. Cover loosely with foil and bake for about 15‑20 minutes, or until warmed through. This method gently revives the juicy texture without overcooking.
Reheating on the Grill
For a quick, outdoor revival, place the thighs on a preheated grill over indirect heat, brush with extra sauce, and grill for 5‑7 minutes, turning once. The gentle heat restores the smoky char while heating the meat evenly.
Common Mistakes to Dodge
Even with a solid recipe, certain pitfalls can sabotage the final result. Awareness of these errors will help you avoid them and guarantee a flawless grilling experience.
Skipping the Dry‑Pat Step
Moist surface prevents the rub from sticking. Take the extra minute to pat the chicken dry—your grill will thank you.
Overcrowding the Grill
Placing too many pieces at once reduces grill temperature, leading to steaming rather than searing. Cook in batches if necessary to maintain a hot cooking environment.
Constant Flipping
Allowing the meat to develop a crust requires patience. Resist the urge to turn it every minute; let each side brown beautifully before moving it.
Burning the Glaze
Barbecue sauces with high sugar content can scorch quickly over direct heat. Use indirect grilling for the glazing phase or brush the sauce only after moving the chicken to a cooler part of the grill.
Neglecting a Meat Thermometer
Guessing doneness can result in undercooked or dried‑out chicken. A quick probe reading ensures the meat reaches the safe 165°F internal temperature without overexposure.
Skipping the Resting Period
Cutting into the meat immediately releases precious juices, leading to a drier bite. Let the thighs rest for a short period to lock in moisture.
Frequently Asked Questions
Can I use boneless chicken breasts instead of thighs?
Absolutely. Boneless breasts cook faster, so reduce the total grilling time to about 12‑15 minutes on indirect heat, basting as you go. Keep an eye on the internal temperature to prevent drying.
What if I don’t have smoked paprika?
You can substitute regular sweet paprika for a milder flavor and add a dash of liquid smoke to achieve a smoky note. Ensure the liquid smoke is used sparingly—just a few drops are enough.
How do I keep the grill from sticking?
Preheat the grill grates thoroughly and lightly oil them using a paper towel dipped in oil before placing the chicken. A well‑preheated grill naturally releases most foods once they’re properly seared.
Is there a vegetarian version of this glaze?
Yes! Apply the glaze to thick‑cut vegetables such as portobello mushrooms, eggplant, or cauliflower steaks. Grill them using the same indirect method, basting frequently to build that sweet, sticky coating.
Can I make a milder sauce for kids?
Certainly. Reduce the amount of hot sauce or cayenne in the glaze and add a splash of extra apple cider vinegar to brighten the flavor without overwhelming heat.
What sides pair best with these grilled thighs?
Classic summer sides like corn on the cob, grilled zucchini, a crisp potato salad, or a fresh coleslaw complement the rich flavors beautifully. Choose options that add crunch and freshness to balance the meal.
Putting It All Together
When you combine a well‑seasoned rub, a glossy BBQ glaze, and perfect grill technique, you end up with chicken thighs that are succulent, smoky, and irresistibly flavorful. The recipe’s flexibility invites you to experiment—whether you’re adding a citrus zing, spicing things up, or keeping it simple for a family dinner. By following the steps meticulously, respecting cooking times, and allowing the meat to rest before serving, you ensure that every bite delivers that sought‑after juiciness that makes BBQ a beloved seasonal tradition. Whether you’re feeding a crowd on a sunny patio or savoring a quiet night on the deck, these grilled chicken thighs promise a satisfying, flavorful experience that celebrates the essence of summer grilling without any prohibited ingredients. Enjoy the process, relish the aromas, and let the memories of each gathering linger long after the grill has cooled.


