Table of Contents
- 1 Why This Swirled Frosting Sugar Cookie Fudge Stands Out
- 2 Ingredients & Notes
- 3 Tools You’ll Need
- 4 Step‑by‑Step Instructions
- 5 Tips for Best Results
- 6 Variation Ideas & Customizations
- 7 Presentation & Serving Ideas
- 8 Frequently Asked Questions (FAQs)
- 9 Why This Recipe Belongs on Your Holiday Dessert Board
Imagine the buttery softness of sugar cookie dough, turned into a luscious fudge, then topped with swooping ribbons of colored frosting that look like frosting from a high‑end bakery. This dessert merges comfort, elegance, and visual wow‑factor all in one. Here’s what makes it special:
No‑bake and simple—just stovetop prep and chill, no oven required.
Visual elegance—the swirled frosting gives it a boutique dessert look.
Flavorful indulgence—base of vanilla sugar cookie fudge enhanced by frosting contrast.
Share‑worthy and gift‑worthy—perfect for holiday parties, cookie swaps, or gifting.
Customizable—change the frosting colour, swirl pattern or add mix‑ins for your theme.
It takes your standard fudge up a notch, both in taste and presentation, letting you serve something memorable without complex baking.
Ingredients & Notes
Below is the ingredient list for a standard batch yielding about 16‑20 squares, plus notes to ensure excellent results.
Ingredients
12 oz (approximately 340 g) white chocolate chips or finely chopped white chocolate
1 (14 oz) can sweetened condensed milk
¼ cup unsalted butter
2 teaspoons pure vanilla extract
¼ teaspoon almond extract (optional, for sugar‑cookie dough flavour)
½ teaspoon salt
1 cup mini sugar cookie chunks (roughly crushed sugar cookies)
Frosting Swirl:
½ cup ready‑made vanilla buttercream frosting (store‑bought or homemade)
Food colouring (pastel pink, light blue or mint green – your choice)
Optional topping: pastel sprinkles or crushed sugar cookies
Ingredient Notes
White chocolate: Use good quality white chocolate rather than cheap “candy melts” for smoother texture.
Sweetened condensed milk: Provides the base of richness and sets without needing special equipment.
Butter: Adds richness and enhances the sugar‑cookie flavour.
Vanilla and almond extracts: Vanilla is essential; almond gives that cookie‑dough nuance.
Salt: A small amount helps balance the sweetness and make flavours pop.
Mini sugar cookie chunks: Adds bite and reinforces the cookie‑inspired concept.
Frosting swirl: Using pre‑made frosting keeps things easy, and colours add visual appeal.
Food colouring: Use gel food colouring to avoid adding too much liquid to the fudge.
Tools You’ll Need
8″×8″ or 9″×9″ square baking pan
Parchment paper or foil to line the pan with overhang for easy removal
Medium saucepan
Heat‑proof spatula or rubber scraper
Sharp knife for cutting squares
Measuring cups and spoons
Two small bowls for frosting swirl mixing
Step‑by‑Step Instructions
Here’s how to create your swirled frosting sugar cookie fudge from start to finish.
Step 1: Prepare the Pan
Line your baking pan with parchment paper or foil, making sure you have an overhang on two sides so you can easily lift the fudge out. Lightly grease the paper with a bit of butter or non‑stick spray.
Step 2: Melt the Base Mixture
In a medium saucepan over low to medium‑low heat, melt the butter.
Add the sweetened condensed milk and stir gently until warm.
Add the white chocolate chips or chopped white chocolate. Stir continuously until fully melted and smooth.
Remove from heat as soon as smooth to avoid overheating or seizing.
Step 3: Flavor and Add Mix‑Ins
Stir in the vanilla extract, almond extract (if using), and salt.
Gently fold in the mini sugar cookie chunks so they’re evenly distributed but still retain some texture.
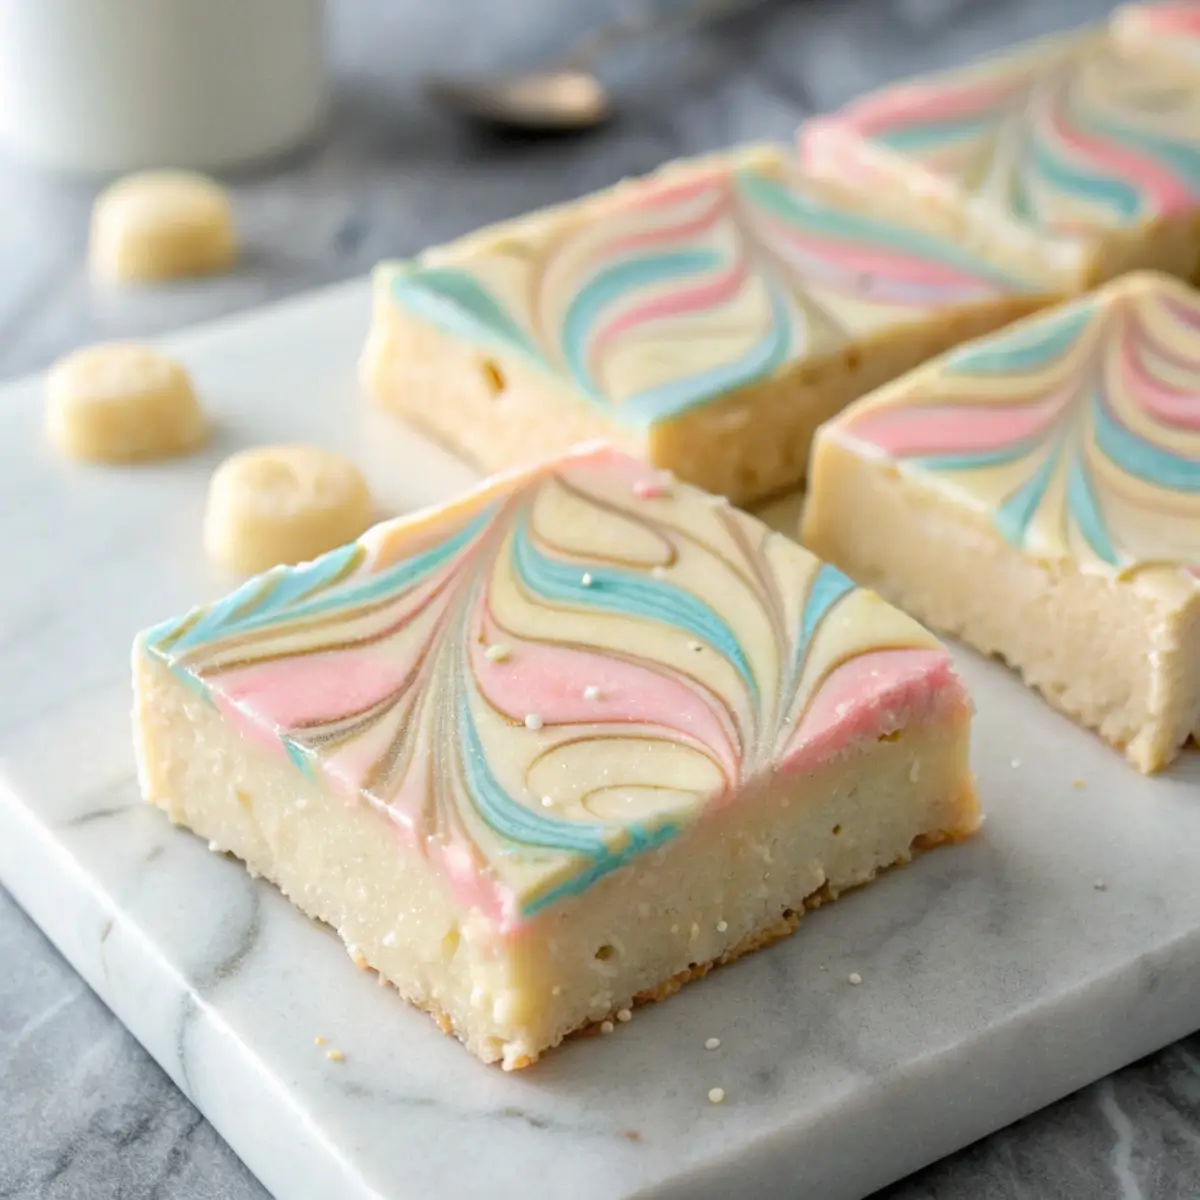
Step 4: Transfer to Pan & Create the Frosting Swirl
Pour the fudge mixture into the prepared pan. Smooth the top with a spatula.
In a small bowl, divide the buttercream frosting into two portions. Tint each portion with your chosen pastel food colouring (e.g., pink and mint).
Drop small dollops of each coloured frosting over the surface of the fudge — about ten to twelve dollops.
Using a toothpick or skewer, gently swirl the colours into the fudge surface in a loose figure‑eight or random swirl pattern. Don’t over swirl—just enough to create marbled visual.
Sprinkle pastel sprinkles or crushed sugar cookies over the top if desired, pressing in lightly.
Step 5: Chill & Set
Cover the pan loosely, then refrigerate for at least 2‑3 hours, or better yet overnight, until the fudge is firm to the touch.
Step 6: Cut and Serve
Use the parchment overhang to lift the fudge block out of the pan.
Use a sharp knife (warm the blade under hot water and dry it for cleaner cuts).
Cut into 1½‑inch or desired sized squares.
Serve on a dessert platter or wrap them individually for gifting.
Tips for Best Results
Use low but steady heat when melting the white chocolate to prevent graininess.
Ensure your saucepan and spatula are completely dry—any moisture can cause white chocolate to seize.
Line your pan properly to avoid sticking and to lift the fudge easily.
Use gel food colouring for the frosting so you don’t add extra liquid.
When swirling the frosting, use a gentle hand—too much swirling can muddy the colours.
Chill fully—cutting too soon can lead to messy squares.
For clean slicing, wipe the knife between cuts and warm it to help.
Storing & gifting: keep fudge in an airtight container with wax or parchment between layers. If room‑temp is cool (<70 °F) you can store 1–2 days; otherwise refrigerate.
Variation Ideas & Customizations
Peppermint version: Use a drop of peppermint extract instead of almond and top with crushed candy canes.
Cookies & cream twist: Stir in crushed chocolate sandwich cookies instead of sugar cookies and use white chocolate base as above.
Nut‑infused: Add ½ cup chopped roasted pistachios or almonds along with the cookie chunks for added texture.
Vanilla‑bean luxe: Use scraped seeds from one vanilla bean instead of extract for a speckled, gourmet look.
Mini fudge bites: Use a mini‑muffin tin to make bite‑sized pieces—adjust chilling time shorter.
Layered look: After pouring half the base fudge, chill partially, then pour remaining fudge tinted pale pink, chill again and swirl for layered colour effect.
Gluten‑free version: Ensure sugar cookies and sprinkles are certified gluten‑free.
Vegan version: Use vegan white chocolate, a coconut‑based condensed milk substitute, and plant‑based butter/frosting.
Presentation & Serving Ideas
Place fudge squares on a marble or slate dessert board with holiday sprinkles and faux snow decor for a stylish display.
Wrap small bundles of squares in clear cellophane bags tied with ribbon for edible gifts or party favors.
Use tiered cake stands to present multiple layers of sweets, with fudge mixed among cookies and other treats.
Display with coffee or hot cocoa station—the vanilla fudge pairs beautifully with warm drizzle of caramel or mocha.
Offer fudge tasting plates with assorted versions (classic, peppermint, cookies & cream) for a festive dessert experience.
Frequently Asked Questions (FAQs)
Is this recipe truly no‑bake?
Yes—no oven baking required. The fudge is made entirely on the stove and then chilled to set.
How long will this fudge last?
Stored in an airtight container in the refrigerator, it stays fresh for up to 7 days. At room temperature (in a cool room) it holds for 2‑3 days.
Can I freeze the fudge?
Yes. Wrap the block in plastic wrap and then foil, and freeze for up to 3 months. Thaw in the fridge before slicing.
Why did my white chocolate fudge grain or separate?
White chocolate is sensitive to heat and moisture. Ensure your pan is dry, maintain low heat, and stir constantly. Also don’t add too much liquid.
Do the cookies in the fudge go soggy?
If you crush the cookies into small chunks and ensure proper chilling, they retain slight texture. Coarse chunks work best; avoid overly large pieces.
Can I skip the frosting swirl?
Yes—you can leave off the swirl for a simpler version. You might then top with crushed sugar cookies or sprinkles instead.
What size should I cut the squares?
Typically 1 to 1½‑inch squares yield about 16‑20 pieces from an 8″×8″ pan. You can adjust size based on portion needs.
Can I use different colour frosting?
Absolutely! Pick colours to match your holiday theme: pastel blue, mint green, gold, silver—whatever suits your event.
Why This Recipe Belongs on Your Holiday Dessert Board
In a season of rolled cookie dough, cut shapes, chilled icing and intricate bake‑steps, this sugar cookie fudge with frosting swirl offers something refreshingly simple yet elegant. It gives you:
Effortless style — swirls and colors impress without advanced technique.
Indulgent flavor — sugar cookie meets rich white chocolate fudge.
Versatility — suitable for gifting, snack tables, cookie swaps or dessert platters.
Minimal bake time — freeing your oven for mains, pies or other priorities.
Crowd appeal — looks like a fancy bakery treat but is made in your own kitchen.
If you want a holiday dessert that feels both homemade and high‑impact, this recipe delivers. It stands out, delights the eyes, pleases the palate, and can be prepared ahead of time so you’re ready when guests arrive.


