Table of Contents
- 1 ✅ Why You’ll Love These Spicy Dilly Beans
- 2 🌶️ What Are Spicy Dilly Beans?
- 3 🛒 Ingredients You’ll Need
- 4 🧰 Supplies & Equipment
- 5 👨🍳 How to Make Spicy Dilly Beans
- 6 🧊 Fridge vs. Canned Pickles
- 7 🌿 Flavor Variations & Add-Ins
- 8 🍴 Serving Suggestions
- 9 🗃️ Storage & Shelf Life
- 10 🧠 Troubleshooting & Tips
- 11 ❓ FAQs
- 12 🔥 Final Thoughts
✅ Why You’ll Love These Spicy Dilly Beans
-
✅ No canning required (but you can preserve if you want)
-
🌱 Naturally vegan, gluten-free, and alcohol-free
-
🌶️ Perfect balance of heat, garlic, dill, and vinegar tang
-
🥒 Keeps for weeks in the fridge or months if canned
-
🎁 Great as edible gifts or spicy snack additions
-
🧄 Easy to customize with more (or less) spice
🌶️ What Are Spicy Dilly Beans?
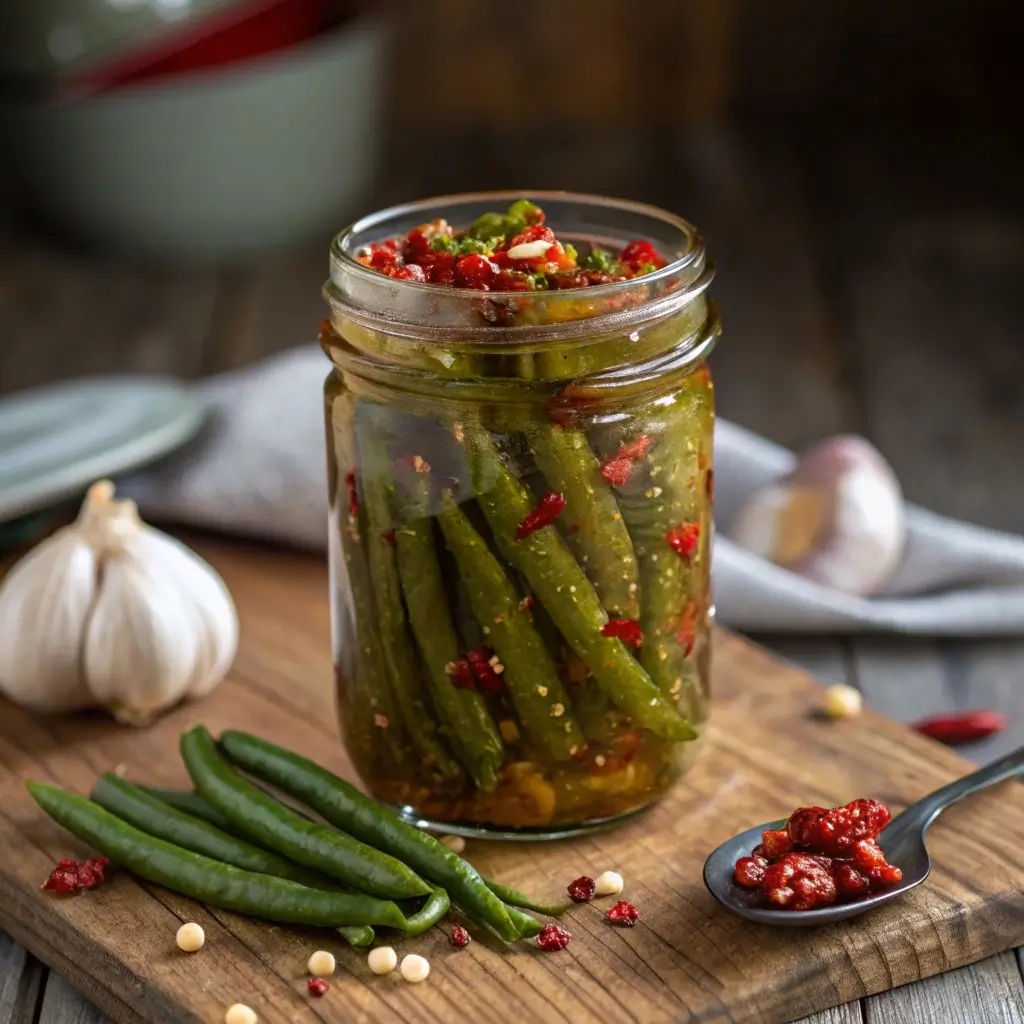
Spicy dilly beans are pickled green beans flavored with vinegar, dill, garlic, and red pepper flakes (or other chili-based heat). Unlike traditional cucumber pickles, these are made with snappy green beans and bring a tangy crunch with a spicy kick.
They’re often served on:
-
Charcuterie or cheese boards
-
As cocktail garnishes (especially virgin Bloody Marys)
-
Alongside sandwiches or wraps
-
Or eaten right from the jar by spice-lovers!
🛒 Ingredients You’ll Need
This recipe makes 4 pint jars of spicy dilly beans.
Base Ingredients:
-
2 lbs fresh green beans, trimmed to fit jars
-
4 cloves garlic, peeled and smashed
-
4 sprigs fresh dill (or 2 tsp dill seeds per jar)
-
4 tsp black peppercorns
-
1 tbsp mustard seeds (optional)
For Heat:
-
2 tsp red chili flakes (adjust to taste)
-
1–2 whole dried chilies per jar (optional for extra heat)
Brine:
-
2½ cups white vinegar (5% acidity)
-
2½ cups water
-
2 tbsp kosher or pickling salt
-
1 tbsp sugar (optional for balance)
💡 Avoid table salt—it can cloud the brine.
🧰 Supplies & Equipment
-
4 clean pint-size mason jars (with lids)
-
Medium saucepan (for the brine)
-
Funnel (optional but helpful)
-
Jar lifter or tongs
-
Cutting board & knife
👨🍳 How to Make Spicy Dilly Beans
Step 1: Prepare the Beans
-
Rinse green beans thoroughly.
-
Trim the stem ends and cut to fit jars vertically.
-
Pat them dry with a clean towel.
Step 2: Sterilize the Jars
If you’re canning, boil jars and lids for 10 minutes.
For refrigerator pickles, wash jars well with hot, soapy water and rinse thoroughly.
Step 3: Make the Brine
In a saucepan, combine:
-
2½ cups water
-
2½ cups white vinegar
-
2 tbsp pickling salt
-
1 tbsp sugar (optional)
Bring to a boil, stirring until salt and sugar dissolve. Remove from heat.
Step 4: Pack the Jars
Into each jar, add:
-
1 garlic clove
-
1 sprig dill
-
1 tsp black peppercorns
-
½ tsp red chili flakes
-
Optional: ¼ tsp mustard seeds, 1 dried chili
Pack green beans tightly upright into jars, leaving ½ inch of headspace.
Step 5: Add the Brine
-
Pour the hot brine over the beans, covering them completely.
-
Use a clean chopstick or bubble remover to release air bubbles.
-
Wipe the rim, and seal the lid fingertip-tight.
Step 6: Store or Process
-
Refrigerator Pickles: Let jars cool to room temperature. Refrigerate for 24–48 hours before eating.
-
Water Bath Canning: Process sealed jars in boiling water for 10 minutes. Store in a cool, dark place.
🧊 Fridge vs. Canned Pickles
| Feature | Refrigerator Pickles | Canned Pickles |
|---|---|---|
| Crunch Level | Crispier | Slightly softer |
| Ready In | 1–2 days | 2–4 weeks (flavor builds) |
| Shelf Life | 3–4 weeks (in fridge) | Up to 1 year (unopened) |
| Skill Level | Beginner | Intermediate |
| Tools Needed | Just a saucepan and jars | Requires canner & jars |
🌿 Flavor Variations & Add-Ins
🧄 Extra Garlic
Add 2 garlic cloves per jar for bold flavor.
🍋 Lemon-Herb Beans
Add a strip of lemon zest + 1 rosemary sprig.
🌶️ Smoked Chili
Swap red pepper flakes for smoked paprika or chipotle powder.
🧅 Onion-Laced Beans
Add 2–3 slices of red onion to each jar for color and sharpness.
🍴 Serving Suggestions
Spicy dilly beans are a versatile addition to:
-
🌮 Tacos and burritos – especially with beans or tofu
-
🥗 Salads – chop and toss into potato or pasta salad
-
🍸 Cocktails – use as a Bloody Mary or mocktail garnish
-
🧀 Charcuterie – pair with cheeses, nuts, and olives
-
🥪 Sandwiches – add inside for a spicy crunch
-
🍽️ Rice bowls or noodle dishes – adds acid and heat
🗃️ Storage & Shelf Life
| Storage Method | Duration | Notes |
|---|---|---|
| Refrigerator | 3–4 weeks | Use clean utensils; keep chilled |
| Pantry (canned) | 1 year | Store in a cool, dark place |
| After opening | 2–3 weeks | Keep refrigerated |
🧠 Troubleshooting & Tips
My beans are floating!
Pack them tighter. You can also add a pickle weight or wedge.
Brine turned cloudy?
This could be:
-
Use of table salt (with anti-caking agents)
-
Improper sealing
-
Contamination
Discard if you notice a foul odor or slime.
Too spicy?
Use half the red pepper flakes and skip whole chilies next time.
Too mild?
Crank it up with cayenne or double the chili flakes.
❓ FAQs
Q1: Can I use apple cider vinegar instead of white?
A: Yes, if it’s 5% acidity. It adds a fruitier, slightly sweet flavor.
Q2: Can I reuse the brine?
A: No. Always make fresh brine for food safety and flavor integrity.
Q3: Do I have to can them?
A: Nope! These are great as refrigerator pickles. Canning is optional for long-term storage.
Q4: Can I make these less spicy?
A: Yes. Reduce chili flakes or skip whole chilies entirely.
Q5: Can I use frozen green beans?
A: Not recommended. Frozen green beans tend to lose their firmness after thawing, which results in a soft, mushy texture once pickled. For the best crisp bite, always use fresh, firm green beans.
Q6: Can I make this sugar-free?
A: Yes! The sugar is optional and used only to balance out the vinegar’s acidity. You can leave it out entirely or replace it with a sugar substitute like stevia or monk fruit, though flavor results may vary.
Q7: What if my garlic turns blue?
A: Don’t panic—it’s safe! Garlic can sometimes turn bluish or greenish in acidic brine, especially if it’s very fresh. It’s a harmless chemical reaction and does not mean the pickles are bad.
Q8: Can I double or halve the recipe?
A: Absolutely. The recipe scales up or down easily. Just maintain the same vinegar-to-water ratio (1:1) and the proper amount of salt (1 tablespoon per quart of brine) for safety and flavor.
🔥 Final Thoughts
Spicy dilly beans bring together the best of crunchy texture, vinegary tang, herby depth, and chili heat—making them a true standout among homemade pickles.
They’re incredibly easy to make, with no canning pressure required, and offer a fantastic way to preserve seasonal green beans. From fridge to picnic basket, these pickled beans are the kind of spicy snack you’ll crave over and over again.
Plus, they’re naturally:
-
🌿 Vegan
-
🧄 Allium-packed
-
🧂 Low-calorie
-
🔥 Customizable in heat and flavor
-
💚 Made without pork, wine, or alcohol
Whether you gift them, garnish with them, or devour them straight from the jar, these spicy dilly beans are guaranteed to light up your taste buds.
Tried this recipe? We’d love to see it!
📸 Tag your creations on Instagram with #SpicyDillyBeans or leave a comment below with your flavor twist.
