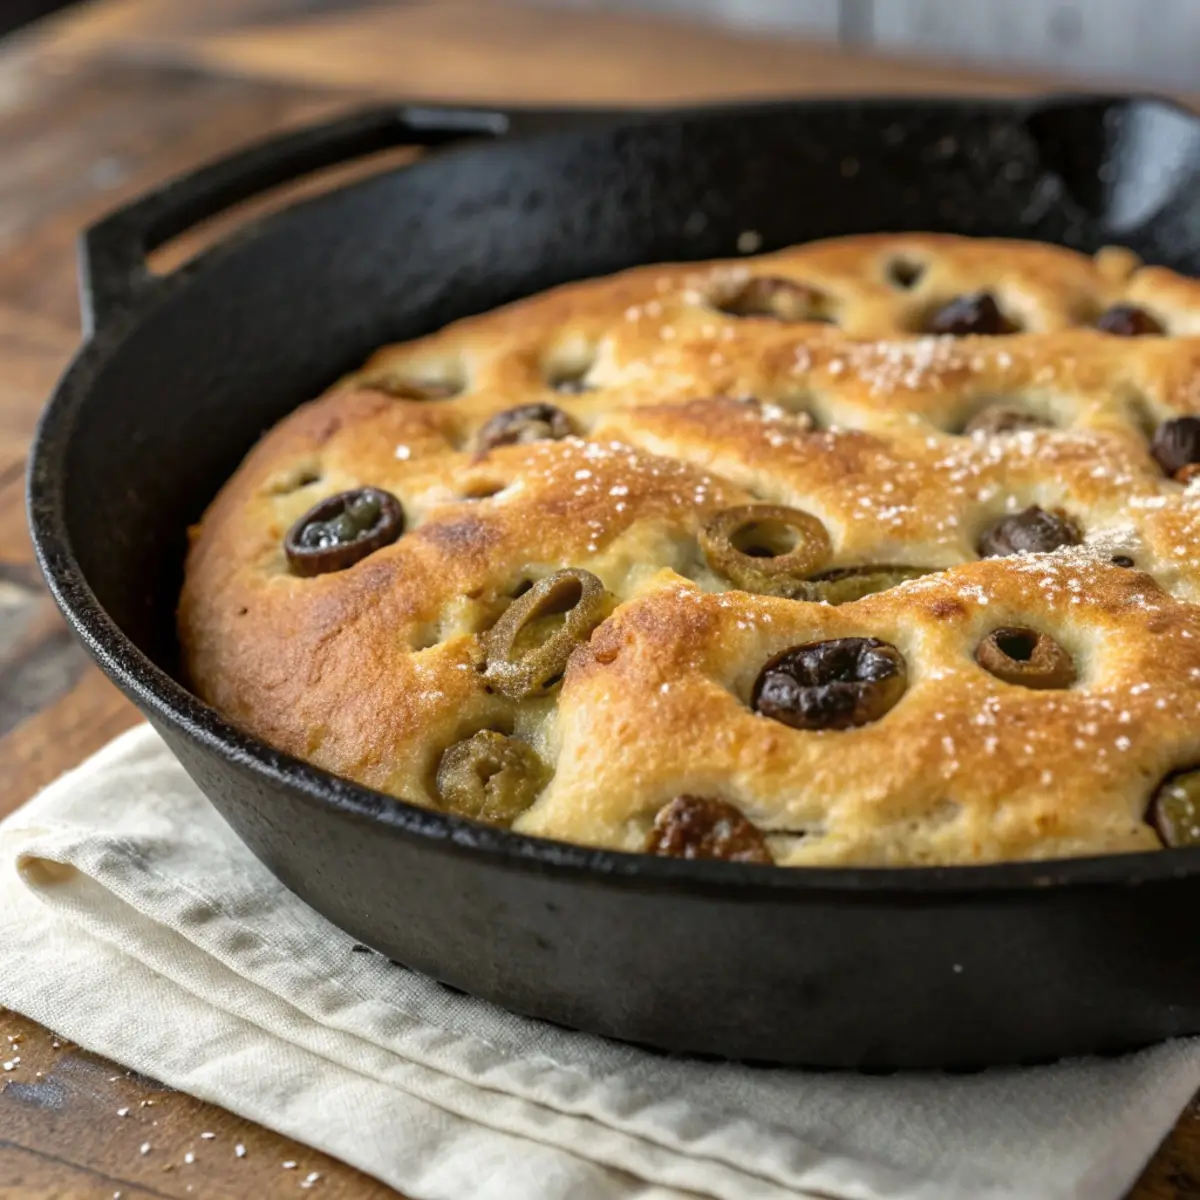
Few breads capture the essence of rustic Italian baking like sourdough focaccia — and when baked in a cast iron skillet, it becomes something truly exceptional. The cast iron creates an unbeatable crispy, golden crust, while the sourdough’s natural fermentation gives the interior a rich, complex flavor and airy texture.
This recipe is all about achieving the perfect contrast: crunchy on the outside, soft and pillowy inside, infused with the nutty aroma of olive oil and a hint of sea salt.
You don’t need to be a professional baker to pull this off. With a little patience and the magic of sourdough fermentation, your kitchen will smell like an artisan bakery in no time. Perfect as a side dish, a base for sandwiches, or simply dipped in extra virgin olive oil — cast iron sourdough focaccia is comfort food elevated to gourmet status.
Why Cast Iron Makes the Best Focaccia
If you’ve ever struggled to get that perfectly crisp bottom crust, the solution is simple: bake in cast iron. Here’s why it works so beautifully:
Even heat distribution: Cast iron heats evenly from edge to edge, ensuring consistent baking.
Retains heat: It stays hot, giving you a crackly, golden crust.
Creates texture: The dough caramelizes where it meets the skillet, giving every bite the perfect crunch.
Rustic presentation: You can serve it straight from the pan — gorgeous and practical.
Why You’ll Love This Recipe
100% no-knead and beginner-friendly.
Naturally leavened — no commercial yeast needed.
Cold-rise option for enhanced flavor.
Crisp edges + soft crumb = perfect texture balance.
Customizable toppings for every season.
Perfect side dish for pasta, soups, and salads.
Ingredients You’ll Need
For the Dough:
500 g (4 cups) bread flour
375 g (1 ½ cups + 1 tbsp) warm water
100 g (½ cup) active sourdough starter (fed and bubbly)
10 g (2 tsp) fine sea salt
25 g (2 tbsp) extra virgin olive oil
For the Topping:
2–3 tbsp olive oil (for drizzling)
Flaky sea salt (for finishing)
Fresh rosemary or thyme leaves (optional)
Garlic-infused oil or sliced garlic (optional)
Tools You’ll Need
10- or 12-inch cast iron skillet
Large mixing bowl
Dough scraper or spatula
Kitchen scale (recommended)
Plastic wrap or reusable cover
Bench scraper
Cooling rack
The Sourdough Magic
Unlike yeasted breads, sourdough relies on wild yeast and natural bacteria in your starter to rise. This gives it not only a deep, slightly tangy flavor but also a wonderfully chewy texture that commercial yeast can’t replicate.
It’s also easier to digest, thanks to the fermentation process that breaks down gluten and sugars. Plus, the long fermentation allows the dough to naturally develop elasticity and complexity — making it ideal for focaccia, which thrives on airy bubbles and chewy bite.
Step-by-Step Instructions
Step 1: Activate Your Starter
Feed your sourdough starter 6–8 hours before you plan to mix. It should be bubbly, doubled in size, and pass the float test — meaning a spoonful floats in water.
Step 2: Mix the Dough
In a large bowl, whisk the starter with warm water until it dissolves. Add flour and salt. Mix with a spatula until all flour is absorbed. The dough will be sticky and rough — that’s perfect.
Add the olive oil and fold the dough over itself a few times until it’s well coated.
Step 3: Bulk Fermentation (First Rise)
Cover the bowl and let the dough rest for 4–6 hours at room temperature (70–75°F / 21–24°C). Perform 2–3 stretch-and-folds during the first 2 hours: gently pull up one edge of the dough and fold it toward the center, rotating the bowl each time.
After the final fold, the dough should be smooth, elastic, and slightly domed.
Step 4: Cold Fermentation (Optional but Recommended)
If you want maximum flavor and convenience, cover the bowl and refrigerate overnight (up to 24 hours). The cold rise develops tang and structure.
Step 5: Prepare the Skillet
Drizzle 2 tablespoons of olive oil into your cast iron skillet, coating the bottom and sides.
Gently transfer the dough into the skillet, using an oiled spatula to scrape it out. Turn the dough once to coat both sides with oil. Let it rest for 30 minutes to relax.
Step 6: Shape the Dough
With oiled hands, gently press and stretch the dough toward the edges of the pan. Don’t force it — if it springs back, let it rest another 10–15 minutes, then stretch again.
Step 7: Final Proof
Cover the skillet and let the dough rest at room temperature for 2–3 hours, or until it looks puffy and airy with visible bubbles.
Step 8: Dimple the Dough
Preheat your oven to 425°F (220°C). Using your fingertips, press deep dimples all over the dough. Don’t be afraid to press down — those dimples are what make focaccia focaccia!
Drizzle generously with olive oil, then sprinkle with flaky salt, herbs, or garlic slices.
Step 9: Bake
Bake uncovered for 25–30 minutes, until golden brown and crisp at the edges. If you like it extra crunchy, bake an additional 5 minutes.
Step 10: Cool and Serve
Let it rest in the skillet for 10 minutes before transferring to a wire rack. Slice and serve warm — the aroma will be irresistible.
Flavor Variations
Make your focaccia uniquely yours with these ideas:
Classic Rosemary & Sea Salt
Top with fresh rosemary sprigs and coarse sea salt for a traditional Italian finish.
Garlic & Herb Infusion
Drizzle garlic-infused olive oil and sprinkle oregano, thyme, or basil.
Tomato & Basil
Press halved cherry tomatoes into the dough before baking and garnish with basil leaves.
Olive & Caramelized Onion
Scatter sliced olives and caramelized onions for a savory twist.
Cheesy Focaccia
Add a light sprinkle of Parmesan or mozzarella during the last 10 minutes of baking.
Pro Tips for Success
Use an active starter: This ensures a strong rise and airy crumb.
Hydration matters: Sticky dough = open crumb. Don’t add too much flour.
Olive oil is key: Be generous; it adds flavor and prevents sticking.
Don’t rush proofing: The dough should be visibly airy before baking.
Preheat your oven fully: Cast iron needs to be hot for that crisp crust.
Cool slightly before slicing: It finishes setting as it cools.
The Perfect Texture
The beauty of cast iron focaccia lies in its contrast of textures:
Bottom: Deeply caramelized and crispy from direct heat contact.
Center: Light, airy, and slightly chewy thanks to sourdough fermentation.
Top: Glossy from olive oil, with salt and herbs that create a fragrant crust.
Each bite combines these layers of flavor and texture — crunchy, fluffy, savory, and subtly tangy.
How to Store and Reheat
Room Temperature:
Store leftovers in an airtight container or wrapped in foil for up to 2 days.
Refrigerator:
Keeps for up to 5 days — just reheat before serving to restore the crispness.
Freezer:
Wrap tightly in plastic wrap and freeze for up to 2 months. Reheat at 375°F (190°C) for 10–12 minutes straight from frozen.
Reheating Tip:
Brush lightly with olive oil before reheating for a freshly baked feel.
Serving Ideas
Appetizer: Cut into strips and serve with olive oil and balsamic vinegar for dipping.
Side Dish: Pair with pasta, soup, or roasted vegetables.
Sandwich Base: Slice horizontally and fill with grilled veggies, mozzarella, or chicken.
Cheese Board: Cut into squares and serve with cheese, olives, and dried fruit.
Holiday Table: Serve warm alongside turkey, roast chicken, or seafood.
Health Benefits of Sourdough Focaccia
Easier digestion: Sourdough fermentation breaks down gluten and phytic acid.
Lower glycemic index: Helps prevent sugar spikes.
Natural preservation: Keeps longer without additives.
Rich in flavor and nutrients: Fermentation enhances mineral absorption.
Pairing sourdough with heart-healthy olive oil also makes this bread a wholesome indulgence.
Troubleshooting
Dough too sticky to handle:
Wet your hands with olive oil — it prevents sticking without adding flour.
Focaccia didn’t rise much:
Your starter may not have been fully active or the dough was too cold.
Bottom burned:
Lower oven rack placement or reduce temperature slightly next time.
Texture too dense:
Underproofing or insufficient fermentation — let the dough rise longer.
FAQs
Can I use all-purpose flour instead of bread flour?
Yes, but the bread flour gives a slightly chewier texture.
Do I need to preheat the cast iron skillet?
No, but you can for a crispier bottom crust — just be careful when transferring the dough.
Can I use other toppings?
Absolutely! Try sun-dried tomatoes, pesto swirls, caramelized shallots, or chili flakes.
How long can I ferment the dough in the fridge?
Up to 48 hours for the deepest flavor.
Can I make this gluten-free?
Use a 1:1 gluten-free flour blend designed for bread recipes, though texture may vary.
Can I double the recipe?
Yes, bake it in two skillets or a large sheet pan.
The Secret to That Irresistible Crust
It all comes down to olive oil and cast iron. The generous oil coating not only prevents sticking but also fries the dough’s surface slightly, creating that signature crisp texture. Combined with the skillet’s heat retention, it’s the ultimate method for achieving focaccia perfection.
When you hear that gentle sizzle as the dough hits the oiled skillet, you’ll know you’re on the right track.
Why Sourdough Focaccia Is Worth the Wait
There’s no rushing true flavor. The overnight fermentation gives this focaccia its depth — subtle tang, nutty aroma, and an open, lace-like crumb that can’t be replicated by quick yeast breads.
And with a cast iron skillet, the baking process becomes nearly foolproof. Even beginners can achieve bakery-quality results with minimal effort.
Final Thoughts
This Sourdough Focaccia in Cast Iron Skillet combines rustic simplicity with gourmet results. It’s everything great bread should be — crispy, airy, golden, and aromatic. Whether you’re preparing it for Sunday dinner, a holiday feast, or your weekly bread ritual, it’s a recipe that delivers every single time.
Once you’ve tasted that first bite — crunchy bottom, fluffy center, kissed with olive oil and sea salt — you’ll understand why this cast iron version is the ultimate way to bake focaccia at home.
So grab your skillet, feed your starter, and get ready to bake a loaf that’s as beautiful as it is delicious.