TheUltimate Guide to Irresistible Soft Fluffy Cinnamon Rolls: From Scratch Perfection
There’s something undeniably magical about the aroma of cinnamon rolls baking in the oven. That warm, sweet, spiced scent promises pure comfort and indulgence. But finding the perfect soft, fluffy, gooey cinnamon roll recipe can feel like searching for a needle in a haystack. Fear not! This isn’t just another cinnamon roll recipe; it’s your comprehensive guide to mastering the art of creating bakery-worthy cinnamon rolls right in your own kitchen. Forget the boxed mixes and frozen dough – we’re diving deep into the science and soul of crafting the absolute best homemade cinnamon rolls, guaranteed to become your new breakfast (or brunch, or dessert!) obsession.
Imagine pulling a warm, pillowy roll from the oven, its surface glistening with a rich, tangy cream cheese icing that melts into the tender, buttery layers beneath. Each bite reveals a perfectly balanced swirl of cinnamon sugar, soft and yielding, not tough or dry. This is the dream, and it’s achievable. This detailed, beginner-friendly tutorial breaks down every step, from understanding the crucial role of yeast to mastering the art of rolling and icing, ensuring your success. We’ll explore variations, troubleshoot common pitfalls, and provide foolproof storage solutions so you can enjoy these delights long after they come out of the oven.
Why This Recipe Stands Out:
- Completely From Scratch: No shortcuts, no pre-made dough. Every single component is crafted by you.
- Unbeatable Softness & Fluffiness: The secret lies in the dough development and proper proofing techniques.
- Gooey Perfection: The filling is generously spiced and perfectly balanced, ensuring every bite is moist and flavorful.
- Cream Cheese Icing: A tangy, smooth, and decadent topping that elevates the entire experience.
- Beginner-Friendly: Detailed explanations and tips make this accessible, even if you’re new to baking yeast doughs.
- Versatile: Easily adaptable for dietary needs and preferences.
The Foundation: Understanding Your Dough
Before we dive into the specifics, let’s talk about the heart of these rolls: the dough. Yeast is a living organism, and treating it right is paramount. We’ll use active dry yeast, a reliable and accessible choice. The key is activating it properly in warm (not hot!) milk. This wakes it up and gets it ready to work its magic, producing the gas that makes your rolls rise beautifully. The dough itself relies on a combination of flour, sugar, butter, eggs, and salt. The butter creates richness and tenderness, while the eggs add structure and flavor. Don’t skip the salt – it’s crucial for balancing the sweetness and enhancing all the other flavors.
Gathering Your Ingredients: Quality Matters
Using good quality ingredients makes a noticeable difference. Here’s what you’ll need:
- Milk: Whole milk is ideal for richness, but 2% or even skim will work. Warm it gently.
- Active Dry Yeast: One standard packet (about 2 1/4 teaspoons).
- Granulated Sugar: For activating the yeast and adding sweetness.
- All-Purpose Flour: The backbone of the dough. Spooned and leveled is best.
- Salt: Fine sea salt or table salt.
- Unsalted Butter: Softened to room temperature for mixing into the dough and for the filling.
- Large Eggs: At room temperature for better incorporation.
- Vanilla Extract: Pure vanilla for depth of flavor.
- For the Filling: Brown sugar (light or dark) and ground cinnamon. A pinch of salt enhances the sweetness.
- For the Icing: Cream cheese (full-fat, softened), powdered sugar, vanilla extract, and a splash of milk or cream.
The Magic Begins: Making the Dough
1. Activate the Yeast: Warm the milk to about 105-110°F (40-43°C). It should feel comfortably warm, like a baby’s bottle, not hot. Pour it into a large mixing bowl. Sprinkle the yeast and 1 tablespoon of granulated sugar over the warm milk. Let it sit for 5-10 minutes until it becomes foamy and fragrant – this means your yeast is alive and ready to work!
2. Combine Dry Ingredients: In a separate medium bowl, whisk together the flour and salt.
3. Incorporate Butter & Eggs: Add the softened butter and eggs to the yeast mixture. Using an electric mixer with a dough hook attachment (or a sturdy wooden spoon and strong arms!), beat on medium speed until the butter is fully incorporated and the mixture is smooth.
4. Add Flour Gradually: With the mixer running on low speed, add the flour mixture in 1/2 cup increments. Mix until a shaggy dough forms and no dry flour remains. The dough will be sticky.
5. Knead for Perfection: Turn the dough out onto a lightly floured surface. Knead for 8-10 minutes. This is crucial! Kneading develops the gluten, giving your rolls their structure and chewiness. Push the dough away with the heel of your hand, fold it over, rotate, and repeat. The dough is ready when it’s smooth, elastic, springs back when poked, and doesn’t stick excessively to your hands or the surface (a little flour dusting is okay, but avoid adding too much).
6. First Rise (Bulk Fermentation): Place the kneaded dough in a lightly oiled bowl, turning it once to coat. Cover the bowl tightly with plastic wrap or a damp kitchen towel. Let it rise in a warm, draft-free spot until doubled in size, about 1 to 1.5 hours. You can place the bowl in an oven with the light on (off) or near a warm appliance. The dough is ready when it looks puffy and has nearly doubled.
Rolling Out the Goodness: Filling & Shaping
1. Prepare the Filling: While the dough rises, make your cinnamon sugar filling. Combine the brown sugar, granulated sugar, cinnamon, and a pinch of salt in a small bowl. Stir until well blended. Set aside.
2. Punch Down & Roll: Once the dough has doubled, gently punch it down to release the air bubbles. Turn it out onto a lightly floured surface. Roll it into a large rectangle, roughly 18×24 inches. Aim for an even thickness, about 1/4 to 1/2 inch thick.
3. Spread the Butter: Using a spatula or your fingers, spread the softened butter evenly over the entire surface of the dough, leaving a small border around the edges.
4. Add the Filling: Sprinkle the cinnamon sugar mixture evenly over the buttered dough, again leaving a small border. Press it gently into the butter so it adheres well.
5. Roll it Up: Starting from the long edge closest to you, carefully roll the dough up tightly into a log. Pinch the seam closed firmly to seal. Trim the uneven ends if desired (these make great snack pieces!).
6. Cut the Rolls: Using a sharp knife or dental floss (for cleaner cuts), slice the log into 12 equal pieces (about 1.5-2 inches thick). Place the rolls cut-side up in a lightly greased 9×13 inch baking dish, leaving a little space between them for expansion. Cover loosely with plastic wrap or a damp towel.
The Final Proof & Bake: Achieving Fluffiness
1. Second Rise (Proofing): Let the rolls rise again in a warm, draft-free spot until they are noticeably puffy and have nearly doubled in size, about 30-45 minutes. They should look soft and full.
2. Preheat & Bake: While the rolls rise, preheat your oven to 375°F (190°C). Once preheated, bake the rolls for 18-22 minutes, or until they are golden brown on top and the edges look set. The internal temperature should reach about 190-200°F (88-93°C) when tested with a thermometer. They should sound hollow when tapped on the bottom.
3. Cool Slightly: Remove the rolls from the oven and let them cool in the pan for at least 10-15 minutes. This allows them to set slightly and makes them easier to handle when icing.
The Crown Jewel: Creamy Cream Cheese Icing
While the rolls cool, prepare the icing. This is where the magic happens!
1. Make the Icing: In a medium bowl, beat the softened cream cheese and softened butter together with an electric mixer until smooth and creamy.
2. Add Sweetness & Flavor: Gradually add the powdered sugar, beating well after each addition. Mix in the vanilla extract.
3. Adjust Consistency: If the icing is too thick, add a splash of milk or cream, one teaspoon at a time, until it reaches a smooth, spreadable consistency. If it’s too thin, add a little more powdered sugar.
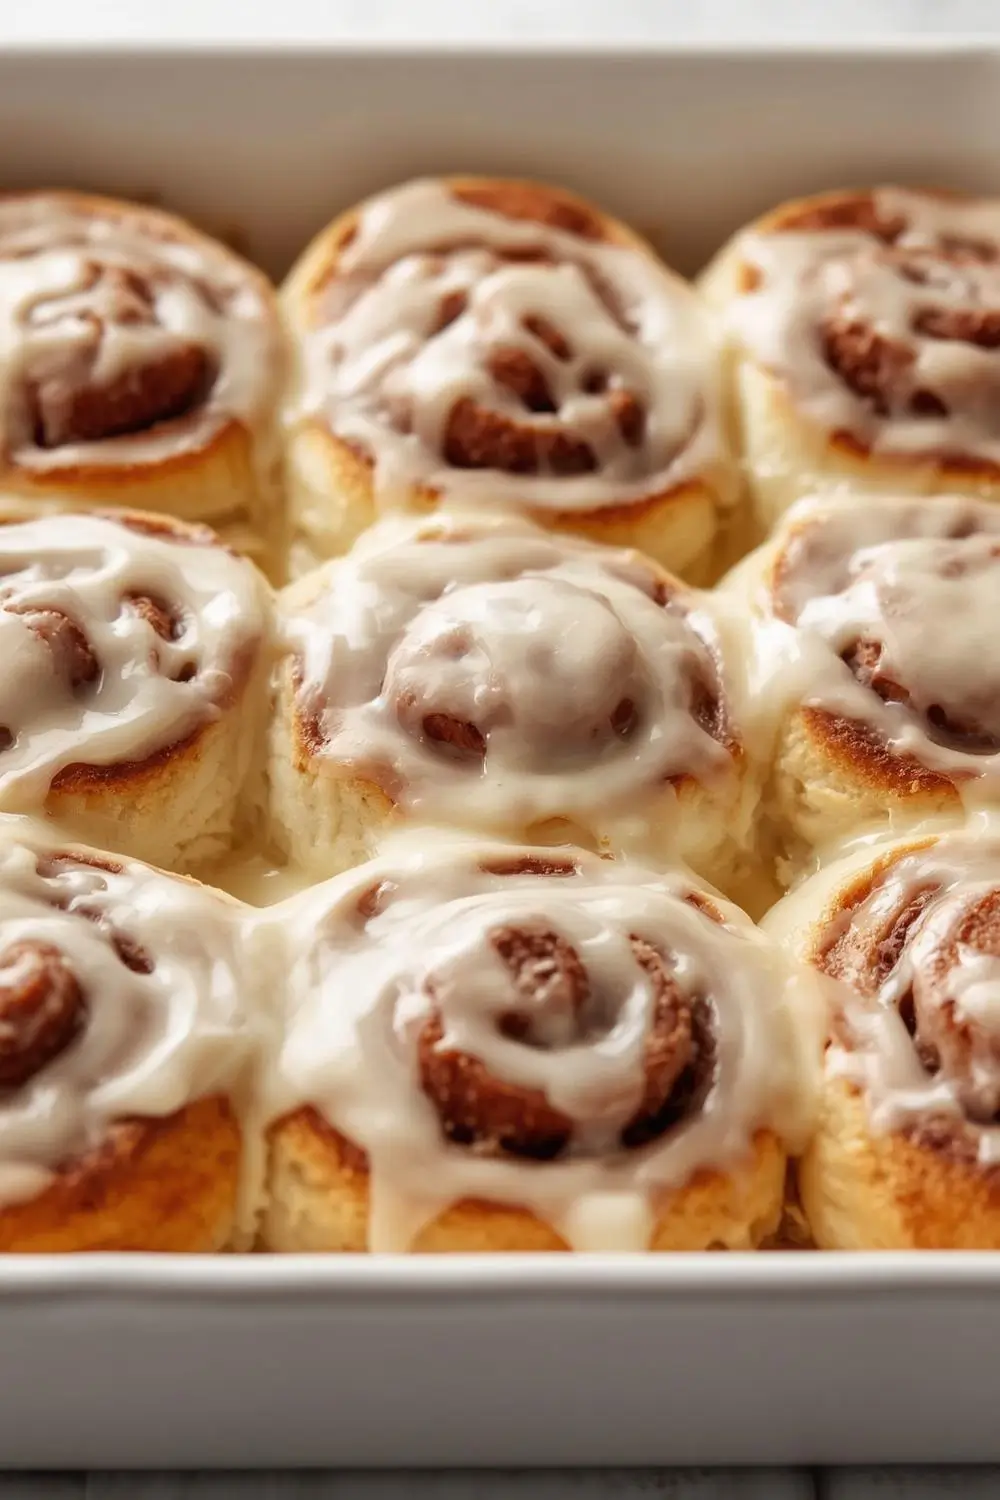
4. Ice the Rolls: Once the rolls are cool enough to handle (but still warm), spread or drizzle the icing generously over the top. The warmth of the rolls will help the icing melt slightly and seep into the crevices, creating that signature gooey texture. The icing should be thick enough to hold its shape but melt beautifully into the rolls.
Variations & Substitutions: Making it Your Own
- Nutty Delight: Fold 1 cup of chopped pecans, walnuts, or almonds into the cinnamon sugar filling before spreading.
- Fruitful Twist: Add 1/2 cup of finely chopped apples, raisins, or dried cranberries to the filling mixture.
- Spiced Up: Increase the cinnamon to 2 tablespoons or add a pinch of nutmeg or cardamom to the filling.
- Chocolate Lover’s Dream: Replace half the brown sugar with brown sugar and add 1/2 cup of chocolate chips to the filling.
- Vegan Option: Use plant-based milk (like almond or soy) and a flax egg (1 tbsp ground flaxseed + 3 tbsp water, let sit 5 mins) instead of regular eggs. Use vegan butter and cream cheese. Adjust the icing with vegan cream cheese and powdered sugar.
- Whole Wheat: Substitute up to 50% of the all-purpose flour with whole wheat flour for a nuttier flavor and denser texture (may affect rise slightly).
- Smaller Batch: This recipe makes a large batch (12 rolls). You can easily halve the ingredients for a smaller family or to freeze half the dough.
Storage & Reheating: Keeping the Magic Alive
- Room Temperature: Store leftover rolls in an airtight container at room temperature for up to 2 days. Reheat gently in the microwave for 10-15 seconds or in a low oven (300°F/150°C) for 5-8 minutes to restore warmth and softness.
- Refrigerator: For longer storage (up to 5 days), wrap individual rolls tightly in plastic wrap and store in the fridge. Reheat as above.
- Freezing: Best Method: After shaping and before the second rise, place the rolls (uncut) on a baking sheet lined with parchment paper. Freeze until solid (about 1-2 hours). Transfer the frozen rolls to a freezer bag or airtight container. Thawing & Baking: Thaw overnight in the refrigerator. Remove from the fridge, let come to room temperature for 30-60 minutes, then let rise until puffy (about 30-45 minutes). Bake as directed, adding 2-3 minutes to the baking time. Freezing After Baking: Cool completely, then wrap tightly in plastic wrap and place in a freezer bag. Reheat at 300°F (150°C) for 10-15 minutes.
Common Mistakes to Avoid: Ensuring Success
1. Killing the Yeast: Using milk that’s too hot (above 110°F/43°C) will kill the yeast. Test the temperature with your finger or a thermometer.
2. Under-Kneading: Insufficient kneading leads to a weak dough that won’t rise properly or develop the right texture. Knead until smooth and elastic.
3. Over-Kneading: While kneading is crucial, over-kneading can make the dough tough. Stop when it’s smooth and springs back.
4. Over-Proofing: Letting the dough rise too long can cause it to collapse. It should be puffy, not overly large and airy.
5. Too Much Flour During Kneading: Adding excessive flour makes the dough dry and tough. Use minimal flour on your surface and hands.
6. Icing Too Early: Applying icing to piping hot rolls can cause it to melt and slide off. Wait until they are cool enough to handle.
7. Not Letting the Rolls Rise Enough: Under-proofed rolls will be dense and won’t have that beautiful, fluffy texture.
8. Cutting with a Dull Knife: A dull knife can squish the rolls and tear the filling. Use a sharp knife or dental floss for clean cuts.
Your Frequently Asked Questions (FAQs)
- Q: Can I make these rolls ahead of time?
A: Absolutely! You can prepare the dough through the first rise, shape the rolls, and refrigerate them overnight. Let them come to room temperature and complete their second rise before baking in the morning. You can also freeze the shaped rolls before the second rise and bake from frozen as described above.
- Q: Why are my rolls dense and not fluffy?
A: This is often due to under-proofing (not rising long enough) or under-kneading (not developing enough gluten). Ensure your yeast is active, knead thoroughly, and let the dough rise in a warm, draft-free spot until noticeably puffy.
- Q: Can I use instant yeast instead of active dry yeast?
A: Yes! You can use instant yeast (also called rapid-rise or bread machine yeast) in the same amount. You don’t need to activate it in warm milk first; simply add it directly to the dry ingredients with the flour and salt.
- Q: How do I know when the rolls are done baking?
A: They should be golden brown on top, sound hollow when tapped on the bottom, and an internal temperature of 190-200°F (88-93°C) when measured with a thermometer. The edges should look set.
- Q: Can I make the dough in a bread machine?
A: Yes! Add the ingredients in the order recommended by your machine (usually liquid first, then dry, with yeast last). Select the dough cycle. Once the cycle finishes, proceed with shaping, rising, and baking as directed.
- Q: How do I prevent the rolls from sticking to the pan?
A: Generously grease your baking dish with butter or non-stick spray. You can also line it with parchment paper for easy removal.
- Q: Can I use margarine instead of butter?
A: While you can use margarine, unsalted butter provides the best flavor and texture. If using margarine, ensure it’s soft and not melted.
- Q: Why is my icing too runny?
A: You might have added too much milk or cream. Add powdered sugar gradually until you reach the desired thickness. If it’s too thick, add a tiny bit more liquid.
- Q: Can I freeze the baked rolls?
A: Yes! Cool them completely, wrap tightly in plastic wrap, and place in a freezer bag. Reheat at 300°F (150°C) for 10-15 minutes. Avoid freezing the icing separately; apply it after reheating.
The Final Rise: A Conclusion of Comfort
There you have it – the blueprint for creating the most heavenly, soft, fluffy, gooey cinnamon rolls you’ve ever tasted, crafted entirely from scratch. This journey from simple ingredients to a towering stack of golden perfection is deeply rewarding. The process itself, the kneading, the waiting for the dough to rise, the anticipation as they bake, and finally, the moment you pull them from the oven, warm and fragrant – it’s an act of love and patience that culminates in pure, unadulterated comfort. These rolls are more than just a breakfast treat; they’re a celebration of homemade goodness, perfect for sharing with loved ones on a cozy weekend morning or as a special dessert. So, gather your ingredients, embrace the process, and get ready to create a tradition that will have everyone asking for seconds. Happy baking, and enjoy every heavenly bite of your homemade cinnamon roll masterpiece!