The irresistible aroma of cinnamon rolls bakingin your kitchen – warm, sweet, and utterly comforting. There’s something magical about pulling a soft, gooey roll from the oven, the cinnamon-sugar filling melting into the tender dough. But let’s be honest, traditional cinnamon rolls often demand hours of your time, rising and resting. What if you could satisfy that craving without dedicating your entire afternoon? This isn’t just a recipe; it’s your ticket to enjoying homemade cinnamon rolls in under an hour. Forget complicated techniques or hours of waiting – this quick one-hour cinnamon rolls recipe delivers soft, decadent results that will have everyone asking for the secret. Ready to transform your kitchen into a cinnamon-scented haven in record time? Let’s dive in.
The Magic of One Hour Cinnamon Rolls
Imagine the scene: you wake up with a sudden, powerful craving for cinnamon rolls. The thought of waiting for dough to rise feels like an eternity. This recipe is your answer. It leverages a few clever tricks to cut down the active time dramatically while still achieving that classic, melt-in-your-mouth texture and flavor. The key lies in a slightly enriched dough and a focused baking process. You’ll mix, knead, shape, and bake – all within the span of an hour. The result? Rolls that are tender, slightly chewy on the edges, and packed with a gooey cinnamon-sugar filling. They’re perfect for a weekend brunch, a special breakfast, or simply a sweet treat when the mood strikes. Best of all, they’re beginner-friendly, requiring no special equipment or advanced baking skills. Let’s gather your ingredients and get started.
Gathering Your Ingredients: The Foundation of Flavor
Before you begin, ensure you have everything ready. This recipe relies on readily available pantry staples, making it incredibly accessible. Here’s what you’ll need:
- For the Dough:
* 2 ¼ teaspoons (1 standard packet) Active Dry Yeast (or Instant Yeast)
* ¾ cup (180ml) Warm Milk (around 110°F / 43°C – not hot, just comfortably warm)
* ¼ cup (50g) Granulated Sugar
* 1 large Egg, at room temperature
* ¼ cup (60g) Unsalted Butter, melted and slightly cooled
* 1 teaspoon Salt
* 3 ½ to 4 cups (440g to 500g) All-Purpose Flour (plus extra for dusting)
- For the Cinnamon Sugar Filling:
* ½ cup (100g) Brown Sugar (light or dark)
* 2 tablespoons Ground Cinnamon
* ¼ cup (50g) Unsalted Butter, softened to room temperature
- For the Glaze (Optional but Recommended):
* 1 cup (120g) Powdered Sugar (Confectioners’ Sugar)
* 2-3 tablespoons Milk or Heavy Cream
* ½ teaspoon Vanilla Extract
Why These Ingredients Work
- Yeast: The rising agent. Warm milk activates it gently. Using warm, not hot, milk prevents killing the yeast.
- Sugar: Feeds the yeast for rising and adds sweetness. Granulated sugar dissolves easily.
- Egg & Butter: Enrich the dough, adding richness, tenderness, and flavor. The melted butter incorporates smoothly.
- Salt: Enhances all the other flavors and controls yeast activity.
- Flour: Provides structure. All-purpose flour is perfect here. Start with 3 ½ cups and add more as needed – the dough should be soft but not sticky.
- Brown Sugar & Cinnamon: Create the signature gooey filling. Brown sugar adds deeper caramel notes.
- Softened Butter: Spreads easily into the filling, creating those beautiful swirls and pockets of melted butter.
- Glaze: Adds a final touch of sweetness and shine. Powdered sugar mixed with liquid creates a simple, delicious icing.
Step-by-Step Instructions: From Bowl to Oven in 60 Minutes
Now, let’s transform those ingredients into delicious rolls. This process is straightforward and efficient.
1. Activate the Yeast (5 minutes):
* In a large mixing bowl, combine the warm milk, granulated sugar, and active dry yeast. Stir gently and let it sit for about 5 minutes. You’ll see it become foamy on top – this means the yeast is active and ready to work its magic.
2. Combine Wet Ingredients (2 minutes):
* Add the room-temperature egg, melted (and slightly cooled) butter, and salt to the yeast mixture. Whisk everything together until well combined and smooth.
3. Incorporate Flour (5-7 minutes):
* Gradually add the flour, starting with 3 ½ cups. Use a wooden spoon or a sturdy spatula to mix until a shaggy dough forms. It will be sticky at first. If the dough seems too wet (sticking to your fingers excessively), add the remaining ½ cup of flour, a little at a time, mixing well after each addition, until the dough begins to pull away from the sides of the bowl and becomes manageable. It should still be soft and slightly tacky, not stiff.
4. Knead the Dough (5-7 minutes):
* Turn the dough out onto a lightly floured surface. Knead it for about 5-7 minutes. Push the dough away with the heel of your hand, fold it over, give it a quarter turn, and repeat. The dough is ready when it becomes smooth, elastic, and springs back slightly when you poke it. It should feel soft and pliable, not hard or dense. This kneading develops the gluten just enough for structure without overworking it.
5. First Rise (10-15 minutes):
* Lightly grease a large bowl with a little oil or butter. Place the kneaded dough ball into the bowl, turning it once to coat it lightly with oil. Cover the bowl tightly with plastic wrap or a damp kitchen towel. Let it rest in a warm, draft-free spot for 10-15 minutes. This short rest allows the gluten to relax slightly, making shaping easier.
6. Prepare the Filling (2 minutes):
* While the dough rests, mix together the brown sugar and ground cinnamon in a small bowl. Set aside. Soften the ¼ cup of butter for the filling to room temperature so it spreads easily.
7. Shape the Rolls (10 minutes):
* Punch down the risen dough gently to release any air bubbles. Turn it out onto a lightly floured surface. Roll the dough into a rectangle roughly 12 inches by 18 inches (30cm x 45cm). Aim for a thickness of about ¼ inch (0.5cm). Spread the softened butter evenly over the entire surface of the dough, leaving a small border around the edges. Sprinkle the cinnamon sugar mixture evenly over the butter.
8. Roll and Cut (5 minutes):
* Starting from the long edge, carefully roll the dough up tightly into a log. Pinch the seam gently to seal it. Using a sharp knife or dental floss, cut the log into 9 equal pieces (about 1.5 inches / 3.8cm thick). Place the rolls cut-side up in a lightly greased 9-inch (23cm) round or square baking pan.
9. Second Rise (20-25 minutes):
* Cover the pan loosely with plastic wrap or a damp towel. Let the rolls rise in a warm spot for another 20-25 minutes. They should look noticeably puffy and almost doubled in size. This short rise helps them become light and airy.
10. Bake to Perfection (15-18 minutes):
* Preheat your oven to 375°F (190°C) during the last 5 minutes of the second rise. Once preheated, place the pan in the center of the oven. Bake for 15-18 minutes, or until the rolls are golden brown on top and the edges look set. The internal temperature should reach around 190-200°F (88-93°C) if you have a thermometer.
11. Make the Glaze (2 minutes):
* While the rolls bake, whisk together the powdered sugar, milk (or cream), and vanilla extract in a small bowl until smooth. Adjust the consistency with a tiny bit more milk if it’s too thick.
12. Glaze and Serve (5 minutes):
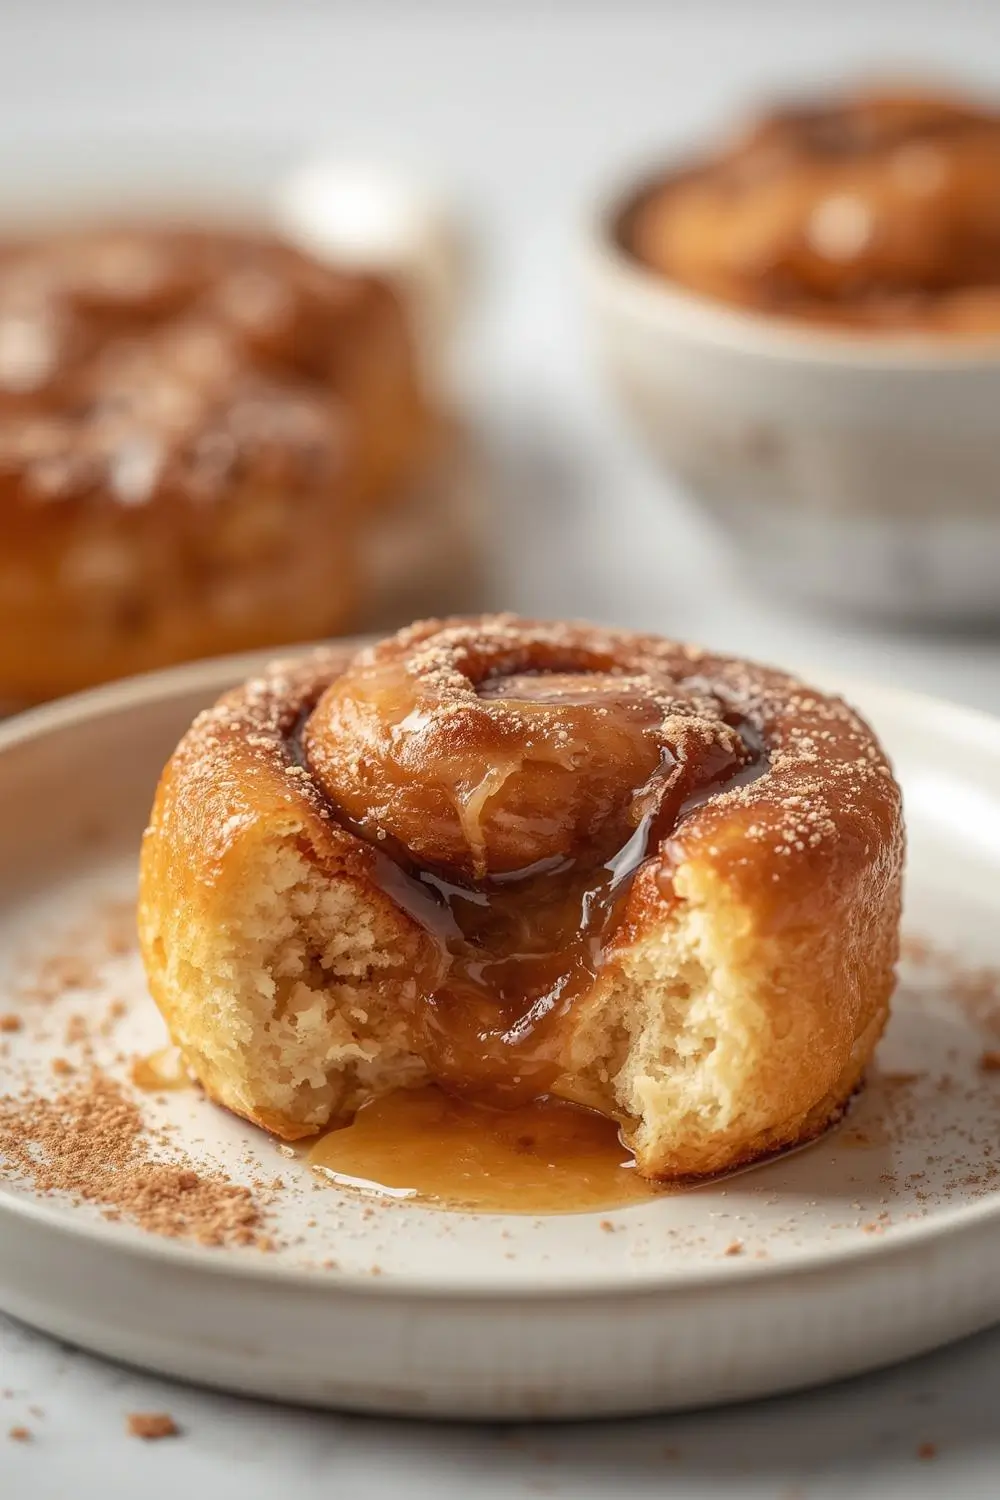
* As soon as the rolls come out of the oven, drizzle the glaze generously over the warm rolls. The heat helps the glaze melt slightly and soak in a little, creating an extra layer of sweetness. Serve immediately while they are warm and gooey. Enjoy the fruits of your 60-minute labor!
Variations and Substitutions: Making it Your Own
This recipe is wonderfully adaptable. Here are some ideas to customize it:
- Different Fillings: Swap the cinnamon sugar for a chocolate-hazelnut spread (like Nutella), a simple brown sugar and cinnamon swirl, or even a lemon zest and sugar filling. For a richer filling, mix in some chopped nuts (walnuts, pecans) or raisins.
- Add-Ins: Fold in some chocolate chips, chopped nuts, or dried fruit (like cranberries or cherries) into the dough before shaping.
- Flavored Dough: Add a teaspoon of vanilla extract to the dough for extra depth. For a subtle citrus note, add the zest of one lemon or orange.
- Butter vs. Oil: While the recipe uses melted butter, you could substitute up to ¼ cup of the butter with neutral oil (like vegetable or canola) for a slightly different texture, though butter is preferred for flavor.
- Milk Alternatives: You can use almond milk, soy milk, or oat milk instead of dairy milk. Ensure it’s unsweetened and warmed to the correct temperature.
- Glaze Variations: Experiment with different extracts (almond, orange) in the glaze. For a thicker glaze, use less milk. For a tangy twist, add a squeeze of lemon juice to the glaze.
Storage and Reheating: Keeping the Magic Alive
You’ll likely have leftovers (or maybe you baked a double batch!). Here’s how to store and reheat them:
- Cooling: Let the baked rolls cool completely in the pan on a wire rack for at least 15-20 minutes before storing. This prevents condensation and sogginess.
- Storage: Place the cooled rolls in an airtight container or wrap them tightly in plastic wrap. They will stay fresh at room temperature for up to 2 days. For longer storage, wrap individual rolls tightly in plastic wrap and freeze them for up to 1 month.
- Reheating:
* Room Temperature: For best texture, let frozen rolls thaw overnight in the refrigerator or on the counter for a few hours before reheating.
* Oven: Reheat thawed rolls (or even frozen ones straight from the freezer) in a preheated 350°F (175°C) oven for 8-10 minutes until warmed through and slightly crisp on the bottom. This is the best method for restoring their original texture.
* Microwave: For a quick option, microwave a single roll for 15-20 seconds. Be aware this can make the center slightly chewy and the glaze sticky, but it’s convenient.
Common Mistakes to Avoid: Ensuring Success
Even experienced bakers can hit a snag. Here’s how to avoid the most common pitfalls:
- Killing the Yeast: Using milk that’s too hot (above 110°F / 43°C) will kill the yeast, preventing rising. Always use warm, not hot, milk.
- Over-Kneading: Overworking the dough develops too much gluten, resulting in tough, chewy rolls instead of tender ones. Knead just until the dough is smooth and elastic.
- Under-Kneading: Under-kneaded dough won’t hold its shape well and may collapse. Ensure the dough is smooth and springs back when poked.
- Too Much Flour: Adding too much flour during kneading makes the dough stiff and dry. Add flour gradually and stop when the dough is soft and slightly tacky.
- Under-Proofing: If the rolls don’t rise enough during the second rise, they’ll be dense. Ensure they look noticeably puffy before baking.
- Over-Baking: Baking too long makes the rolls dry and hard. They should be golden brown but still soft inside. Check them a few minutes early.
- Glaze Too Thick/Thin: Adjust the milk in the glaze to achieve your desired consistency. Too thick? Add a tiny bit more milk. Too thin? Add a teaspoon of powdered sugar.
- Skipping the Rest: The short rests (after kneading and before shaping) are crucial for relaxing the gluten, making shaping easier and improving texture.
Frequently Asked Questions: Your Quick Reference
- Q: Can I use instant yeast instead of active dry yeast?
A: Yes! You can use instant yeast (also called rapid-rise or bread machine yeast) in place of active dry yeast. You don’t need to activate it in warm milk first; just add it directly to the dry ingredients with the flour. The process remains the same.
- Q: My dough is too sticky. What should I do?
A: Add flour, a little at a time, while kneading. Don’t add more than the extra ½ cup specified. The dough should be soft and slightly tacky, not dry.
- Q: My rolls didn’t rise much. Why?
A: Check your yeast – was it expired? Ensure your milk was warm but not hot. Make sure the dough rose in a warm, draft-free spot. Over-kneading can also weaken the gluten structure.
- Q: Can I make these ahead of time?
A: Absolutely! You can shape the rolls, place them in the pan, cover, and refrigerate them overnight (or up to 24 hours). Let them sit at room temperature for about 30-45 minutes before baking to allow the second rise. Bake as directed.
- Q: How do I know when the rolls are done baking?
A: They should be golden brown on top and sound hollow when tapped on the bottom. An internal temperature of 190-200°F (88-93°C) is ideal.
- Q: Can I freeze the baked rolls?
A: Yes! Let them cool completely, then wrap individual rolls tightly in plastic wrap and place them in a freezer bag. Freeze for up to 1 month. Thaw at room temperature or reheat from frozen in the oven as described.
- Q: Why is my glaze runny?
A: You might have added too much milk. Whisk in a little more powdered sugar to thicken it. If it’s too thick, add a tiny bit more milk.
- Q: Can I use a different pan?
A: A 9-inch round or square pan is ideal for even baking and a nice shape. A 9×13-inch pan will make slightly thinner rolls. Avoid very dark pans as they can cause overbrowning.
- Q: Are these rolls dairy-free or vegan?
A: This recipe uses dairy (milk, butter, egg). To make it dairy-free, substitute the milk with a dairy-free alternative and use a dairy-free butter. For vegan, also substitute the egg (flax egg or commercial egg replacer) and ensure the butter is vegan. The texture may vary slightly.
- Q: Can I double the recipe?
A: Yes, you can easily double the ingredients and use a larger baking pan (like a 9×13-inch). Adjust baking time slightly if needed, checking for doneness.
A Sweet Conclusion: Your One-Hour Reward
There you have it – the secret to enjoying warm, gooey cinnamon rolls in under an hour. This recipe proves that delicious homemade treats don’t always require hours of effort. With a few simple steps and readily available ingredients, you can transform your kitchen into a bakery and satisfy that cinnamon roll craving whenever it strikes. The soft, tender dough, the irresistible cinnamon-sugar filling, and the optional drizzle of sweet glaze come together in a surprisingly quick process. It’s a perfect project for a weekend morning, a special treat for guests, or simply a moment of pure, sweet indulgence. So, preheat your oven, gather your ingredients, and get ready to experience the joy of baking – and eating – these quick one-hour cinnamon rolls. Enjoy every gooey, cinnamon-scented bite!