Imagine biting into a sandwich where the bread is so soft, it practically melts in your mouth, yet holds together perfectly for your favorite fillings. Now, imagine that bread is made almost entirely from something you’d normally discard – sourdough starter discard! This isn’t just any sourdough bread; it’s a dedicated, soft, sandwich-worthy loaf designed to utilize your discard efficiently and deliciously. Forget dense, crumbly sourdough bricks; this recipe delivers a tender crumb and a subtle tang that makes it ideal for everything from classic PB&J to gourmet club sandwiches. Let’s unlock the secrets to baking this versatile, beginner-friendly treasure.
Why Sourdough Discard is Perfect for Sandwich Bread
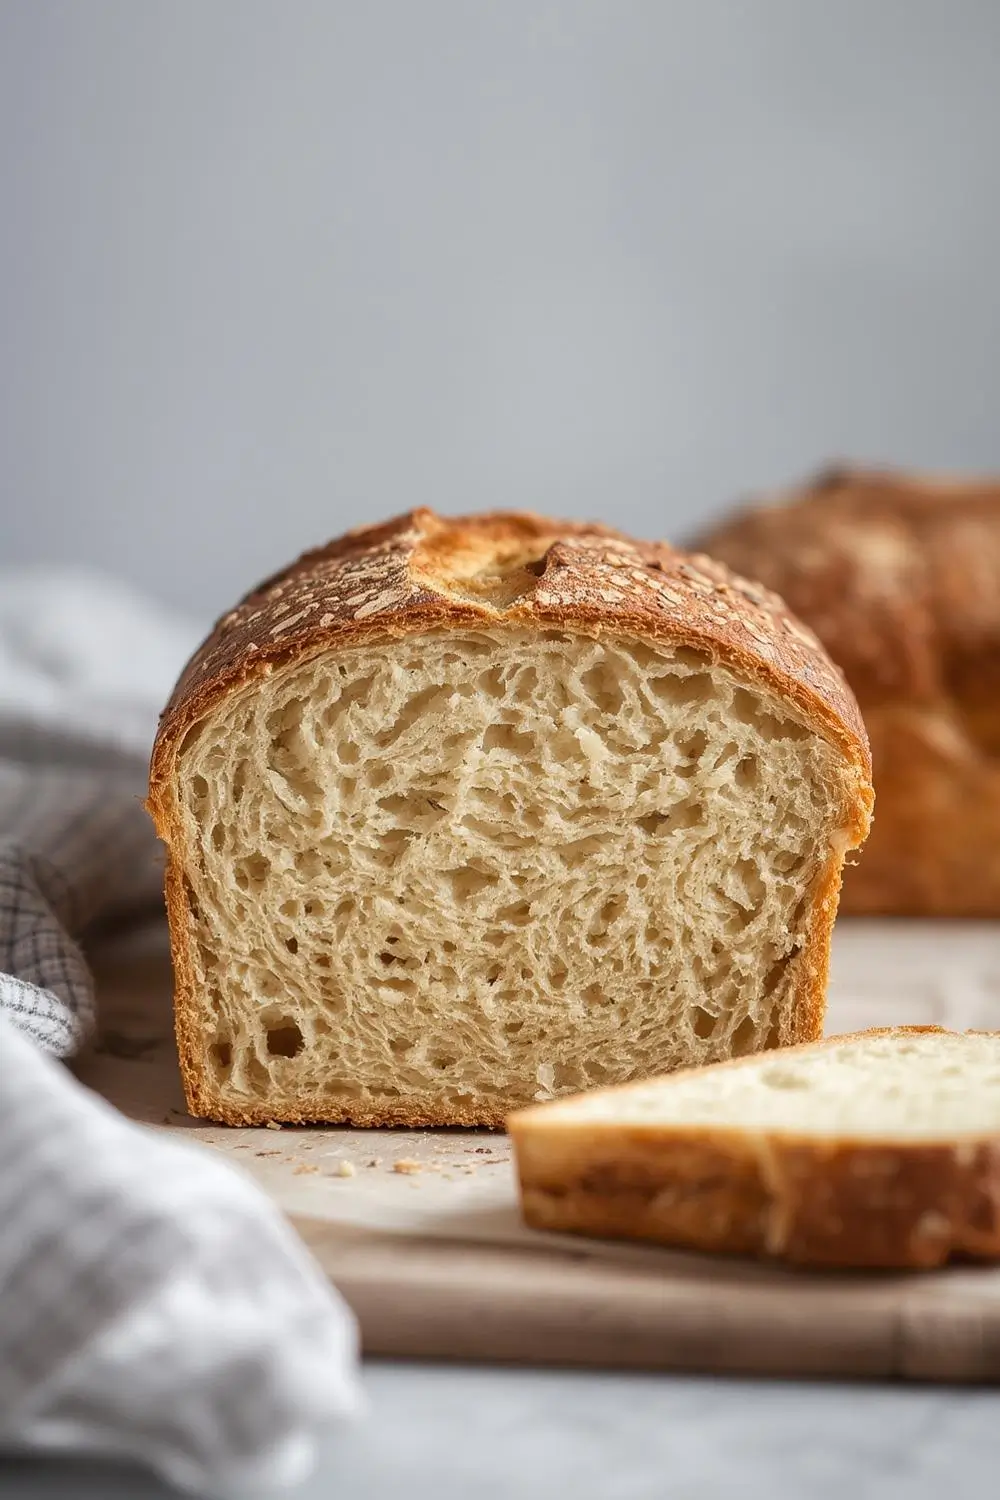
Sourdough discard often gets a bad rap for being too sour or too wet, but when harnessed correctly, it’s a powerhouse for creating incredibly soft, flavorful bread. The natural acidity from the discard helps develop a tender crumb structure and adds a pleasant, underlying tang that complements savory fillings beautifully. Using discard minimizes waste and transforms what might be trash into a kitchen staple. This recipe focuses on achieving that elusive soft crumb while ensuring the bread holds its shape for slicing and toasting.
The Magic of the Soft Crumb
The key to achieving that melt-in-your-mouth softness lies in a few crucial techniques. First, we use a higher hydration dough (more liquid relative to flour) than traditional sourdough loaves, which encourages a more open crumb structure. Second, we incorporate a small amount of vital wheat gluten (optional but recommended for beginners) to strengthen the dough and improve elasticity, preventing it from collapsing and ensuring a soft, springy texture. Finally, a strategic baking method involving steam and a hot oven creates a beautiful crust while keeping the interior moist and tender. Don’t worry if you’re new to sourdough; this recipe is designed to be forgiving and straightforward.
Ingredients: Simple, Effective, and Flexible
Here’s what you’ll need to create your perfect loaf. Quantities are given in both cups (US standard) and grams for precision. Feel free to substitute or add variations as discussed later.
Sourdough Discard: 1 1/2 cups (360g) This is the star! Use discard that’s been fed recently (1-3 days old) for best flavor and activity.*
All-Purpose Flour: 3 1/2 cups (420g) The base for structure and tenderness.*
Vital Wheat Gluten (Optional but Recommended): 1 1/2 tablespoons (12g) This is your secret weapon for beginner-friendly softness and structure. Skip if you prefer a more rustic texture.*
Salt: 1 1/2 teaspoons (8g) Essential for flavor and controlling yeast activity.*
Olive Oil: 2 tablespoons (30ml) Adds richness, tenderness, and helps with browning.*
Warm Water: 1 1/4 cups (300g) Use water between 100-110°F (38-43°C) – warm to the touch, not hot.*
Honey or Maple Syrup (Optional): 1 tablespoon (21g) A small amount adds food for the yeast, promoting a slightly sweeter, more robust rise and browning. Skip if you prefer a more neutral flavor.*
- Cornmeal or Parchment Paper: For dusting the loaf pan.
Essential Equipment
- Large Mixing Bowl: For combining ingredients.
- Stand Mixer with Dough Hook (Optional but Recommended): Makes kneading much easier.
- Kitchen Scale: Highly recommended for accuracy, especially with sourdough discard.
- Loaf Pan: 9×5 inch (23×13 cm) standard size.
- Parchment Paper or Cornmeal: For easy removal.
- Kitchen Towel or Plastic Wrap: For covering the dough during rise.
- Sharp Knife or Serrated Bread Knife: For scoring and slicing.
- Baking Sheet: To place under the loaf pan in the oven (for steam).
- Oven Thermometer: Ensures accurate baking temperature.
Step-by-Step Instructions: From Bowl to Beautiful Loaf
Baking sourdough discard bread is a rewarding process. Here’s how to do it step-by-step, with tips for success:
1. Prepare Your Workspace: Ensure your loaf pan is lightly greased or lined with parchment paper, leaving an overhang for easy removal. Preheat your oven to 375°F (190°C). Place a baking sheet on the bottom rack to hold water for steam.
2. Combine the Wet Ingredients: In your large mixing bowl, whisk together the warm water, olive oil, and honey (if using). Whisk in the sourdough discard until mostly smooth. It might look a bit lumpy at first – that’s fine.
3. Mix the Dry Ingredients: In a separate bowl, whisk together the all-purpose flour, vital wheat gluten (if using), and salt. This ensures even distribution.
4. Combine Wet and Dry: Add the dry ingredients to the wet ingredients in the large bowl. Using a sturdy spatula or your hands, mix until a shaggy dough forms. It will be sticky!
5. Knead the Dough (The Key to Softness):
By Hand: Turn the dough out onto a lightly floured surface. Knead vigorously for 8-10 minutes. Push the dough away with the heel of your hand, fold it over, rotate, and repeat. The dough will start smooth and elastic. Add a tiny bit more flour only if it’s extremely* sticky and sticking to your hands excessively – aim for a tacky but manageable dough.
With a Stand Mixer:* Attach the dough hook. Mix on low speed for 5 minutes, then increase to medium-low for another 5 minutes. The dough should pull away from the sides of the bowl and form a smooth ball. It will be quite sticky.
6. First Rise (Bulk Fermentation): Place the kneaded dough in a lightly oiled bowl, turning it once to coat. Cover tightly with plastic wrap or a damp kitchen towel. Let it rise at room temperature (around 70-75°F / 21-24°C is ideal) for 1 to 1.5 hours, or until it has roughly doubled in size. It might take a bit longer if your discard is very active or the room is cooler.
7. Shape the Loaf: Gently deflate the risen dough by pressing down on it. Turn it out onto a lightly floured surface. Shape it into a rough log, trying to minimize surface tension. This helps it rise evenly in the pan. Place the shaped dough into your prepared loaf pan, pressing it gently to fit. Cover loosely with plastic wrap or a towel.
8. Second Rise (Proofing): Let the dough rise again in the pan, covered, for another 45-60 minutes. It should rise just above the rim of the pan. This is crucial for achieving a tall loaf. The dough is ready when it springs back slowly when gently poked with a finger.
9. Preheat and Score: About 20 minutes before the second rise finishes, place your oven rack in the middle position and preheat to 375°F (190°C). Place the baking sheet with water on the bottom rack. Gently score the top of the loaf with a sharp knife or razor blade, making 2-3 shallow diagonal slashes about 1/4 inch deep. This allows steam to escape and controls expansion.
10. Bake: Carefully place the loaf pan on a middle oven rack. Bake for 35-45 minutes. The bread is done when:
* It is deep golden brown.
* The internal temperature reaches 190-200°F (88-93°C) when measured with an instant-read thermometer inserted into the center.
* The bottom sounds hollow when tapped.
11. Cool Completely: This is non-negotiable! Remove the loaf from the pan and place it on a wire rack. Let it cool completely, at least 1-2 hours. Cutting into it too soon releases steam and makes the crumb gummy and dense. Patience pays off!
12. Slice and Enjoy: Once cooled, slice your beautiful sourdough discard sandwich bread loaf. Enjoy it fresh, toasted, or used for your favorite sandwiches. Store any leftovers properly.
Variations and Substitutions: Making it Your Own
- Adding Flavor: Stir in 1/4 cup (25g) of seeds (sunflower, pumpkin, sesame) or 1/4 cup (25g) finely chopped herbs (chives, rosemary, thyme) into the dough during kneading for extra flavor and texture.
- Whole Wheat Twist: Substitute up to 1 cup (120g) of the all-purpose flour with whole wheat flour for a nuttier flavor and denser texture (though still soft).
- Sweet Treat: Omit the salt and honey. Add 1/4 cup (50g) brown sugar and 1 teaspoon cinnamon to the dry ingredients. This makes a fantastic sweet sandwich bread or toast.
- Gluten-Free Option: Unfortunately, this specific recipe relies on vital wheat gluten for its soft texture. A true gluten-free sourdough discard sandwich bread would require a completely different recipe and flour blend.
- Using Less Discard: If you have less discard, you can scale the recipe down proportionally. The texture might be slightly denser, but it will still work.
- Higher Hydration: For an even softer, more open crumb, increase the water to 1 1/2 cups (360g). You might need to adjust kneading slightly and expect a slightly more delicate structure.
Storage and Reheating: Keeping it Fresh
- Room Temperature: Store the cooled, completely unwrapped loaf in a paper bag or a bread box at room temperature for 1-2 days. It stays remarkably soft this way.
- Refrigeration: For longer storage (3-4 days), wrap the cooled loaf tightly in plastic wrap or place it in an airtight container. The crust will soften significantly, but it’s still delicious.
- Freezing: Slice the cooled loaf before freezing. Wrap individual slices tightly in plastic wrap or place them in a freezer bag. Freeze for up to 3 months. To thaw, remove slices from the freezer and let them come to room temperature, or toast them directly from frozen for best texture.
- Reheating: For the best texture:
* Toasting: Slice and toast slices lightly in a toaster or toaster oven.
* Oven: Wrap the whole loaf (or slices) in foil and warm in a 300°F (150°C) oven for 10-15 minutes.
* Stovetop: Place slices in a dry skillet over medium-low heat for a few minutes per side.
Common Mistakes to Avoid: Baking Success
- Skipping the Vital Wheat Gluten: This is the biggest culprit for dense, crumbly sourdough discard bread. It provides the necessary structure. If you skip it, expect a denser texture, but it will still be edible and flavorful.
- Over-Kneading: While kneading is important, over-kneading can develop too much gluten, leading to a tough loaf. Knead just until the dough is smooth and elastic.
- Under-Kneading: Under-kneaded dough won’t develop enough gluten, resulting in a collapsed loaf or a dense, gummy crumb. Knead until the dough passes the windowpane test (stretch a small piece thin enough to see light through without tearing).
- Rushing the Rise: Sourdough needs time. Rushing the bulk fermentation or proofing leads to poor flavor development and a dense crumb. Be patient.
- Cutting Too Soon: This is the cardinal sin! Cutting into warm bread releases steam, making the crumb gummy and preventing it from setting properly. Wait for complete cooling.
- Using Cold Water: Warm water (not hot) is essential to activate the yeast in your discard effectively. Cold water slows down the rise significantly.
- Not Scoring: Forgetting to score the loaf prevents controlled expansion and can cause the loaf to burst unpredictably on the sides.
Frequently Asked Questions: Sourdough Discard Bread
- Q: Can I use discard that’s been in the fridge for weeks? A: Yes! Cold, inactive discard works perfectly for this recipe. It might take a bit longer to rise, but the flavor can be even more pronounced. Just ensure it’s not moldy.
- Q: My bread collapsed in the oven. Why? A: This is often due to under-kneading (not enough gluten development), under-proofing (not enough rise before baking), or a dough that’s too wet. Check your kneading and proofing times.
- Q: My bread is dense and gummy inside. What went wrong? A: Cutting it too soon is the most common cause. Also, under-kneading, under-proofing, or using too little vital wheat gluten can contribute. Ensure you knead sufficiently and wait for full cooling.
- Q: Can I use a different type of flour? A: Yes! You can substitute up to 25% of the all-purpose flour with whole wheat, rye, or spelt flour for interesting flavor and texture variations. Adjust hydration slightly if needed.
- Q: How do I know if my discard is active enough? A: Active discard should be bubbly, slightly domed, and smell pleasantly sour. If it’s very inactive (flat, no bubbles, very sour), it might need a quick feed before using, but it still works fine in this recipe.
- Q: Can I make this without a stand mixer? A: Absolutely! Kneading by hand for 8-10 minutes is perfectly effective and gives you a great workout.
- Q: How long does the bread stay fresh? A: At room temperature in a paper bag, it’s best for 1-2 days. Refrigerated, it lasts 3-4 days. Frozen slices last 3 months.
- Q: Can I use this bread for French toast or bread pudding? A: Definitely! Its soft crumb and subtle tang make it excellent for soaking up egg mixtures or custard.
- Q: Why is the gluten optional? A: Vital wheat gluten helps beginners achieve a soft, sandwich-worthy texture. If you have experience with sourdough discard and prefer a more rustic, open crumb, you can omit it. The bread will still be delicious and flavorful.
- Q: Can I add nuts or dried fruit? A: Yes! Fold in 1/2 cup (50g) chopped nuts or 1/2 cup (75g) dried fruit (like cranberries or raisins) into the dough after the first rise for added texture and flavor.
The Perfect Finish: Your Soft Sourdough Discard Loaf Awaits
Creating your own soft, flavorful sourdough discard sandwich bread is a deeply satisfying achievement. It transforms kitchen scraps into a versatile, everyday staple that elevates simple meals. The process, from nurturing your discard to the final slice, connects you to the ancient art of sourdough while providing a delicious, waste-free solution. The tender crumb, subtle tang, and satisfying chew make it the ideal canvas for your favorite fillings. So, gather your discard, embrace the process, and enjoy the incredible aroma and taste of your homemade creation. Share your results, experiment with variations, and savor the joy of baking with sourdough. Happy baking!