Spring arrives, painting the world in vibrant greens and bursts of yellow. For many, this season whispers of renewal, fresh beginnings, and the simple joy of foraging. Among the first signs of spring, often overlooked but brimming with potential, are the cheerful faces of dandelions. While often seen as a pesky weed, these resilient flowers hold a secret: they can be transformed into something truly special – golden, sweet, and utterly unique dandelion flower jelly. This isn’t just a recipe; it’s a connection to generations past, a taste of the countryside captured in a jar, perfect for brightening your breakfast table or gifting to loved ones.
Foraging for Dandelion Petals: A Gentle Harvest
Before we dive into the jelly-making process, a word on foraging. Dandelion petals are most abundant and sweetest in the early spring, before the plant produces its familiar seed head. Look for patches of dandelions growing in sunny, undisturbed areas – perhaps your own lawn (if you haven’t sprayed it with chemicals!), a meadow, or a field. The key is to harvest petals from plants that haven’t been treated with pesticides or herbicides. Choose flowers that are fully open, vibrant yellow, and free from any signs of disease or insects. Gently pluck the petals, ensuring you only take the yellow part, discarding the green base. A gentle morning harvest, before the sun gets too strong, often yields the best flavor. Remember to leave plenty behind for the bees and the next generation of dandelions!
The Magic of Dandelion Petals
Dandelion petals possess a subtle, honey-like sweetness and a delicate floral note that shines through when preserved. They lack the bitterness sometimes found in the leaves or roots. When steeped in a sugar syrup, they release their unique character, creating a jelly that’s both visually stunning and delightfully different. This recipe honors the traditional methods, using simple ingredients to let the dandelion’s natural essence shine.
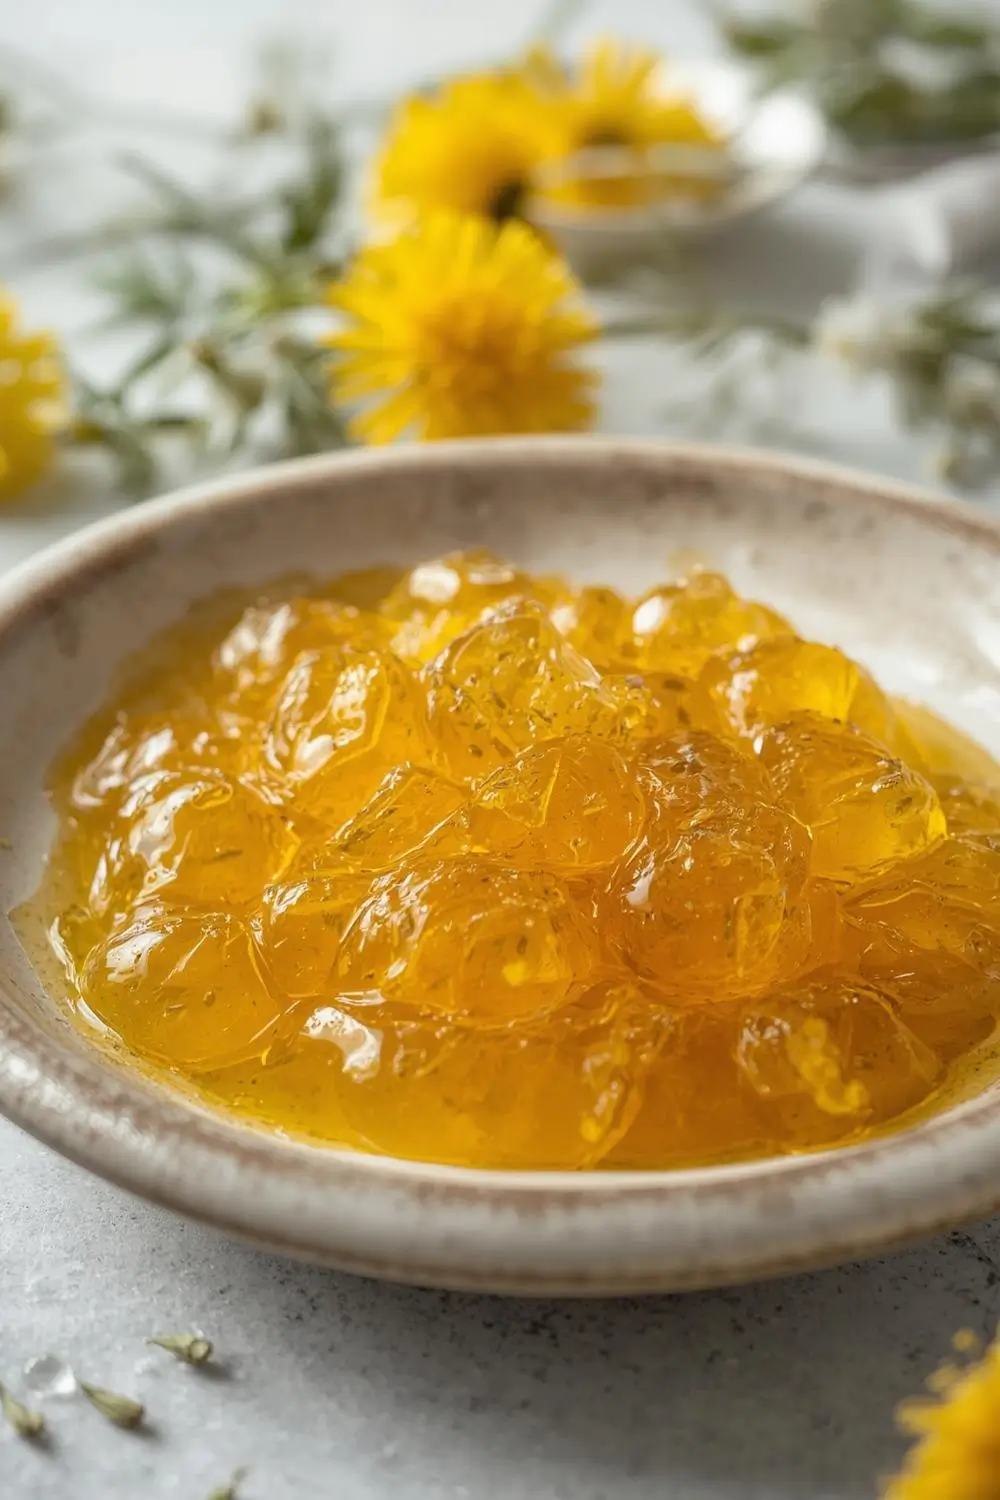
Golden Spring Harvest Delight: Old Fashioned Dandelion Flower Jelly
Yields: Approximately 4-5 half-pint jars
Prep Time: 30 minutes
Cook Time: 45-60 minutes
Total Time: 1 hour 15 minutes – 2 hours (including steeping)
Ingredients:
- Dandelion Petals: 4-5 cups (tightly packed) – The heart of the recipe, harvested as described above.
- Water: 4 cups – For steeping the petals and creating the base.
- Lemon Juice: 1/4 cup – Essential for setting the jelly and adding a bright, balancing note.
- Lemon Zest: 1 tablespoon – Adds a beautiful aromatic depth that complements the dandelion.
Pectin: 1 (1.75-ounce) box of powdered pectin (like Sure-Jell or Ball) – Crucial for achieving the perfect gel. Do not substitute liquid pectin.*
- Sugar: 6 cups – The primary sweetener. Granulated white sugar works best for clarity and setting.
- Butter (Optional): 1/2 teaspoon – A small amount helps reduce foaming during cooking.
Equipment:
- Large, non-reactive pot (stainless steel or enameled cast iron)
- Fine-mesh strainer or jelly bag
- Cheesecloth (optional, for clearer jelly)
- Large bowl
- Candy thermometer (highly recommended)
- Sterilized jars and lids (mason jars work perfectly)
- Jar lifter
- Funnel
- Magnetic lid wand or tongs
- Clean kitchen towels
Step-by-Step Instructions:
1. Prepare the Dandelion Infusion:
* Place the 4-5 cups of freshly harvested dandelion petals into a large bowl.
* Pour the 4 cups of cold water over the petals.
* Cover the bowl and let the petals steep at room temperature for at least 4 hours, or preferably overnight (8-12 hours). This gentle infusion draws out the dandelion’s delicate flavor and color. The petals will darken significantly during this time. Strain the mixture through a fine-mesh strainer lined with cheesecloth if you desire an extra-clear jelly. Press gently on the petals to extract as much liquid as possible. Discard the spent petals. You should have approximately 4 cups of vibrant yellow dandelion-infused water. Set this aside.
2. Combine Ingredients & Prepare Jars:
* While the petals steep, sterilize your jars and lids. Wash them thoroughly in hot, soapy water, rinse well, and then place them in a large pot of simmering water (not boiling) for at least 10 minutes. Keep them hot until ready to fill. Alternatively, run them through a dishwasher’s sanitize cycle.
* In your large, non-reactive pot, combine the strained dandelion infusion, the 1/4 cup of lemon juice, and the 1 tablespoon of lemon zest. Stir well to combine.
3. Add Pectin & Bring to a Boil:
* Measure out the 6 cups of sugar. Have it measured and ready nearby.
Stir the powdered pectin into the dandelion-lemon mixture. It’s important to add the pectin before* bringing the mixture to a boil.
* Place the pot over medium-high heat. Bring the mixture to a full, rolling boil that cannot be stirred down. This means large bubbles that don’t stop bubbling when you stir the pot. Stir constantly during this process.
4. Add Sugar & Achieve Set Point:
Once the mixture reaches a full rolling boil, add all* of the measured sugar at once, stirring vigorously and constantly for exactly 1 minute. This ensures the sugar dissolves completely and the pectin activates properly.
Continue boiling the mixture hard for another 1-2 minutes, still stirring constantly. The jelly is ready when it reaches 220°F (104°C) on a candy thermometer, or when it passes the “sheet test.” To do the sheet test, place a small amount of the boiling jelly onto a chilled plate. Let it sit for a few seconds, then push it with your finger. If it wrinkles and forms a sheet that doesn’t immediately flow back, it’s set. If it’s still very liquid, boil for another minute and test again. This step is critical for the jelly to set properly.*
5. Skim Foam & Prepare for Jarring:
* As the jelly cooks, a foam may form on the surface. You can skim this off with a spoon if desired, though it’s not strictly necessary. A small amount of butter added at the beginning can help reduce foaming.
* Once the jelly reaches the set point, remove the pot from the heat immediately.
6. Fill the Jars:
* Carefully ladle or pour the hot dandelion jelly into the sterilized jars, leaving about 1/4 inch of headspace at the top. Use a funnel to make this step cleaner.
* Wipe the rims of the jars thoroughly with a clean, damp cloth or paper towel to remove any jelly residue. This ensures a proper seal.
* Place the sterilized lids on the jars and screw on the bands fingertip-tight (just until resistance is met).
7. Process in a Water Bath (Optional but Recommended for Shelf Stability):
* Place the filled jars on a rack in a large pot or boiling water canner. Ensure they are covered by at least 1-2 inches of water.
* Bring the water to a rolling boil. Process the jars for 10 minutes (adjust for your altitude if necessary – check your local extension service guidelines).
* After processing, carefully remove the jars using a jar lifter and place them on a clean kitchen towel or wire rack, spacing them apart. Allow them to cool completely, undisturbed, for 12-24 hours. You will hear the satisfying “ping” of the lids sealing as they cool.
8. Check Seals & Store:
* After the jars have cooled completely, check the seals. The center of the lid should be concave (indented) and not flex up and down when pressed. Any jars that did not seal properly should be refrigerated and used first.
* Label your jars with the date and contents. Store sealed jars in a cool, dark, dry place like a pantry for up to 1 year. Once opened, refrigerate and use within 3 months for the best flavor and texture.
Variations and Substitutions:
- Flavor Boosters: Add a split vanilla bean (scraped) or a few strips of orange zest to the steeping liquid for extra complexity. A pinch of salt can also enhance the flavors.
- Sweetener Swap: While granulated sugar is traditional, you can experiment with a small amount of honey or maple syrup for a different flavor profile, though the setting power may be slightly reduced. Use less liquid sweetener.
- Pectin Alternatives: If you can’t find powdered pectin, you can use liquid pectin (follow the package instructions, usually adding it at the end of cooking). Some recipes use a natural pectin source like apple juice, but this requires more testing and adjustment.
- Fruit Additions: For a unique twist, consider adding a handful of crushed raspberries or blackberries to the pot during the last minute of cooking for a beautiful marbled effect and extra fruitiness.
- Less Sweet?: If you prefer a less sweet jelly, you can reduce the sugar slightly, but be aware it may affect the set and shelf life.
Storage and Reheating Tips:
- Sealed Jars (Pantry): Store in a cool, dark, dry place. Avoid temperature fluctuations.
- Opened Jars: Once opened, always refrigerate. Use within 3 months for optimal quality.
- Reheating: Dandelion jelly is best enjoyed at room temperature or slightly chilled. It doesn’t typically need reheating. If you want to gently warm it for a specific use (like drizzling over ice cream), do so very gently over low heat, stirring constantly, and avoid boiling.
Common Mistakes to Avoid:
1. Using Old or Wilted Petals: Petals lose their flavor and color quickly. Use fresh, vibrant petals.
2. Not Sterilizing Jars: This is crucial for preventing spoilage. Never skip this step.
3. Overcooking or Undercooking: Both lead to problems. Overcooking can make the jelly bitter or darken it excessively. Undercooking results in runny jelly that won’t set. Use a thermometer or the sheet test.
4. Adding Sugar Too Slowly: Adding sugar gradually can prevent the mixture from boiling over and ensure proper dissolution.
5. Skipping the Lemon Juice: Lemon juice is vital for both flavor and the setting process. Don’t omit it.
6. Using Liquid Pectin Without Adjustment: Liquid pectin requires different timing and sugar amounts. Follow the package instructions carefully.
7. Forgetting to Skim Foam: While not always necessary, a thick foam can affect the final texture and appearance. Skim if it’s excessive.
8. Not Leaving Headspace: Filling jars too full can prevent proper sealing and cause overflow during processing.
9. Processing Time: Ensure you process for the correct time based on your altitude and jar size.
Frequently Asked Questions (FAQs):
1. Where can I find dandelion petals? Look for dandelions in your own yard (if chemical-free), local parks, meadows, or fields. Harvest in early spring before the flowers go to seed.
2. Are dandelion petals safe to eat? Yes, when harvested from areas free of pesticides, herbicides, and pollution, and used in recipes like this jelly. Always wash them gently before use.
3. Why do the petals need to steep? Steeping extracts the delicate flavor and color from the petals into the water, forming the base of the jelly.
4. Can I use dandelion leaves instead of petals? No, dandelion leaves are bitter and not suitable for making jelly. Only the yellow petals are used.
5. How long does the jelly keep? Properly sealed and stored in a cool, dark pantry, it lasts up to 1 year. Once opened, refrigerate and use within 3 months.
6. What if my jelly doesn’t set? This usually happens if the mixture wasn’t boiled long enough or the sugar wasn’t added correctly. Check the set point with a thermometer or plate test. Ensure you used the correct amount of pectin and sugar.
7. Can I freeze dandelion jelly? Yes, it freezes well for up to 6 months. Leave 1/2 inch headspace in a freezer-safe container. Thaw in the refrigerator.
8. Is this jelly sweet? Yes, it’s a sweet preserve. The dandelion flavor is subtle and honey-like, not bitter.
9. Can I make this without a candy thermometer? Yes, you can use the sheet test: place a small amount of boiling jelly on a chilled plate. If it wrinkles and forms a sheet that doesn’t flow back, it’s set.
10. What can I serve this jelly with? It’s delightful on toast, scones, or pancakes. Use it as a glaze for ham or pork chops, or swirl it into yogurt or oatmeal.
Conclusion: A Golden Harvest of Joy
Creating your own old-fashioned dandelion flower jelly is more than just a culinary project; it’s an act of connection. It links you to the rhythms of the earth, the changing seasons, and the wisdom of those who came before us, finding sweetness and sustenance in the simplest of nature’s gifts. The vibrant golden hue and unique, delicate flavor are a testament to the bounty of spring. Each spoonful offers a taste of the countryside, a reminder of the beauty found in foraging and the satisfaction of preserving it yourself. Whether enjoyed on a warm morning toast, shared as a thoughtful gift, or simply admired for its stunning color, this Golden Spring Harvest Delight is a true celebration of the season’s first, most cheerful bloom. So, venture out, gather your petals, and experience the magic of transforming a humble weed into a jar of liquid sunshine. Happy foraging and preserving!


