Table of Contents
- 1 Wake Up Your Inner Leprechaun With These Magically Simple Treats
- 2 Gathering Your Magical Supplies
- 3 Brewing Your Marshmallow Potion: Step-by-Step Magic
- 4 Unleash Your Inner Treat Sorcerer: Customization Spells
- 5 Keeping Your Treats Fresh: Storage Sorcery
- 6 Avoiding Common Kitchen Curses
- 7 Your Magical Treat Questions Answered
- 8 Go Forth and Spread the Edible Magic
Wake Up Your Inner Leprechaun With These Magically Simple Treats
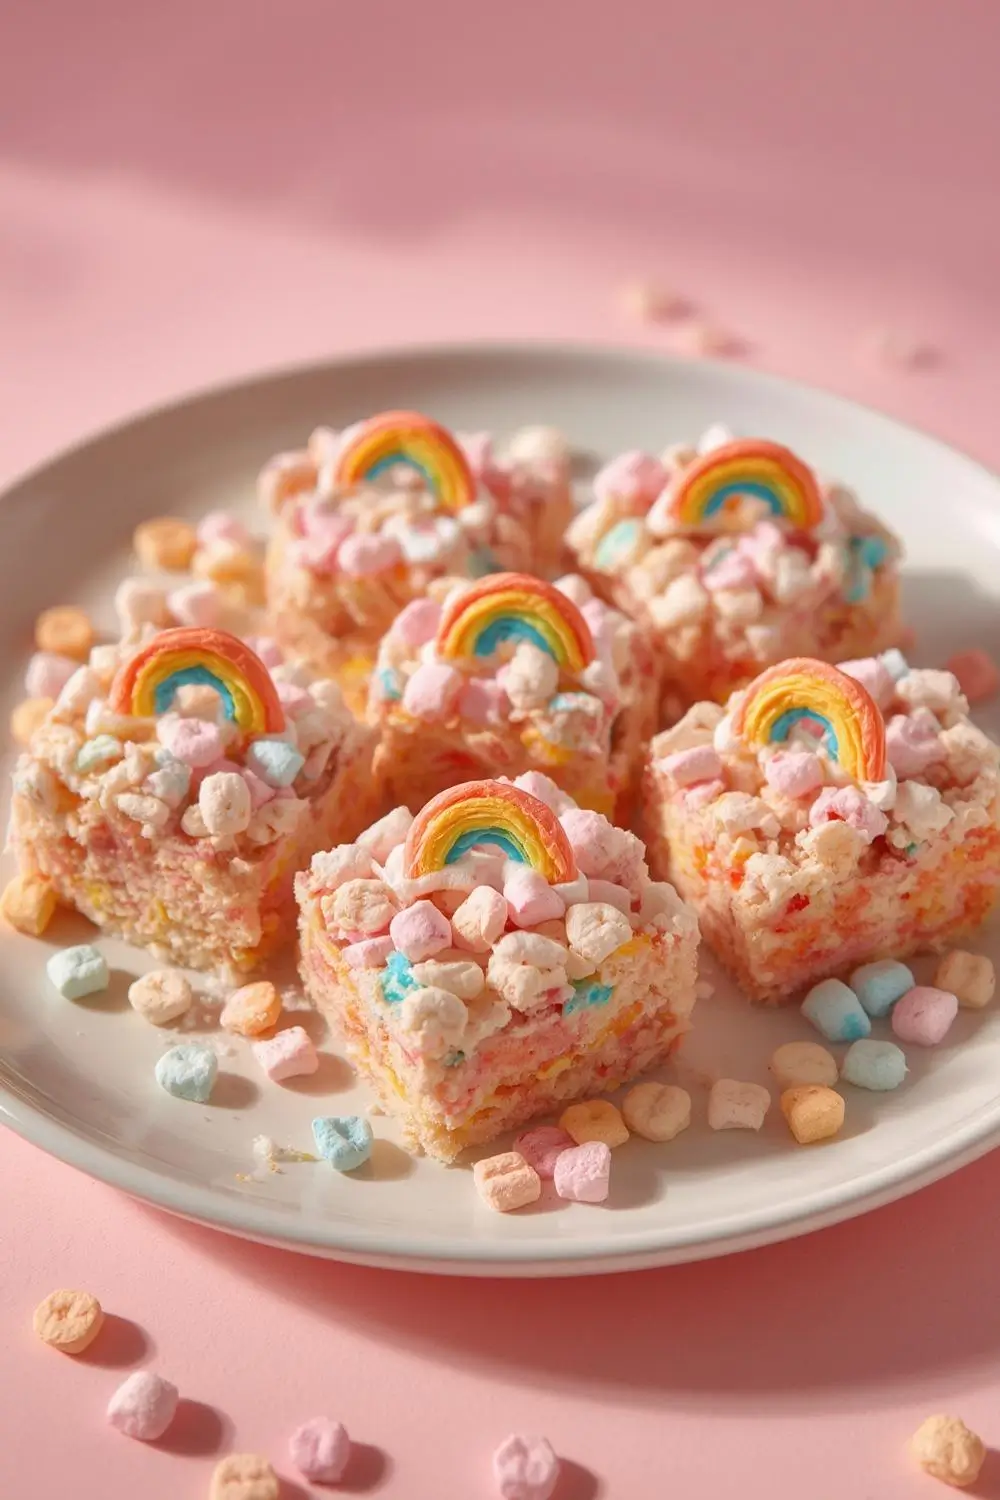
The moment your spoon hits that rainbow-speckled cereal box, something magical happens. Those pastel moons and rainbow shapes seem to whisper promises of childhood wonder – but what if you could transform that breakfast nostalgia into something even more enchanting? Enter these No-Bake Lucky Charm Treats: your golden ticket to edible happiness that requires exactly zero oven time and maximum fun. Imagine crispy cereal hugs coated in sweet marshmallow clouds, studded with candy-coated charms that wink at you like edible confetti. This isn’t just another dessert recipe; it’s your passport to becoming the kitchen magician who turns ordinary afternoons into sprinkle-dusted memories.
What makes these treats truly spellbinding isn’t just their vibrant appearance (though those rainbow marshmallows certainly work their charm). It’s how they manage to be ridiculously simple while tasting like you spent hours crafting kitchen alchemy. Within 15 minutes flat, you’ll have a pan full of sweet, chewy squares that disappear faster than a leprechaun spotting a four-leaf clover. Whether you’re prepping for St. Patrick’s Day festivities, planning a birthday party surprise, or just need a quick dopamine boost on a gloomy Tuesday, this recipe transforms pantry staples into pure edible joy. The best part? Little helpers can join the adventure without touching a single appliance – just bowls, spoons, and plenty of marshmallow-covered giggles.
Why These Treats Will Steal Your Pot of Gold
Before we dive into marshmallow clouds and cereal rainbows, let’s talk about why this recipe deserves a permanent spot in your treat rotation. Unlike traditional rice crispy treats that sometimes taste one-note, the combination of crispy rice cereal and Lucky Charms creates this magical textural duet. The crispy grains give that satisfying crunch while the marshmallow bits in the cereal melt into gooey pockets of sweetness. It’s like the cereal box fairy exploded in your baking dish (in the best possible way). And because we’re using both the cereal and extra marshmallows, every bite delivers that nostalgic marshmallow creaminess we all crave. No more fishing through the box for those precious charms – we’re loading these treats with bonus marshmallows so every square is stuffed with magic.
Gathering Your Magical Supplies
One of the best spells in a kitchen witch’s grimoire? Transforming six humble ingredients into pure enchantment. Here’s your potion list with notes to make your treat-making journey smooth sailing:
Core Ingredients
- 5 cups Lucky Charms cereal – That’s about one standard 11.5oz box, but measure properly! The ratio is key for perfect texture.
- 3 cups mini marshmallows – Divided into 2 cups for melting + 1 cup for folding in. Minis melt faster than regular size.
- 4 tablespoons unsalted butter – Cut into chunks for even melting. Salted butter works too – just skip added salt.
- Pinch of fine sea salt – Balances the sweetness beautifully. Omit if using salted butter.
- 1 teaspoon pure vanilla extract – The secret flavor enhancer! Imitation works too.
- 4 cups crispy rice cereal – Not puffed rice! This gives the essential crunch foundation.
The Equipment Charm Bracelet
No fancy tools needed here, but these helpers make the magic happen:
- 9×13″ baking dish – Metal conducts heat better for quicker setting
- Parchment paper – Lifesaver for clean removal
- Large heatproof mixing bowl – Metal or glass, avoid plastic for melting
- Rubber spatula – Silicone edges scrape every bit of marshmallow goodness
- Cooking spray or butter – For greasing hands when pressing mixture
Brewing Your Marshmallow Potion: Step-by-Step Magic
Ready to work some kitchen wizardry? Follow these steps to treat-making triumph:
1. Prep Your Cauldron (Okay, Baking Dish)
- Line your 9×13″ baking dish with parchment paper, letting it hang over two sides. This creates handles for easy removal later.
- Lightly grease the parchment and exposed dish edges with butter or cooking spray. Trust me, skipped this step once and mourned lost treat edges.
2. Melt Your Golden Elixir
- Combine butter and 2 cups mini marshmallows in your large bowl. Microwave in 30-second bursts, stirring between each, until silky smooth (about 1½ minutes total).
- Pro Tip: Stop heating when a few lumps remain – residual heat will finish melting them as you stir.
- Immediately stir in vanilla and salt. The aroma will make your kitchen smell like a candy shop!
3. The Great Cereal Conjuring
- Working quickly, pour both cereals and remaining 1 cup marshmallows into the molten marshmallow mixture.
- Fold gently with your spatula from bottom to top – you want every piece coated but not crushed.
- When ingredients are 90% combined, let the mixture cool for 2 minutes. This prevents marshmallows from completely melting when you add them.
4. Pressing Spell for Perfect Squares
- Dump the mixture into your prepared dish. Lightly grease your hands with cooking spray or butter.
- Press mixture evenly into corners using fingertips – don’t smash! Gentle pressure prevents dense bricks.
- Sprinkle extra marshmallows on top and gently press to adhere – creates irresistible visual appeal.
5. The Patience Charm (Hardest Part!)
- Let treats rest at room temperature for 1-2 hours until completely set. Rushing this = crumbly mess.
- For speedier setting: Pop in fridge for 45 minutes. But room temp yields chewier texture.
Unleash Your Inner Treat Sorcerer: Customization Spells
Now that you’ve mastered the basic incantation, let’s explore spell variations to match any occasion:
Shape-Shifting Magic
- Rainbow wand pops: Press mixture into round cookie cutter shapes, insert popsicle sticks before setting
- Leprechaun hat bars: Shape into triangles with black candy melt brims
- Edible gold coin rounds: Use circular cutter, brush with edible gold dust
Flavor Alchemy
- Chocolate cauldrons: Add ½ cup melted chocolate chips to marshmallow mixture
- Peanut butter potion: Swirl in ⅓ cup creamy peanut butter with melted marshmallows
- Birthday cake blast: Mix in ½ cup rainbow sprinkles + 1 tsp cake batter extract
Dietary Charm Adjustments
- Vegan enchantment: Use vegan butter + Dandies marshmallows + gluten-free crisp rice cereal
- Gluten-free magic: Substitute gluten-free crispy rice cereal + certified GF Lucky Charms
- Lower-sugar spell: Reduce marshmallows to 2.5 cups total + add ¼ cup unsweetened applesauce
Keeping Your Treats Fresh: Storage Sorcery
Properly stored, these magical morsels stay delicious for days (if they last that long!):
- Room Temperature: Store in airtight container with parchment between layers for up to 4 days
- Refrigerated: Extends freshness to 7 days, but may harden slightly – let sit at room temp 15 minutes before serving
- Freezing Spell: Wrap individual bars in plastic, then place in freezer bag for 2 months. Thaw at room temp 1 hour
Reviving Stale Magic
Found forgotten treats? Here’s how to resurrect them:
- Microwave a single bar for 8 seconds to refresh chewiness
- Transform hardened pieces into cereal treat French toast – dip in egg/milk mixture, pan-fry
- Crumble over ice cream for instant magic sundae topping
Avoiding Common Kitchen Curses
Even experienced wizards stumble. Protect your treats with these counter-spells:
- Curse of the Crumbly Bars: Caused by undermeasuring marshmallows. Always use liquid measuring cups for marshmallows – pack lightly.
- Hardened Marshmallow Hex: Result of overheating. Melt slowly at 50% power with frequent stirring.
- Soggy Spell Disaster: Happens when adding cereal to hot mixture too slowly. Have all ingredients measured and ready before melting begins.
- Sticky Hands Plague: Grease hands AND spatula before pressing mixture – cooking spray works miracles.
Your Magical Treat Questions Answered
Can I use regular marshmallows instead of mini?
Absolutely! Substitute equal amounts by weight (about 10 oz regular marshmallows). Chop into smaller pieces before melting to ensure even dissolving.
How do I prevent the cereal from getting soggy?
Two key tricks: 1) Use freshly opened, crisp cereal 2) Work quickly once marshmallow mixture is ready – have all ingredients pre-measured.
Can I make these vegan friendly?
Indeed! Use vegan butter (like Miyoko’s or Earth Balance) plus vegan marshmallows (Dandies brand works great). Ensure all cereals are vegan – some marshmallow bits contain gelatin.
Why did my treats turn out rock hard?
This happens if marshmallows are overheated or overmixed. Melt gently at lower heat and stop stirring once everything is just combined.
Can I add food coloring for extra color?
For vibrant swirls, add gel food coloring to the melted marshmallow mixture before adding cereals. Liquid coloring may make treats sticky.
How far in advance can I make these?
They taste best within 48 hours but keep well sealed for up to 4 days. For parties, I recommend making them the day before so flavors meld.
Go Forth and Spread the Edible Magic
As you pull that first glorious square from the pan – crisp edges giving way to a perfect chewy center dotted with candy moons and rainbows – you’ll understand why these treats feel like edible happiness. This isn’t just a recipe; it’s a kitchen spell that conjures grins from picky toddlers and nostalgic adults alike. The magic isn’t just in those technicolor marshmallows, but in the memories you’ll create while pressing sticky handfuls into pans with little hands, or surprising coworkers with a spontaneous pot of gold. So grab that wooden spoon like a wand, channel your inner cereal wizard, and remember: the only thing better than finding the last marshmallow in the box is knowing you can make endless more. Now who’s ready for seconds?


