There’s something undeniably magical about the aroma of cinnamon rolls baking in the oven. That warm, inviting scent promises comfort, indulgence, and a moment of pure bliss. Forget the store-bought versions; crafting your own batch of these iconic treats is surprisingly accessible, even for baking beginners. This isn’t just a recipe; it’s your roadmap to creating gooey, sweet, cinnamon-spiced perfection topped with a luscious, smooth cream icing that melts into every bite. Get ready to transform your kitchen into a cozy bakery and your weekend into a celebration of homemade goodness.
Why These Cinnamon Rolls Stand Out:
- Unbeatable Gooeyness: The secret lies in the dough and the generous filling. We’re focusing on a tender, slightly enriched dough that stays delightfully soft and chewy, not dry or tough. The filling isn’t just sprinkled on; it’s generously layered, ensuring every single bite is packed with warm cinnamon and melted butter.
- Luscious Cream Icing: Forget gritty powdered sugar frostings. Our smooth cream icing is made with cream cheese and butter, creating a velvety, tangy-sweet topping that complements the cinnamon roll’s sweetness perfectly. It’s easy to make and spreads beautifully.
- Beginner-Friendly: No fancy equipment, no complicated techniques. Just simple steps, clear instructions, and tips to ensure your success. You’ll be amazed at how achievable this classic treat really is.
- Pure Homemade Flavor: Every ingredient is chosen for its contribution to flavor and texture. The warmth of the cinnamon, the richness of the butter, the tang of the cream cheese icing – it’s all about creating that authentic, comforting taste you can’t get from a can.
The Heart of the Recipe: Ingredients Explained
Before we dive into the mixing bowls, let’s understand the stars of the show:
- Warm Milk (1 cup): This activates the yeast. It needs to be warm, not hot (around 105-110°F / 40-43°C). Too hot kills the yeast; too cold won’t activate it. Whole milk adds richness, but 2% works fine.
- Active Dry Yeast (2 1/4 tsp / 1 packet): The leavening agent that makes the dough rise. Ensure it’s fresh and active.
- Granulated Sugar (1/4 cup + 1/4 cup): Used in two parts. The first 1/4 cup feeds the yeast, helping it bloom. The second 1/4 cup sweetens the dough and filling.
- Unsalted Butter (1/2 cup / 1 stick), melted: Adds incredible richness and tenderness to the dough. Let it cool slightly before adding to the warm milk mixture.
- Large Eggs (2), room temperature: Adds structure, richness, and helps the dough rise. Room temperature eggs incorporate better.
- Salt (1 1/2 tsp): Enhances all the other flavors. Don’t skip it!
- Bread Flour (4 1/2 cups / 22.5 oz / 640g): Provides the best structure and chew for cinnamon rolls. All-purpose flour works in a pinch, but bread flour gives a slightly better texture. Spoon and level for accuracy.
- Softened Unsalted Butter (1/2 cup / 1 stick): For the filling. Softened means pliable but not melted. This is crucial for spreading the filling evenly.
- Light Brown Sugar (3/4 cup), packed: Adds moisture, caramel notes, and helps create that beautiful gooeyness. Packed means firmly packed into the measuring cup.
- Ground Cinnamon (2 tbsp): The star spice. Use high-quality cinnamon for the best flavor.
- Cream Cheese (4 oz / 1/2 block), softened: The base for our smooth icing. Full-fat cream cheese is essential for the best texture and flavor.
- Unsalted Butter (1/4 cup / 1/2 stick), softened: Adds richness and helps create that smooth, spreadable icing.
- Powdered Sugar (2 1/2 cups): The sweetener for the icing. Sift it for a lump-free result.
- Pure Vanilla Extract (1 tsp): Enhances the overall flavor profile.
- Salt (1/4 tsp): Balances the sweetness in the icing.
The Process: From Dough to Deliciousness
Now, let’s bring it all together. This process is straightforward, but attention to detail, especially with the yeast and rising times, makes all the difference.
Step 1: Activating the Yeast (The Foundation)
- In a large mixing bowl or the bowl of your stand mixer, combine the warm milk, 1/4 cup of granulated sugar, and the active dry yeast. Stir gently and let it sit for about 5-10 minutes. You’ll see it become foamy on top – this means the yeast is alive and active! If it doesn’t foam, your yeast might be expired, and you’ll need fresh yeast.
Step 2: Building the Dough Base
- Add the melted butter (cooled slightly), the room temperature eggs, and 1 teaspoon of salt to the yeast mixture. Whisk everything together until well combined.
- Gradually add the bread flour, about 1 cup at a time, mixing on low speed with the dough hook attachment (or stirring vigorously with a sturdy spoon if mixing by hand). Mix until a shaggy dough forms and pulls away from the sides of the bowl. It will be sticky at first.
Step 3: Kneading for Perfection
- If using a stand mixer, switch to a medium speed and knead for about 8-10 minutes. If kneading by hand, turn the dough out onto a lightly floured surface and knead for 8-10 minutes. The dough is ready when it becomes smooth, elastic, and springs back when you gently poke it. It should be soft but not overly sticky. Add small amounts of flour only if absolutely necessary during kneading – too much flour makes the rolls dense.
Step 4: The First Rise (Patience is Key)
- Lightly grease a large bowl with a little oil or butter. Place the kneaded dough ball into the bowl, turning it once to coat it lightly with oil. Cover the bowl tightly with plastic wrap or a damp kitchen towel.
- Let the dough rise in a warm, draft-free spot until it doubles in size. This usually takes 1 to 1.5 hours. You can place the bowl in an oven with the light on (off) or near a warm appliance. Don’t rush this step; proper rising is crucial for flavor and texture.
Step 5: Preparing the Filling & Rolling
- While the dough rises, make the filling: In a small bowl, combine the softened butter, light brown sugar, and ground cinnamon. Mix until it forms a thick, spreadable paste. Set aside.
- Once the dough has doubled, punch it down gently to release the air. Turn it out onto a lightly floured surface. Roll the dough into a large rectangle, roughly 18×24 inches. Aim for an even thickness, about 1/4 to 1/2 inch thick. This is your canvas!
Step 6: Adding the Filling & Rolling Up
- Spread the cinnamon-sugar butter mixture evenly over the entire surface of the rolled-out dough, leaving a small border (about 1/2 inch) along one of the longer edges. This border helps seal the roll.
- Starting from the long edge opposite the border, carefully roll the dough up tightly into a log. Pinch the seam closed firmly to seal. You should have a long, tight roll.
Step 7: Cutting and Second Rise
- Using a sharp knife or dental floss (for cleaner cuts), cut the log into 12 equal pieces (about 1.5-2 inches thick each). Place the rolls cut-side up in a lightly greased 9×13 inch baking pan or two 9-inch round pans. They should be snug but not overcrowded.
- Cover the pan loosely with plastic wrap or a damp towel. Let the rolls rise again in a warm place until they look puffy and have doubled in size, about 30-45 minutes. They should look much fuller than before.
Step 8: Baking to Golden Perfection
- Preheat your oven to 350°F (175°C) during the last 10 minutes of the second rise.
- Bake the rolls for 25-35 minutes, or until they are deeply golden brown on top and the edges look cooked through. The internal temperature should reach about 190-200°F (88-93°C) if you have a thermometer. They should sound hollow when tapped on the bottom. The aroma will be irresistible!
Step 9: Creating the Smooth Cream Icing
- While the rolls are baking, make the icing. In a medium bowl, beat the softened cream cheese and softened butter together with an electric mixer until completely smooth and creamy.
- Add the sifted powdered sugar, vanilla extract, and a pinch of salt. Beat on low speed until combined, then increase to medium speed and beat for 2-3 minutes until the icing is silky smooth and spreadable. It should be thick but pourable. If it’s too thick, add a tiny splash of milk or cream; if too thin, add a bit more powdered sugar.
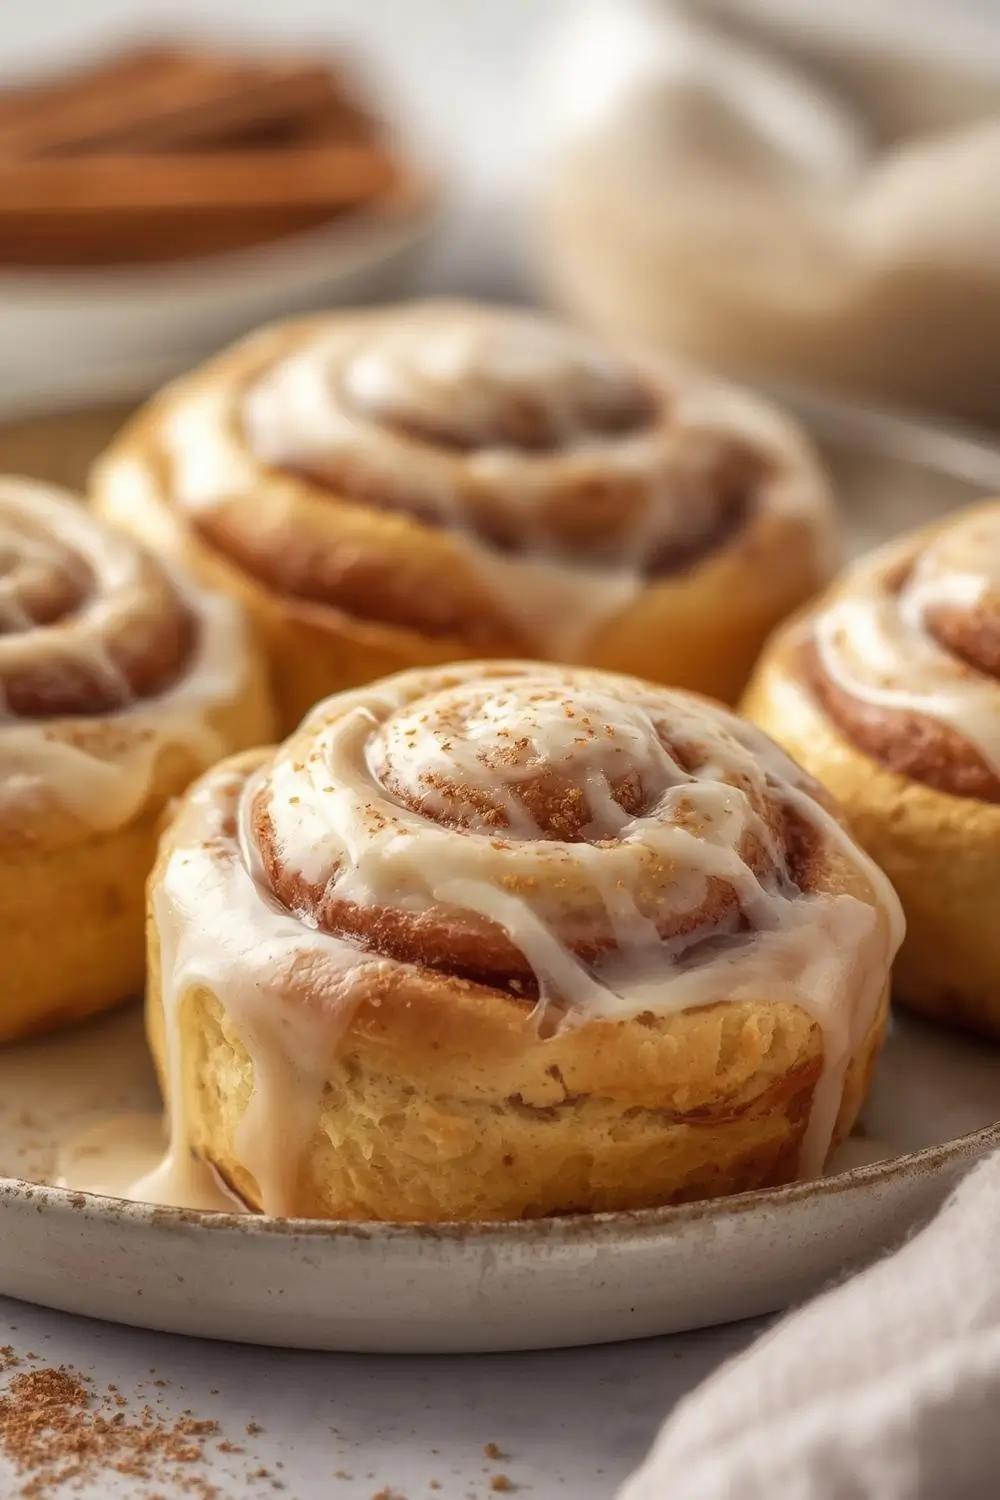
Step 10: The Grand Finale
- As soon as the rolls come out of the oven, spread or drizzle the warm cream cheese icing generously over the hot rolls. The heat helps the icing melt slightly and seep into the rolls, creating that ultimate gooey, decadent experience. The icing will set as it cools, but it will remain deliciously soft and creamy.
- Let the rolls cool in the pan for at least 15-20 minutes before serving. This allows the icing to set slightly and makes them easier to handle. The wait is worth it!
Variations and Substitutions: Making it Your Own
- Flavor Boosters: Add 1/2 cup of chopped pecans, walnuts, or raisins to the filling for extra texture and flavor. A teaspoon of almond extract in the dough or icing adds a lovely twist.
- Dairy-Free: Use almond milk or oat milk instead of dairy milk. Substitute vegan butter for the butter in the dough and filling. Use vegan cream cheese and a dairy-free butter substitute for the icing. Ensure your yeast is vegan.
- Gluten-Free: This recipe is not inherently gluten-free. Use a high-quality gluten-free all-purpose flour blend designed for yeast breads, following the package instructions closely. You may need to adjust liquid slightly.
- Sweetener Swap: Replace granulated sugar with an equal amount of coconut sugar or brown sugar in the dough. Use maple syrup or honey in the filling (reduce liquid slightly).
- Spice It Up: Add 1/2 teaspoon of ground cardamom or nutmeg to the filling for a different warm flavor profile.
- Make Ahead: Prepare the dough through step 6 (cutting the rolls). Place the cut rolls in the pan, cover tightly, and refrigerate overnight. Let them sit at room temperature for 1-2 hours before baking to allow the second rise. Bake as directed.
- Freezing: Bake the rolls completely. Let them cool completely. Wrap tightly in plastic wrap and then foil. Freeze for up to 3 months. To reheat, thaw overnight in the fridge, then warm in a 300°F (150°C) oven for 10-15 minutes. Ice before serving.
Storage and Reheating: Keeping the Magic Alive
- Room Temperature: Store leftover rolls in an airtight container at room temperature for up to 2 days. They are best enjoyed fresh!
- Refrigerator: For longer storage (up to 5 days), refrigerate the rolls in an airtight container. Reheat gently in the microwave for 15-30 seconds or in a 300°F (150°C) oven for 5-10 minutes until warmed through.
- Freezing: As mentioned above, freezing is excellent for long-term storage. Thaw overnight in the fridge and reheat as above.
Common Mistakes to Avoid: Ensuring Success Every Time
- Killing the Yeast: Using water that’s too hot (above 110°F / 43°C) is the most common mistake. Test the milk temperature with your finger or a thermometer.
- Under-Kneading: Dough that isn’t kneaded enough won’t develop the necessary gluten for structure and chew. Knead until smooth and elastic.
- Over-Kneading: While kneading is important, over-kneading can make the dough tough. Stop when it’s smooth and springs back.
- Rushing the Rise: Yeast needs time. Don’t skip the first rise or rush the second rise. Cold environments slow it down significantly.
- Too Much Flour: Adding too much flour during kneading or shaping makes the rolls dense and dry. Use the minimum needed to handle the dough.
- Filling Leakage: Ensure the filling is spread evenly and the final seam is pinched tightly closed. Overfilling can cause leaks.
- Icing Too Thick or Thin: The icing should be smooth and spreadable. Adjust with powdered sugar or milk as needed.
- Icing Too Warm: Applying icing to hot* rolls can cause it to melt and slide off. Let rolls cool slightly before icing.
Frequently Asked Questions (FAQs)
- Can I use all-purpose flour instead of bread flour? Yes, you can. The rolls will be slightly less chewy but still delicious. You might need a tiny bit more flour during kneading.
- Why did my rolls not rise enough? Check your yeast (is it fresh?), the temperature of the milk (too cold or too hot?), the rising environment (not warm enough?), or if you kneaded too much flour in.
- Can I make the dough in a bread machine? Yes! Add all ingredients to the bread machine pan in the order recommended by your machine (usually liquid first, then dry). Select the dough cycle. Once the cycle finishes, proceed with shaping, rising, and baking as directed.
- How do I know when the rolls are done baking? They should be a deep golden brown, sound hollow when tapped on the bottom, and an internal temperature of 190-200°F (88-93°C) is ideal. The edges should look cooked through.
- Can I freeze the unbaked rolls? Yes! Place the cut rolls in the pan, cover tightly, and freeze. When ready to bake, let them thaw and rise at room temperature for 1-2 hours, then bake as directed (may need a few extra minutes).
- Why is my icing grainy? Sifting the powdered sugar before adding it to the butter and cream cheese is crucial. If it’s still grainy, beat it longer or add a tiny bit of milk.
- Can I use margarine instead of butter? For the best flavor and texture, use unsalted butter. Margarine can sometimes make the dough less tender and the icing less stable.
- How do I prevent the rolls from sticking to the pan? Generously grease the pan with butter or non-stick spray. You can also line the pan with parchment paper for easy removal.
- Can I make these without a stand mixer? Absolutely! You can knead the dough by hand on a lightly floured surface for 8-10 minutes until smooth and elastic. It takes a bit more effort but is very achievable.
The Final Slice: A Celebration of Homemade Comfort
There you have it – the blueprint for creating the most decadent, gooey, and utterly satisfying homemade cinnamon rolls you’ve ever tasted. This recipe is more than just instructions; it’s an invitation to slow down, savor the process, and create something truly special from scratch. The aroma filling your home, the anticipation as they bake, the first heavenly bite – it’s a sensory experience that embodies comfort and love.
These rolls are perfect for a leisurely weekend breakfast, a celebratory brunch centerpiece, or a simple dessert to brighten someone’s day. Share them with family, friends, or neighbors. Wrap them up as a thoughtful gift. Most importantly, enjoy the journey of baking and the pure joy of sharing homemade goodness. Remember to share your creations using #CinnamonRollsLove and brighten someone’s day with dessert. Happy baking!
Pin this recipe for later!


