Table of Contents
- 1 Essentials of a Great Halloween Charcuterie Board
- 2 Spooky & Kid‑Friendly Snack Ideas for Your Board
- 3 Step‑by‑Step: Layout & Styling Your Board
- 4 Sample Board Menu Plan
- 5 Dietary & Allergy Considerations
- 6 Make-Ahead & Storage Tips
- 7 Troubleshooting & Common Mistakes
- 8 Frequently Asked Questions
- 9 Final Thoughts
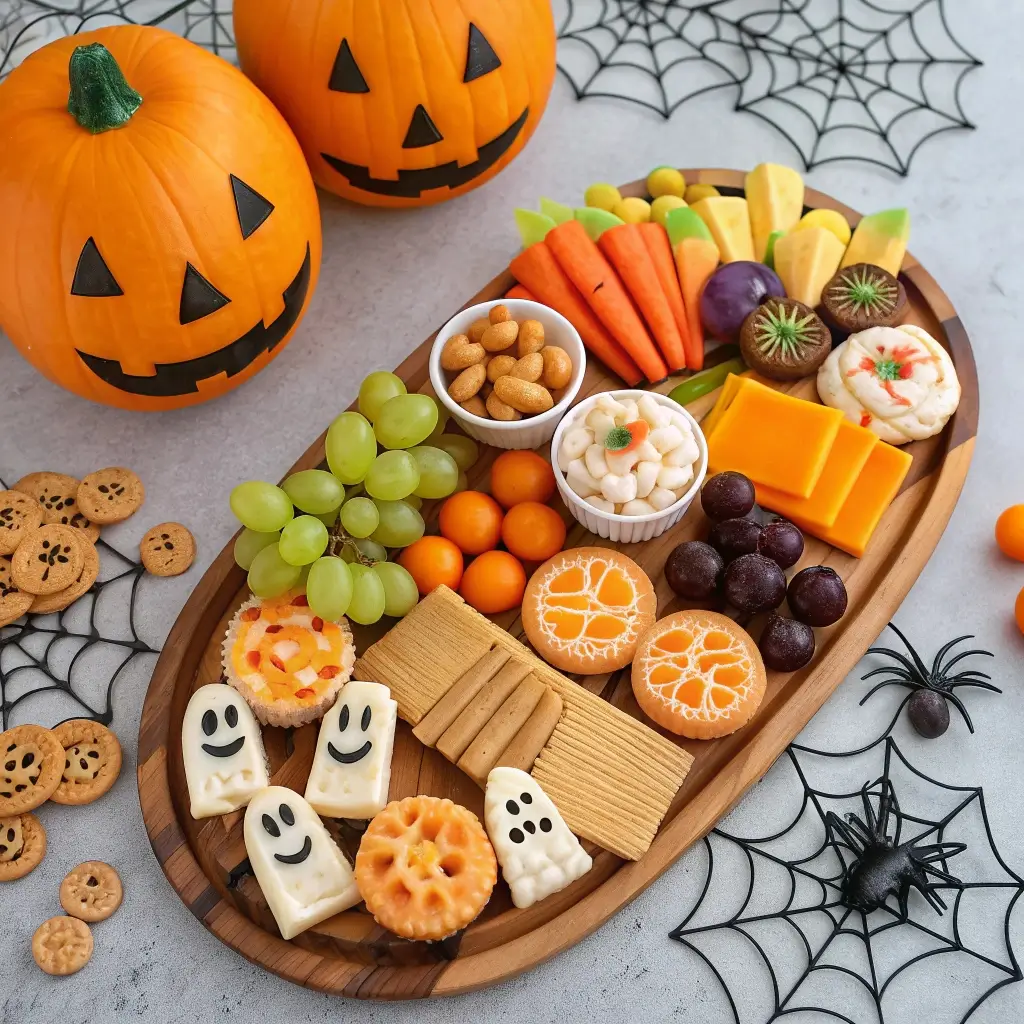
Charcuterie boards have taken over as the go-to party snack format—and Halloween gives you an exciting opportunity to transform one into a spooky, irresistible spread. By combining savory bites, sweet treats, fruits, dips, and themed elements, you can build a Halloween charcuterie board that’s balanced, visually dramatic, and crowd-pleasing for kids and adults alike.
Because Halloween often leans heavy on candy and sweets, this kind of board helps strike a balance. Plus, it lets you showcase creativity without relying solely on sugar. With some planning and a few clever details, your board can be the highlight of the night.
In this article you’ll find:
Key principles for building a Halloween charcuterie board
Savory, sweet, and fun snack ideas (pork-free, no alcohol)
Step‑by‑step layout and styling suggestions
Dietary and allergy-friendly adaptations
Tips for prepping, storing, and serving
Troubleshooting common challenges
Frequently asked questions
Let’s get spooky and snacky!
Essentials of a Great Halloween Charcuterie Board
Before diving into specific ideas, it helps to think about the structure and guidelines that make any charcuterie board succeed—even a themed one.
Balance savory and sweet: Don’t just pile in candy—include vegetables, crackers, cheeses (or non-dairy alternatives), dips, and fruits.
Vary textures and flavors: Crisp, creamy, chewy, crunchy, fresh, and spiced elements all help keep it interesting.
Color contrast: Use the spooky palette—black, orange, white, green, purple—for visual pop.
Accessibility: Use finger foods or small bites so guests can graze easily.
Thematic touches: Use shaped foods (pumpkins, ghosts), edible decorations, and small props to evoke Halloween without going overboard.
Modular layout: Create little “zones” or clusters so guests can easily see and access items.
With these principles in mind, your board becomes both beautiful and functional.
Spooky & Kid‑Friendly Snack Ideas for Your Board
Here’s a wide range of snack ideas (savory, sweet, dipping items) you can choose from to fill your board.
Savory & Veggie Bites
Skeleton Veggie Platter slices: Carrot, cucumber, bell pepper sticks arranged like bones, with a central dip “joint.”
Mini cheese pumpkins: Use orange cheese cubes (cheddar, or a plant-based orange cheese) with a small piece of green pepper or celery as the “stem.”
Black olive spiders: Press half an olive on the board, then use thin olive slices or black bean strips as legs.
Jalapeño popper bites: Mini stuffed peppers filled with cream cheese or non-dairy cheese, for a spicy bite.
Dark crackers & chips: Use black sesame seed crackers, charcoal crackers (if safe/edible), or black corn tortilla chips.
Bread sticks or pretzel rods dipped in colored dough: For example, wrap puff pastry strips around rods to make “mummy sticks.”
Dips & Spread Elements
Spooky hummus – orange or black version (e.g. roasted red pepper hummus, or beet/black bean hummus)
Black bean dip or smoky bean spread
Pumpkin or sweet potato dip—slightly spiced
Cheese or “moon dip”: White or pale cheese dip as contrast
Place dips in small bowls or hollowed-out mini pumpkins for effect.
Sweet & Candy Accents
Candy corn or candy pumpkins (in moderation)
Chocolate candy bark pieces (black & orange swirls)
Mini marshmallow ghosts on toothpicks
Halloween-themed cookies (ghosts, bats, pumpkins)
Fresh fruit pops: slices of orange, persimmons, mandarin segments, dark grapes
Dark chocolate squares or candy pieces
Jelly beans or gummy worms nestled through the board for creepiness
Decorative & Edible Accents
Fresh herbs (rosemary, parsley, thyme) to mimic “creepy vines”
Edible flowers in dark or orange colors
Small chalkboard signs for labeling (e.g. “Zombie Bites,” “Ghost Dip”)
Mini plastic spiders or candy skeleton hands (food-safe)
Veggie or fruit carvings (pumpkin silhouettes, apple bats)
Step‑by‑Step: Layout & Styling Your Board
Here’s a logical workflow to stage your Halloween charcuterie board effectively.
Step 1: Choose Your Board/Base
Pick a large wooden board, slate, or flat tray. A rectangular or long board works well for a long table layout.
Step 2: Place Dips First
Put the dips and spreads in their containers and position them first—usually near the center or at “head/heart” positions so the “bones” radiate outwards.
Step 3: Add Large Items & Clusters
Place the larger items—veggie cluster, cheese pumpkins, trays of sweet bits—around dips to anchor zones.
Step 4: Build Skeleton or Themed Shapes
If you want a skeleton or spine-like layout, use long sticks (carrots, breadsticks) to form lines or shapes (like ribs) radiating from the dip “skull.” This adds structure and Halloween form.
Step 5: Fill in Smaller Items
Scatter candy, fruit, mini cookies, spiders, and decorative accoutrements in the gaps. Be mindful not to overcrowd—leave breathing space so each item shows.
Step 6: Garnish & Final Touches
Add herbs, edible moss, dusting powder, or small props. Use colored sprinkles or edible glitter for shimmer. Adjust contrast for visual pop.
Step 7: Label Items (optional)
Tiny labels help guests know flavor (e.g. “spicy pepper bites,” “ghost marshmallow pop”). Use festive labels in Halloween fonts.
Here’s a suggested board composition mixing the categories above:
| Zone | Savory / Veggie | Dip / Spread | Sweet / Candy |
|---|---|---|---|
| Top center (head) | Mini cheese pumpkins | Spooky pumpkin hummus | Marshmallow ghost pops |
| Left “rib side” | Bell pepper strips, cucumber sticks, carrot sticks | — | Orange candy pumpkins, chocolate bark |
| Right “rib side” | Broccoli florets, black olive spiders, pretzel rods | — | Dark grapes, jelly worms |
| Bottom “feet / ground” | Celery sticks, mini stuffed peppers | Black bean dip | Halloween cookies, candy corn |
| Edges / Gaps | Crackers, black sesame crackers | Cheese spread or moon dip | Popcorn (colored), candy bits |
This layout gives variety, accessible grazing, and preserves your theme aesthetic.
Dietary & Allergy Considerations
Dairy-free / Vegan: Use plant-based cheeses, hummus, or bean dips. Use non-dairy chocolate for sweets.
Nut-free: Avoid using nuts in dips or candy bits; use seed butters or simple spreads.
Gluten-free: Include gluten-free crackers or eliminate wheat-based dippers.
Sugar sensitivity: Limit candy pieces and provide more fruit or plain sweets. Use sugar-free candy alternatives.
Allergy labeling: If hosting, label items with potential allergens (nuts, dairy, gluten) and possibly separate zones.
Make-Ahead & Storage Tips
Veggies: Cut and store in sealed containers or water baths up to the morning of serving.
Dips: Prepare the day before; cover and keep chilled. Let come to serving temperature shortly before offering.
Sweets & candy bits: Store separately and place on board just before guests arrive to maintain freshness.
Final assembly: Do last touches just before serving (glazing, sprinkling, adding soft items).
Leftovers: Cover and refrigerate promptly. Veggies will last a couple of days; candy/sweets longer but separate by type.
Troubleshooting & Common Mistakes
Veering off theme (too many non-theme colors): Stick to black, orange, white, dark purples. Use extras as accent only.
Veggies wilting: Keep them chilled and away from direct sun or heat sources.
Crowded board: Leave small gaps and group in zones; do not pile high everywhere.
Dip running / spilling: Use bowls slightly inset or rimmed, and use stable containers.
Sweets overwhelming: Maintain balance—don’t let candy dominate. Use candy as accents, not the main show.
Frequently Asked Questions
Can kids help assemble this board?
Yes! Kids can place veggies, candy bits, build the skeleton structure, help with themes. Just supervise knives and dips.
How many servings does a charcuterie board provide?
Estimate about 4–6 oz of assorted snacks per adult. For kids or mixed, one board of the size above can feed 8–12 people.
What if I don’t want candy?
You can skip candy and use dried fruits (dried apricot, dried mango), dark chocolate chunks, raisins, etc. Keep the color palette.
How to keep the board from looking messy as guests nibble?
Replenish dippers, move food from edges inward, and have extra backup snacks to refill clusters.
Is it okay to include cooked or warm items?
You can if space allows—mini savory tartlets, hot cheesy dip in a small bowl—but ensure they don’t spoil room temp.
Final Thoughts
A Halloween charcuterie board is a dynamic and clever way to merge creativity, theme, and variety. By combining savory vegetables, dips, sweets, and themed decorations into a skeleton-inspired or themed layout, you can wow guests, give healthier snack options, and create a leftover-ready, engaging party centerpiece.
Let your imagination guide your layout—build ribs from carrot sticks, skulls from dips, candy pumpkins, olive spiders, and filler greens—and you’ll have a snack board that delights visually and gastronomically. Happy haunting and snacking!


