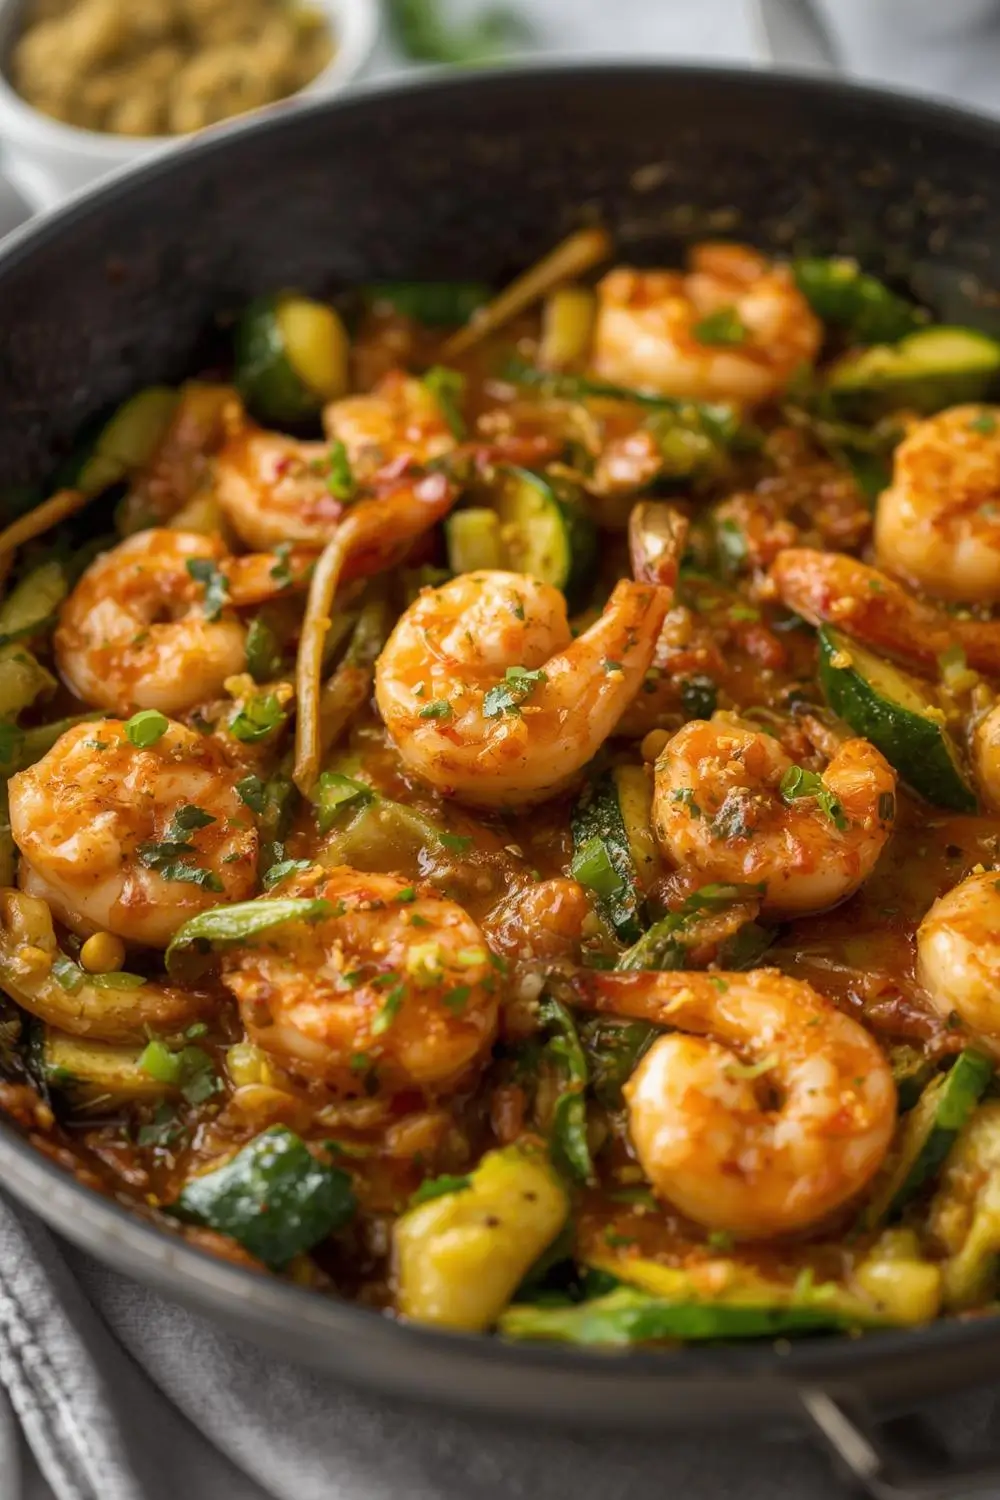
Imagine coming home after a long day, craving something delicious, healthy, and ready in practically no time. That’s exactly what this Garlic Shrimp and Zucchini Stir-Fry delivers. It’s the ultimate weeknight savior, a vibrant dance of flavors and textures that comes together in a mere 15 minutes. This isn’t just a meal; it’s a celebration of simplicity and freshness. Tender, juicy shrimp meet crisp, slightly sweet zucchini, all bathed in a fragrant, garlicky sauce that’s light yet deeply satisfying. No heavy creams, no complicated sauces, just pure, clean flavors that sing on your palate. Best of all, it’s completely free from pork, bacon, wine, or any other alcohol – making it a perfect, guilt-free option for anyone watching their intake or simply seeking a lighter, more vibrant dinner. Whether you’re a seasoned cook or just starting your culinary journey, this recipe is designed to be approachable, foolproof, and utterly delicious. Let’s dive into creating this quick, light, and utterly delightful dinner.
Ingredients: The Building Blocks of Flavor
The beauty of this stir-fry lies in its simplicity and the quality of its few ingredients. Here’s what you’ll need:
- Shrimp: 1 pound (450g) of large, peeled, and deveined shrimp. Look for shrimp that are firm to the touch and have a translucent white color with a pinkish hue. Avoid any that smell overly fishy. If using frozen, ensure they are completely thawed and patted dry before cooking – this is crucial for getting that perfect sear.
- Zucchini: 2 medium zucchinis. Choose zucchinis that are firm and bright green. They should feel heavy for their size. Avoid any that are soft, wrinkled, or have dull skin. You can leave the skin on for extra nutrients and texture, or peel them if you prefer a smoother result.
- Garlic: 3-4 cloves. Fresh garlic is non-negotiable here. It provides the essential aromatic base. Mince it finely or press it through a garlic press for maximum flavor release.
- Olive Oil or Avocado Oil: 2 tablespoons. These oils have high smoke points, making them ideal for stir-frying. Olive oil adds a subtle fruity note, while avocado oil is very neutral.
- Low-Sodium Soy Sauce or Tamari: 2 tablespoons. This provides the essential savory umami depth. Tamari is a gluten-free alternative if needed. Avoid regular soy sauce if you need to strictly avoid gluten.
- Rice Vinegar: 1 tablespoon. This adds a bright, slightly tangy note that balances the richness of the sauce. White vinegar can be used in a pinch, but rice vinegar is preferred.
- Honey or Maple Syrup: 1 teaspoon. This adds a touch of sweetness to balance the garlic and soy sauce, rounding out the flavors. Use pure honey or maple syrup.
- Red Pepper Flakes (Optional): A pinch. For a gentle kick of heat. Adjust to your taste preference.
- Salt: To taste. Start with a pinch and adjust after tasting.
- Black Pepper: Freshly ground, to taste.
- Optional Additions: A squeeze of fresh lemon juice at the end brightens everything. A handful of chopped fresh parsley or cilantro adds a lovely fresh finish. A pinch of red pepper flakes adds heat.
Why These Ingredients Work: Each component plays a vital role. The shrimp provides lean protein and a satisfying bite. Zucchini offers a light, crisp texture and absorbs the flavors beautifully. Garlic is the soul of the dish, infusing the oil and sauce. The soy sauce and vinegar create the essential savory-sour base, while the honey balances it. The oil ensures everything cooks quickly and evenly without sticking. This combination creates a dish that’s vibrant, flavorful, and incredibly healthy.
Step-by-Step Instructions: Bringing It All Together
Now, let’s transform these ingredients into a delicious meal. This process is quick and straightforward, designed for efficiency.
1. Prep is Key: Before you even turn on the stove, have everything ready. Measure out your soy sauce, vinegar, honey, and pepper flakes. Mince your garlic. Pat the shrimp completely dry with paper towels – this is critical for browning. Slice the zucchini into bite-sized pieces, about 1/2 inch thick. Have your oil measured and ready. This “mise en place” (everything in place) approach ensures a smooth, stress-free cooking process.
2. Heat the Pan: Place a large skillet or wok over medium-high heat. Add the 2 tablespoons of oil. Let it heat for about 30 seconds until it shimmers and is very hot but not smoking. This high heat is essential for getting a good sear on the shrimp without overcooking them.
3. Sear the Shrimp: Carefully add the shrimp in a single layer (don’t overcrowd the pan – cook in batches if necessary). Season them lightly with salt and pepper. Let them cook undisturbed for 1-2 minutes, until they turn opaque and pink on the bottom side. Flip them and cook for another 1-2 minutes until they are fully pink and opaque throughout. They should be slightly curled and firm. Remove the shrimp to a clean plate and set aside. Tip: Overcooking shrimp makes them tough. They cook very quickly once the pan is hot.
4. Sauté the Aromatics: Reduce the heat to medium. Add the minced garlic to the hot pan. Stir constantly for about 30 seconds to 1 minute, until fragrant and just starting to turn golden. Be careful not to burn it – garlic burns quickly and becomes bitter.
5. Add the Zucchini: Add the sliced zucchini to the pan with the garlic. Season with a pinch of salt and pepper. Stir to coat the zucchini in the garlicky oil. Cook for 3-4 minutes, stirring occasionally, until the zucchini is crisp-tender – still holding its shape but easily pierced with a fork. It shouldn’t be mushy.
6. Combine and Sauce: Return the cooked shrimp to the pan with the zucchini. Pour in the soy sauce, rice vinegar, honey, and red pepper flakes (if using). Stir everything together gently but thoroughly, ensuring the shrimp and zucchini are well coated in the vibrant sauce. Cook for another 1-2 minutes, just until the sauce thickens slightly and coats the ingredients evenly.
7. Finish and Serve: Taste the dish and adjust seasoning if needed – add a little more salt, pepper, or a squeeze of lemon juice for brightness. If using, stir in chopped fresh parsley or cilantro. Serve immediately while hot and fresh. This dish is best enjoyed right away to appreciate the perfect texture contrast between the tender shrimp and crisp-tender zucchini.
Tips for Success:
- Dry Shrimp is Essential: Never skip patting the shrimp dry. Moisture prevents browning and leads to steaming instead of searing.
- Don’t Overcrowd the Pan: Cooking in batches ensures each shrimp gets that beautiful sear. It might take a little longer, but the result is worth it.
- High Heat is Your Friend: Cooking over medium-high heat ensures the shrimp sear quickly and the zucchini stays crisp. Don’t reduce the heat too much.
- Don’t Walk Away: Stir-frying moves fast. Keep an eye on it, especially the garlic, to prevent burning.
- Taste and Adjust: Seasonings can vary. Taste the sauce before adding it to the shrimp and zucchini, and adjust salt, pepper, or acidity (lemon juice) as needed.
- Fresh Garlic: Use fresh garlic cloves, not powder. It makes a significant difference in flavor.
Cooking Variations and Substitutions
This versatile recipe lends itself well to tweaks based on what you have on hand or personal preference:
- Protein Swap: Chicken breast (thinly sliced) or cubed tofu (pressed and pressed dry) work well. Cook chicken slightly longer (5-7 minutes) until no longer pink. Press tofu well and cook until golden and slightly crispy.
- Vegetable Mix: Swap zucchini for yellow squash, bell peppers (add them earlier as they take longer to cook), or broccoli florets (blanch briefly first). Add mushrooms (sauté first) or snap peas for extra crunch.
- Sauce Variations: For a creamier sauce, stir in a teaspoon of sesame oil or a splash of coconut milk at the end. For extra depth, add a teaspoon of grated ginger along with the garlic. For a spicier kick, increase the red pepper flakes or add a dash of sriracha.
- Gluten-Free: Use tamari instead of soy sauce.
- Low-Sodium: Use low-sodium soy sauce or tamari and add a pinch of salt carefully.
- Sweetener: Use brown sugar or coconut sugar instead of honey or maple syrup.
- Oil: Use sesame oil for a distinct flavor (use sparingly as it’s strong), or a neutral oil like canola or grapeseed.
Storage and Reheating Tips
This dish is best enjoyed fresh, but leftovers can be stored:
- Refrigeration: Let the stir-fry cool completely. Transfer it to an airtight container. It will keep in the refrigerator for 3-4 days.
- Reheating: Reheat gently on the stovetop over medium-low heat, stirring occasionally, until piping hot. Add a splash of water or broth if it seems dry. Alternatively, reheat in the microwave in 30-second bursts, stirring in between, until warmed through. Important: Avoid reheating more than once.*
Common Mistakes to Avoid
- Overcooking the Shrimp: This is the most common pitfall. Shrimp cook incredibly fast. Remove them from the pan as soon as they turn opaque and pink.
- Undercooking the Zucchini: Zucchini cooks quickly, but it needs a few minutes to become tender-crisp. Don’t rush this step.
- Burning the Garlic: Garlic burns easily. Keep the heat medium and stir constantly once it hits the pan.
- Overcrowding the Pan: This leads to steaming, not searing, and prevents the shrimp from browning properly.
- Using Wet Shrimp: As mentioned, moisture is the enemy of a good sear. Pat them dry thoroughly.
- Skipping the Sauce Thickening Step: Cooking the sauce with the shrimp and zucchini for the final minute allows it to thicken slightly and coat everything properly. Don’t skip this step.
Frequently Asked Questions (FAQs)
1. Can I use frozen shrimp? Yes, but they must be completely thawed and patted dry before cooking. Thaw them overnight in the refrigerator.
2. How do I know when the shrimp are done? Shrimp are done when they turn opaque (white or pink) throughout and curl slightly. They should feel firm, not rubbery.
3. Can I make this ahead of time? The stir-fry is best served immediately. You can prep the ingredients (chop veggies, measure sauce) ahead of time, but cook the shrimp and combine everything just before serving.
4. Is this dish spicy? It has a subtle kick from the red pepper flakes, but it’s not overwhelmingly spicy. Adjust the amount to your taste.
5. Can I add noodles or rice? Absolutely! Serve it over cooked rice, quinoa, or rice noodles for a heartier meal. Add the noodles/rice to the pan in the last minute of cooking to heat through.
6. What if my zucchini is watery? If your zucchini releases a lot of water during cooking, increase the heat slightly for the last minute to evaporate it, or drain it briefly before adding to the pan.
7. Can I use other proteins? Yes! Chicken breast (sliced thinly and cooked slightly longer), cubed tofu (pressed and cooked until golden), or even diced chicken sausage (remove casing first) work well.
8. Is this dish healthy? Yes! It’s low in calories, fat (especially if using lean shrimp and minimal oil), and high in protein and vegetables. It’s a great light dinner option.
9. Can I make it without garlic? Garlic is essential to the flavor profile. If you truly can’t use it, omit it, but expect a very different (and less flavorful) dish.
10. Can I add cheese? This dish is traditionally dairy-free. If you want to add cheese, sprinkle a little crumbled feta or parmesan on top after cooking, but it’s not traditional.
Conclusion
There you have it – a vibrant, flavorful, and incredibly simple Garlic Shrimp and Zucchini Stir-Fry ready in under 15 minutes. It’s a testament to how few ingredients, when chosen well and cooked with care, can create something truly special. The tender shrimp, crisp-tender zucchini, and aromatic garlic sauce come together in perfect harmony, offering a satisfying, healthy, and completely pork-free, alcohol-free meal that’s perfect for any night of the week. It’s beginner-friendly, adaptable, and guaranteed to become a staple in your quick dinner repertoire. So, gather your ingredients, heat your pan, and savor the delicious simplicity of this weeknight winner. Enjoy every bite!