Table of Contents
- 1 Why Focaccia Is Perfect for Beginners
- 2 Understanding the Sourdough Basics
- 3 Ingredients for Foolproof Sourdough Focaccia
- 4 Step-by-Step Beginner Method
- 5 The Perfect Beginner Focaccia Texture
- 6 Simple Troubleshooting for Beginners
- 7 Common Beginner Mistakes to Avoid
- 8 Flavor Variations
- 9 How to Serve Focaccia
- 10 Storing and Reheating
- 11 Why This Recipe Works
- 12 Beginner FAQs
- 13 Texture Timeline
- 14 Tips for Success
- 15 Why Beginners Love This Recipe
- 16 Final Thoughts
Starting your sourdough journey can feel intimidating — the feeding schedules, the sticky dough, the uncertain proofing times. But it doesn’t have to be complicated.
This Foolproof Sourdough Focaccia for Beginners is designed to simplify every step so anyone can achieve bakery-quality bread from home. It’s a forgiving, flexible recipe that builds your confidence and understanding of how sourdough behaves — without needing any advanced tools or experience.
You’ll learn how to mix, fold, and bake a focaccia that’s irresistibly soft inside, crisp on the edges, and full of flavor. This guide also includes tips for managing hydration, identifying dough readiness, and troubleshooting common beginner mistakes.
By the end, you’ll have not only a perfect loaf but also the skills to tackle more advanced sourdough recipes with ease.
Why Focaccia Is Perfect for Beginners
Focaccia is one of the best breads for first-time sourdough bakers because it’s:
No-knead and low-stress: Minimal handling and no shaping anxiety.
Visually forgiving: Dimples and bubbles look rustic and beautiful.
Highly hydrated: Creates a soft, open crumb without precise shaping.
Versatile: Works as a snack, side dish, or sandwich base.
Delicious: Olive oil and sea salt bring flavor that rivals bakery loaves.
This recipe doesn’t require a mixer or special equipment — just your hands, a bowl, and a pan.
Understanding the Sourdough Basics
Before baking, it helps to understand a few key sourdough fundamentals.
What Is a Sourdough Starter?
A sourdough starter is a natural yeast culture made from flour and water. Over time, it ferments and becomes active, allowing bread to rise without commercial yeast.
How to Know Your Starter Is Ready
Doubles in size within 4–6 hours of feeding
Smells pleasant and slightly tangy
Has visible bubbles on top and throughout
If your starter passes these signs, it’s ready to bake.
Ingredients for Foolproof Sourdough Focaccia
Dough
500 g bread flour (or all-purpose flour with at least 11% protein)
400 g water (80% hydration)
100 g active sourdough starter (100% hydration)
10 g fine sea salt
25 g olive oil
For the Pan and Topping
2–3 tablespoons olive oil (for the pan and drizzling)
Flaky sea salt
Fresh rosemary, thyme, or cherry tomatoes (optional)
Step-by-Step Beginner Method
This method focuses on simplicity and clarity, guiding you through each stage so you understand what your dough should look and feel like.
Step 1: Mix the Dough
In a large bowl, combine the active starter and water. Stir with a whisk or your hand until the starter dissolves.
Add the flour and mix until all dry spots disappear. The dough will look shaggy and sticky — that’s perfect.
Cover with a damp towel and rest for 45 minutes. This rest (called autolyse) allows gluten to form naturally and makes the dough easier to handle.
Step 2: Add Salt and Olive Oil
After resting, sprinkle in the salt and pour in the olive oil. Wet your hands to prevent sticking and gently squeeze and fold the dough to incorporate.
You’ll notice the dough becomes more elastic and smoother as you fold.
Step 3: Bulk Fermentation
Cover the bowl with a lid or plastic wrap and let the dough ferment at room temperature (around 75°F or 24°C) for 4–6 hours, or until it has doubled in size and shows visible bubbles.
During this time, you’ll strengthen the dough using stretch and folds:
Every 30 minutes for the first 2 hours, perform a set of folds.
Wet your hands.
Grab one side of the dough, stretch it up gently, and fold it over itself.
Rotate the bowl and repeat 3–4 times.
By the third set, your dough will feel stronger and more elastic.
After the final fold, let it rest untouched for the remainder of the bulk fermentation.
Step 4: Optional Cold Ferment
Once your dough has risen and looks airy, you can move straight to shaping — or refrigerate overnight (12–18 hours) for deeper flavor and easier handling.
Cold fermentation slows the yeast and enhances the bread’s taste while making the sticky dough firmer.
Step 5: Prepare the Pan
Generously oil your baking pan (9×13 inch or 10×14 inch metal pan). Drizzle 2–3 tablespoons of olive oil and use your fingers to spread it along the bottom and sides.
This step is essential for creating that signature golden crust and preventing sticking.
Step 6: Shape the Focaccia
Gently transfer the dough into the oiled pan. Use oiled hands to stretch it toward the edges. If it resists, let it rest for 10–15 minutes, then stretch again.
Cover and let it rest for 2–3 hours, or until puffy and slightly jiggly when you shake the pan.
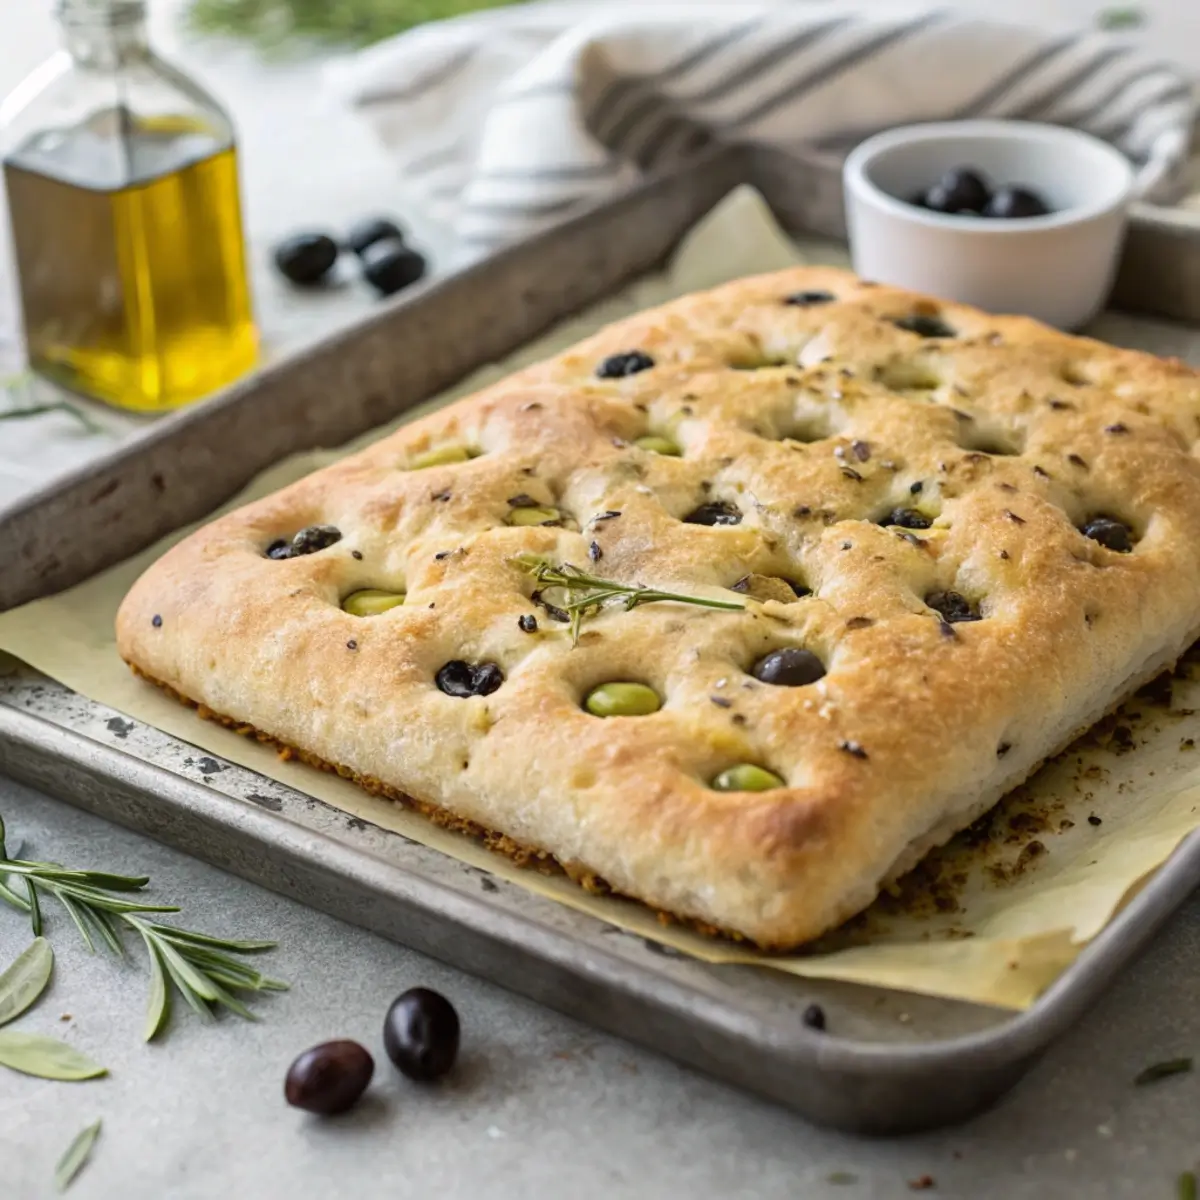
Step 7: Dimple and Top
Preheat your oven to 450°F (230°C).
Once the dough is proofed, drizzle olive oil generously over the surface. With oiled fingertips, press deeply into the dough to create dimples. Don’t worry about popping bubbles — that’s what creates focaccia’s iconic texture.
Sprinkle flaky salt on top, and if you like, add rosemary, tomatoes, or olives.
Step 8: Bake
Bake for 25–30 minutes or until the focaccia is golden brown and crisp at the edges.
For an extra-crispy crust, bake an additional 3–5 minutes, keeping an eye on the color.
Step 9: Cool and Serve
Remove from the oven and let cool in the pan for 5 minutes, then transfer to a wire rack.
Wait at least 15 minutes before slicing — this helps the crumb set and keeps the interior fluffy.
The Perfect Beginner Focaccia Texture
Crisp edges: From generous olive oil coating.
Soft, open crumb: Thanks to proper fermentation and hydration.
Golden top: A visual cue for perfectly baked focaccia.
Fragrant aroma: A blend of sourdough tang and olive oil richness.
Every bite should have a tender chew and light tang — that’s when you know you’ve nailed it.
Simple Troubleshooting for Beginners
Dough too sticky?
That’s normal for focaccia. Use wet or oiled hands — avoid adding extra flour, which makes it dense.
Dough not rising?
Check if your starter was active. If your kitchen is cold, extend the fermentation time.
Flat focaccia?
Under-proofing is the likely cause. Give it more time during the final rise until visibly puffy.
Too salty or oily?
You can always drizzle less oil next time — but focaccia thrives on bold flavors, so don’t be shy with olive oil.
Common Beginner Mistakes to Avoid
Using an inactive starter: This prevents proper rise and texture.
Skipping the rest period: Gluten development needs time.
Under-proofing: The dough must look airy and alive before baking.
Not using enough oil: Oil equals flavor and crispness.
Cutting too early: Warm bread may appear gummy — let it cool slightly.
Flavor Variations
Once you master the basic focaccia, try these beginner-friendly flavor twists:
Herb and Garlic Focaccia: Add minced garlic and mixed herbs to the olive oil topping.
Tomato and Basil Focaccia: Press cherry tomato halves and torn basil into the dough before baking.
Caramelized Onion Focaccia: Spread sautéed onions over the dough for a savory twist.
Simple Sea Salt Focaccia: Keep it classic — just olive oil and flaky salt for a pure, clean flavor.
How to Serve Focaccia
This versatile bread fits every meal:
Breakfast: Toast with olive oil or spread with mashed avocado.
Lunch: Slice and fill with grilled vegetables or cheese.
Dinner: Serve alongside soups, salads, or pasta.
Snack: Tear and dip into olive oil and herbs.
Storing and Reheating
Allow focaccia to cool completely before storing.
Room Temperature: Store in an airtight container for up to 2 days.
Refrigerator: Keeps fresh up to 5 days.
Freezer: Slice and freeze for up to 1 month.
To reheat: Place slices in a 350°F (175°C) oven for 5–8 minutes until warm and crisp.
Avoid microwaving — it softens the crust.
Why This Recipe Works
This beginner recipe is foolproof because it focuses on process over perfection. Each stage builds dough strength, flavor, and texture naturally — without complex steps.
Hydration: The high water content ensures a soft crumb.
Olive oil: Creates crispness and rich flavor.
Sourdough fermentation: Adds depth and digestibility.
No-knead approach: Gentle folding builds gluten without effort.
By the time it bakes, the dough has done all the hard work for you.
Beginner FAQs
Do I need a stand mixer?
No! You can mix and fold this dough by hand easily.
What if I don’t have bread flour?
All-purpose flour works fine. Your focaccia may be slightly softer, but still delicious.
Can I skip the overnight rest?
Yes, but the flavor deepens with the cold ferment. If you’re short on time, bake the same day.
How do I know when it’s done baking?
The top should be golden and the bottom crisp. Tap it lightly — it should sound hollow.
Can I add toppings before baking?
Absolutely! Herbs, olives, tomatoes, and onions all bake beautifully into focaccia.
Texture Timeline
After mixing: Sticky and rough.
After folds: Smooth and elastic.
After bulk rise: Puffy and bubbly.
After proofing: Airy and jiggly.
After baking: Golden, crisp, and beautifully soft inside.
Tips for Success
Use room temperature water to encourage fermentation.
Keep your dough covered at all times to prevent drying out.
Learn to trust your eyes, not the clock — dough behavior varies with temperature.
Don’t rush the proof — the more air, the better the crumb.
Why Beginners Love This Recipe
This recipe builds skills step-by-step:
You learn what active starter looks like.
You feel how dough texture changes with fermentation.
You watch air bubbles form, teaching you readiness cues.
It’s like a hands-on sourdough workshop in your own kitchen — easy, forgiving, and incredibly satisfying.
Final Thoughts
Baking your first sourdough focaccia doesn’t have to be overwhelming. With this foolproof beginner method, you’ll create a loaf that looks and tastes professional — crispy, airy, and rich with olive oil aroma.
More importantly, you’ll gain the confidence to explore more complex sourdough recipes in the future. Every stretch, fold, and bubble tells the story of natural fermentation at work — a small miracle that happens right in your own bowl.
So, grab your starter, trust the process, and enjoy the beautiful simplicity of this Beginner-Friendly Sourdough Focaccia.