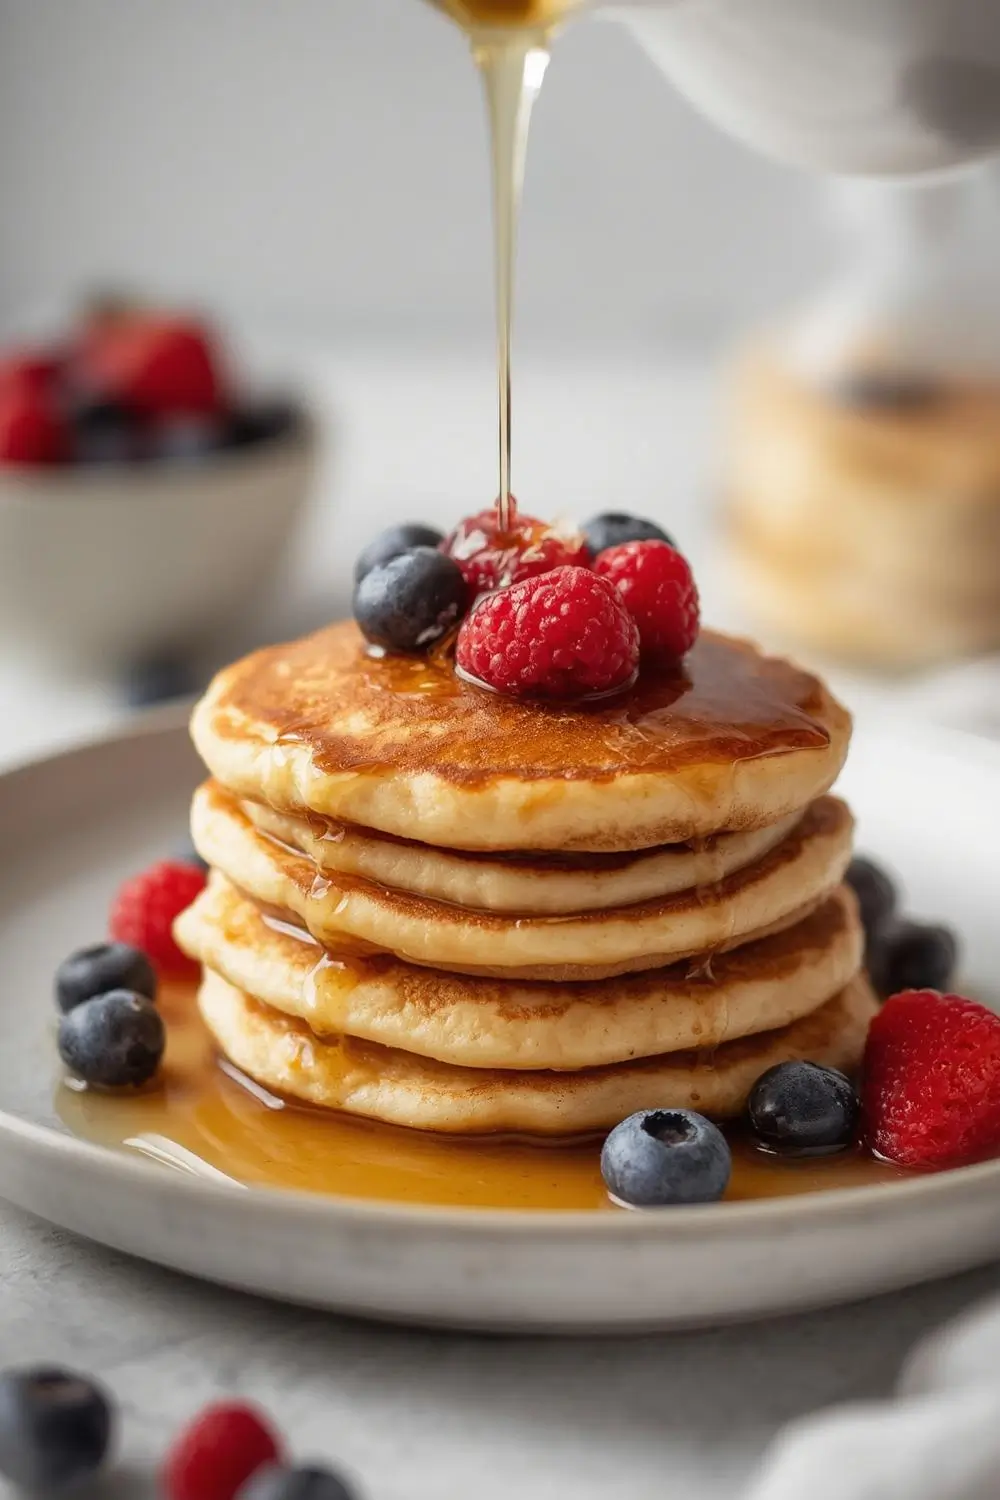
Imagine waking up to the irresistible aroma of golden-brown pancakes, their surfaces speckled with tiny bubbles, promising a tender, melt-in-your-mouth experience. Now, picture making them using something you already have – your sourdough discard! These Fluffy Sourdough Discard Pancakes transform what might seem like kitchen waste into the star of your breakfast table. They’re incredibly simple, requiring just pantry staples, and deliver a texture that’s light, airy, and utterly satisfying. Perfect for a lazy weekend brunch or a quick, delicious weekday morning, these pancakes are your new breakfast obsession. Let’s dive into how to create this magic.
Why Sourdough Discard Works Wonders
Sourdough discard isn’t just a byproduct; it’s a flavor powerhouse and a fantastic leavening agent. The natural acidity in the discard helps tenderize the gluten in the flour, resulting in pancakes that are incredibly soft and fluffy. It also adds a subtle, tangy depth that complements sweet toppings beautifully. Best of all, using your discard reduces food waste and adds incredible flavor to your morning routine.
Gathering Your Pantry Staples
Before you start mixing, ensure you have these essentials on hand:
- Sourdough Discard: The star ingredient! Use about 1 cup (240ml) of discard that’s been sitting at room temperature for a few hours (or overnight) to ensure it’s active and bubbly. If your discard is very thick, you might need a splash more liquid.
- All-Purpose Flour: Provides the structure. You can use whole wheat or a blend, but all-purpose gives the classic texture.
- Baking Powder: The primary leavener for these pancakes. It creates those lovely air pockets.
- Salt: Enhances all the other flavors.
- Granulated Sugar: Balances the tanginess and adds a touch of sweetness.
- Milk (or Plant-Based Alternative): Adds moisture and richness. Whole milk is ideal, but any kind works.
- Large Eggs: Bind the ingredients together and add richness.
- Unsalted Butter (or Neutral Oil): Melted for the batter and for cooking. Butter adds incredible flavor.
- Vanilla Extract: A classic flavor enhancer.
- Cooking Oil (for the pan): Like vegetable or canola oil, for greasing the skillet or griddle.
The Magic Begins: Mixing the Batter
The key to fluffy pancakes is not overmixing. Here’s how to combine your ingredients:
1. Combine Dry Ingredients: In a large bowl, whisk together the flour, baking powder, salt, and sugar. This ensures even distribution and prevents clumping.
2. Combine Wet Ingredients: In a separate medium bowl, whisk together the sourdough discard, milk, eggs, melted butter (or oil), and vanilla extract until smooth.
3. The Gentle Fold: Pour the wet ingredients into the bowl with the dry ingredients. Using a spatula or wooden spoon, gently fold the mixture just until the dry ingredients are moistened. It’s okay if there are a few small lumps – overmixing develops gluten, leading to tough pancakes. The batter should be thick but pourable.
4. Rest the Batter: Let the batter sit for 5-10 minutes. This allows the flour to fully hydrate and the baking powder to start activating, contributing to a fluffier texture.
Cooking to Perfection: Tips for Golden Pancakes
Now comes the fun part – cooking! Here’s how to achieve that perfect golden-brown exterior:
1. Heat Your Pan: Preheat a non-stick skillet or griddle over medium-low heat. You want it hot enough to cook the pancakes through but not so hot that they burn before cooking. A drop of water flicked onto the pan should skitter and evaporate quickly.
2. Grease Lightly: Add a small amount of cooking oil or melted butter to the pan and swirl to coat the surface lightly. You don’t need a lot – just enough to prevent sticking.
3. Pouring the Batter: For consistent size, use a 1/4 cup measuring cup or a ladle. Pour the batter onto the hot pan. If you want larger pancakes, use a bit more batter.
4. The Bubble Test: Watch for bubbles to form on the surface of the pancake and the edges to look set. This usually takes 2-3 minutes. Don’t rush this step!
5. Flip with Confidence: Once bubbles cover the surface and the edges look dry, carefully slide a thin spatula underneath the pancake. Flip it over in one smooth motion. Cook for another 1-2 minutes on the second side, until golden brown and cooked through.
6. Keep Warm: As you cook, transfer finished pancakes to a wire rack set over a baking sheet in a warm oven (around 200°F/95°C). This keeps them crisp on the bottom while staying warm.
Variations to Suit Your Cravings
Don’t be afraid to customize these fluffy delights:
Berry Burst: Gently fold in 1 cup of fresh or frozen berries (blueberries, raspberries, sliced strawberries) into the batter after* the initial rest. Be careful not to overmix.
- Chocolate Chip Delight: Stir in 1/2 to 3/4 cup of chocolate chips into the batter after the rest period.
- Nutty Crunch: Add 1/4 cup of chopped nuts (walnuts, pecans, almonds) for texture.
- Spice It Up: Add 1 teaspoon of cinnamon, pumpkin pie spice, or nutmeg to the dry ingredients.
- Citrus Zing: Zest 1 lemon or orange into the wet ingredients.
- Sweet Toppings: Serve with maple syrup, honey, whipped cream, Greek yogurt, or a sprinkle of powdered sugar.
Storage and Reheating: Keeping the Fluff Alive
Leftover pancakes are a breakfast dream! Here’s how to handle them:
- Cooling: Let cooked pancakes cool completely on the wire rack.
- Freezing: Layer cooled pancakes between sheets of parchment paper in a freezer-safe bag or container. Freeze for up to 3 months.
- Reheating: To enjoy frozen pancakes, thaw overnight in the fridge or reheat directly from frozen. The best methods are:
* Toaster: Toast frozen pancakes for 1-2 minutes per side until heated through and crisp.
* Oven: Place pancakes on a baking sheet in a 350°F (175°C) oven for 5-10 minutes.
* Microwave: Heat for 20-30 seconds on high, but be aware this can make them slightly soggier.
Common Mistakes to Avoid
Even seasoned cooks can slip up. Here’s how to dodge pitfalls:
- Overmixing: This is the #1 culprit for tough pancakes. Mix just* until combined.
- Too Hot Pan: High heat burns the outside before the inside cooks. Start medium-low and adjust if needed.
- Undercooking: Flip too early when bubbles haven’t formed. Wait for the surface to set.
- Using Cold Discard: Room temperature discard mixes in more easily and activates the baking powder better.
- Skipping the Rest: Letting the batter rest is crucial for texture. Don’t skip it!
- Overcrowding the Pan: Cook pancakes in batches to avoid lowering the pan’s temperature too much.
Your Questions Answered: FAQs
Q: Can I use sourdough discard that’s been in the fridge for weeks?
A: Absolutely! Just ensure it’s bubbly and active when you use it. If it’s very thick, you might need a splash more milk. The flavor will be more pronounced.
Q: What if my pancakes are too dense?
A: Check these points: Did you overmix the batter? Was the pan too hot? Did you skip letting the batter rest? Ensure your baking powder is fresh.
Q: Can I make these pancakes without eggs?
A: Yes! Substitute each egg with 1/4 cup of unsweetened applesauce, mashed banana, or a commercial egg replacer. The texture might be slightly different, but they’ll still be delicious.
Q: Can I use whole wheat flour instead of all-purpose?
A: Yes, you can. Whole wheat flour makes denser pancakes. For a lighter texture, use a 50/50 blend of whole wheat and all-purpose flour.
Q: How do I prevent the berries or chocolate chips from sinking?
A: Toss the add-ins (like berries or chips) in a small amount of flour before folding them into the batter. This helps them suspend better.
Q: Can I make a larger batch and freeze them?
A: Definitely! Make a double batch, cool completely, stack with parchment, and freeze. Reheat as needed for a quick breakfast.
The Perfect Finish: Serving Your Creation
There’s something deeply satisfying about serving a stack of these fluffy sourdough discard pancakes. The golden-brown surface, the light and airy crumb, the subtle tang – it’s a breakfast triumph. Serve them immediately while they’re hot, piled high on a plate. Drizzle generously with warm maple syrup, scatter fresh berries, or add a dollop of whipped cream. A sprinkle of powdered sugar or a squeeze of lemon juice adds the perfect finishing touch. Enjoy the fruits of your labor – a delicious, waste-free breakfast that’s sure to become a weekend staple.
Your Turn!
Now it’s your turn to create these fluffy wonders. Gather your sourdough discard, whisk up the batter, and experience the joy of transforming leftovers into a breakfast masterpiece. Share your creations, your tips, and your favorite toppings in the comments below. What will you serve with your pancakes today?