Table of Contents
- 1 Why You’ll Love Fermented Green Beans
- 2 🌿 What is Fermentation?
- 3 🌟 Benefits of Fermented Green Beans
- 4 🛒 Ingredients
- 5 🧰 Equipment You’ll Need
- 6 How to Ferment Green Beans
- 7 ⏳ Fermentation Timeline
- 8 ⚠️ Troubleshooting Ferments
- 9 🍋 Flavor Variations
- 10 🍽️ Serving Suggestions
- 11 🧊 Storage & Shelf Life
- 12 ❓ FAQs
- 13 🌟 Final Thoughts
Why You’ll Love Fermented Green Beans
🦠 Rich in probiotics for gut and immune health
🧂 Naturally preserved without vinegar or canning
🥬 Crunchy, flavorful, and customizable
🕒 Easy prep — the jar does the work
🌱 Vegan, gluten-free, paleo, and keto-friendly
🧄 A great intro to home fermentation
🌿 What is Fermentation?
Fermentation is a natural preservation method that uses beneficial bacteria—mainly Lactobacillus—to break down sugars and produce lactic acid. This acid acts as a natural preservative while creating the signature tangy, sour flavor of fermented foods.
Unlike pickling (which uses vinegar), fermentation relies on saltwater brine and time to transform raw vegetables into probiotic powerhouses.
🌟 Benefits of Fermented Green Beans
🦠 Probiotics
Natural fermentation creates live cultures that promote healthy gut flora, support digestion, and may even improve immune response.
🥒 Crunchy & Low-Calorie
Fermented beans stay crisp and are naturally low in calories, carbs, and fat.
🍃 Clean Eating
No alcohol, sugar, preservatives, or animal products. Just plants, salt, water, and good bacteria.
💪 Supports Mental Clarity & Energy
Recent studies link gut health to mood, mental function, and energy levels—making fermented foods a no-brainer for brain health.
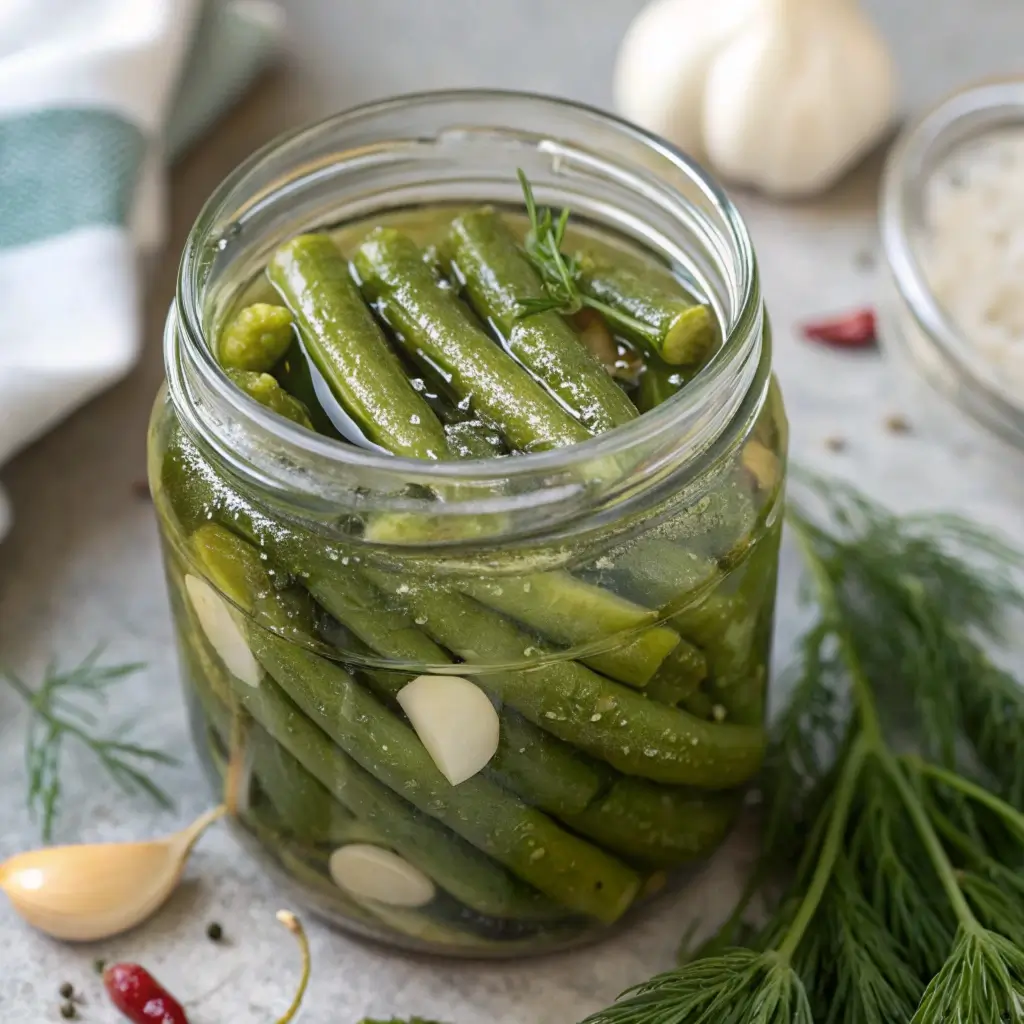
🛒 Ingredients
This recipe makes 1 quart jar of fermented green beans.
Base Ingredients:
1 lb fresh green beans, ends trimmed
2 cloves garlic, peeled and smashed
2–3 sprigs fresh dill
1 tbsp kosher salt (or sea salt, non-iodized)
2 cups filtered water (unchlorinated)
Optional Flavor Boosters:
1 tsp mustard seeds
½ tsp red pepper flakes
1 bay leaf
2–3 slices ginger or lemon zest
❗ Important: Avoid iodized salt or chlorinated tap water—both can inhibit fermentation.
🧰 Equipment You’ll Need
1 quart-size wide-mouth mason jar
1 fermentation weight (or small food-safe object to keep beans submerged)
1 clean cloth or fermenting lid
1 rubber band (if using cloth)
Measuring spoons and cups
💡 Optional but helpful: a fermentation airlock lid or burp lid to release pressure.
How to Ferment Green Beans
Step 1: Prepare the Brine
Mix 1 tbsp salt with 2 cups filtered water until fully dissolved.
Set aside.
Step 2: Pack the Jar
Stand trimmed green beans upright in the jar.
Tuck garlic cloves, dill sprigs, and any additional seasonings around the beans.
Pour brine over until beans are completely submerged.
📝 Tip: Leave about 1 inch of headspace at the top.
Step 3: Weigh It Down
Place a fermentation weight or a small clean glass (like a shot glass) to keep beans submerged.
This prevents mold and ensures safe fermentation.
Step 4: Cover and Store
Cover the jar with a breathable cloth and secure with a rubber band or use a fermentation lid.
Place the jar on a small plate or tray (it may bubble over).
Store in a cool, dark area—65–75°F (18–24°C) is ideal.
⏳ Fermentation Timeline
| Day | What’s Happening? |
|---|---|
| 1–2 | Bubbling starts, brine may cloud |
| 3–5 | Stronger aroma, mild tang forms |
| 6–10 | Peak fermentation & sour flavor |
| 11+ | Beans may soften slightly |
Taste test from Day 5 onward. When they reach your desired flavor, transfer to the fridge to slow fermentation and preserve crunch.
⚠️ Troubleshooting Ferments
White Film on Top?
Likely kahm yeast—harmless, but remove it. Fermenting too warm or not submerged enough can cause this.
Mold?
Fuzzy, colored mold is unsafe. Discard the batch and start over with cleaner tools and tighter control of conditions.
Beans Not Tangy?
Let them ferment longer. Cooler temperatures slow the process.
Too Salty?
You may have over-concentrated the brine. Try a 2% brine (1.5 tsp salt per cup water) next time.
🍋 Flavor Variations
🌶️ Spicy Green Beans
Add red pepper flakes, fresh jalapeño slices, or a dried chili.
🍋 Lemon-Ginger Beans
Add a strip of lemon peel and 3 slices of fresh ginger.
🌿 Italian-Inspired
Use basil, oregano, and a few garlic slices instead of dill.
🧄 Garlic Explosion
Add 4–6 cloves of garlic per jar for bold flavor.
🍽️ Serving Suggestions
Fermented green beans are more than just a snack!
🥗 Chop into salads (potato, egg, or pasta)
🍴 Add to grain bowls or poke-style dishes
🧀 Pair with olives, crackers, and plant-based cheese
🌯 Use as a zesty topping in wraps or tacos
🥒 Enjoy as a crunchy gut-friendly side or snack
🧊 Storage & Shelf Life
| Storage Location | Duration | Notes |
|---|---|---|
| Room Temperature | Up to 10 days | Active fermentation phase |
| Refrigerator | 3–6 months | After desired flavor is reached |
🧊 Keep submerged at all times in cold storage to maintain quality and safety.
❓ FAQs
Q1: Are fermented green beans the same as pickled?
A: No. Pickled beans use vinegar for acidity. Fermented beans use natural bacteria to create lactic acid, resulting in a tangy, probiotic-rich food.
Q2: How do I know if the fermentation worked?
A: Signs of successful fermentation:
Bubbles forming
Slight brine cloudiness
Tangy, sour smell (not rotten or foul)
Beans stay submerged and crisp
Q3: Can I make these without dill?
A: Yes! Dill is traditional but optional. Feel free to use thyme, rosemary, or no herbs at all.
Q4: Is fermentation safe?
A: Yes, when following proper guidelines: clean jars, salt-to-water ratio, and keeping beans submerged. Always discard if you see mold or smell something foul.
Q5: Can I use this method for other vegetables?
A: Absolutely! Try carrots, cauliflower, radishes, asparagus, or even jalapeños using the same brine base.
🌟 Final Thoughts
Fermented green beans are an easy and delicious way to add probiotics to your diet. Their satisfying crunch and tangy, complex flavor make them a perfect snack, salad topper, or appetizer addition. Plus, the fermentation process is straightforward and forgiving, making it ideal for beginners.
By making your own fermented green beans, you’re not only preserving your fresh harvest or grocery store bounty but also nurturing your gut health naturally—with no added alcohol, pork, bacon, or wine involved.
If you give this recipe a try, tag your creation with #fermentedgreenbeans on social media or leave a comment below! We’d love to hear about your favorite flavor combos or fermentation tips.