The Magicof Overnight Cinnamon Rolls: Brunch Made Effortless
There’s something undeniably special about the aroma of freshly baked cinnamon rolls filling your home on a lazy weekend morning. The promise of warm, gooey swirls of cinnamon and sugar, nestled in a soft, buttery dough, is pure comfort. But let’s be honest, the traditional process can feel a bit daunting, especially when you’re juggling brunch preparations. What if you could have that same delicious result with significantly less morning effort? Enter the game-changer: Easy Overnight Cinnamon Rolls. This recipe transforms your brunch routine, allowing you to prep the dough the night before, let it rise slowly in the refrigerator, and wake up to the simple joy of baking and serving warm, irresistible rolls. It’s the perfect blend of convenience and homemade goodness, designed for busy home cooks who crave that special brunch touch without the stress.
Why Overnight Cinnamon Rolls are a Brunch Hero
The beauty of this method lies in its simplicity and the science behind slow fermentation. By letting the dough rise overnight in the fridge, you achieve several wonderful things:
1. Deepened Flavor: The cold, slow rise develops complex, rich flavors in the dough that a quick rise simply can’t match. Think of it as letting the dough savor its time, resulting in a more nuanced, slightly tangy taste.
2. Easier Handling: Chilled dough is much firmer and less sticky, making it a breeze to roll out and shape without excessive flour dusting.
3. Convenience: Prep the dough in the evening, pop it in the fridge, and the next morning, you’re just a few steps away from baking. No frantic kneading or waiting for dough to double in a warm spot.
4. Perfect Texture: The slow rise creates a tender, light crumb structure that’s simply divine.
This recipe is designed to be foolproof for beginners, with clear steps and helpful tips. You’ll master the art of the perfect overnight cinnamon roll, impressing your family and friends with minimal morning effort.
Gathering Your Ingredients: The Foundation of Flavor
The magic starts with quality ingredients. Here’s what you’ll need for the dough and the filling:
For the Dough:
- 2 ¼ teaspoons (1 standard packet) Active Dry Yeast: The leavening agent that makes your rolls rise. Make sure it’s fresh!
- ¾ cup (150ml) Warm Milk (110-115°F / 43-46°C): Not too hot, not too cold. Warm milk activates the yeast gently. Whole milk adds richness, but 2% works fine.
- ¼ cup (50g) Granulated Sugar: Feeds the yeast and adds sweetness.
- ¼ cup (56g) Unsalted Butter, melted and slightly cooled: Adds tenderness and flavor. Don’t skip this!
- 1 large Egg, at room temperature: Provides structure and richness.
- 1 teaspoon Salt: Balances the sweetness and enhances flavor.
- 4 cups (500g) All-Purpose Flour (plus extra for dusting): The base. Bread flour can be used for an even chewier texture, but AP flour is perfectly fine.
- ¼ cup (57g) Unsalted Butter, softened: For brushing the dough before rolling and for the filling.
For the Cinnamon Sugar Filling:
- ¾ cup (150g) Granulated Sugar: Sweetness.
- 2 tablespoons Ground Cinnamon: The star flavor. Use high-quality cinnamon for the best taste.
- ¼ cup (56g) Unsalted Butter, softened: Creates a spreadable, flavorful layer.
For the Cream Cheese Frosting (Optional but Recommended):
- 4 oz (115g) Cream Cheese, softened: The creamy base.
- ¼ cup (57g) Unsalted Butter, softened: Adds richness.
- 2 cups (240g) Powdered Sugar, sifted: Sweetness and structure.
- 1 teaspoon Vanilla Extract: Enhances flavor.
- 2-4 tablespoons Heavy Cream or Milk: For desired consistency.
Step-by-Step: Crafting Your Overnight Dough
1. Activate the Yeast (The First Step to Rise): In a large mixing bowl, combine the warm milk, ¼ cup of the granulated sugar, and the active dry yeast. Stir gently and let it sit for about 5-10 minutes. You’ll see it become foamy on top – this means your yeast is alive and active! If it doesn’t foam, your yeast might be expired, and you’ll need fresh yeast.
2. Combine Wet Ingredients: Add the melted (but cooled) butter, the room-temperature egg, and the salt to the yeast mixture. Whisk everything together until well combined.
3. Incorporate the Flour: Gradually add the flour, about ½ cup at a time, stirring with a wooden spoon or sturdy spatula after each addition. The dough will start to come together and become quite thick. Once it’s too thick to stir, turn it out onto a lightly floured surface.
4. Knead to Perfection: Knead the dough for about 5-7 minutes. This develops the gluten, giving your rolls their light, airy texture. Push the dough away with the heel of your hand, fold it over, give it a quarter turn, and repeat. The dough should become smooth, elastic, and slightly tacky but not sticky. Add small amounts of flour only if it’s extremely sticky. Don’t over-flour!
5. First Rise (The Overnight Chill): Lightly grease a large bowl with a little oil or butter. Place the kneaded dough ball into the bowl, turning it once to coat it lightly with oil. Cover the bowl tightly with plastic wrap or a damp kitchen towel. Place it in the refrigerator. This is your first rise, happening slowly and gently overnight (8-12 hours). The cold temperature slows the yeast activity, developing flavor and making the dough easier to handle later.
6. Prepare the Filling: While the dough chills, mix together the ¾ cup granulated sugar and 2 tablespoons of ground cinnamon in a small bowl. Set aside. Soften the ¼ cup of butter for the filling until it’s spreadable but not melted.
7. Shape the Rolls (Morning Time!): The next morning, or whenever you’re ready to bake, remove the dough from the refrigerator. It will have risen slightly and feel cold and firm. Gently punch it down to release any large air bubbles. Turn it out onto a lightly floured surface.
8. Roll it Out: Roll the dough into a large rectangle, roughly 12 inches by 18 inches. Aim for an even thickness, about ¼ to ½ inch thick. Use a rolling pin and rotate the dough occasionally to prevent sticking.
9. Spread the Butter & Sugar: Spread the softened ¼ cup of butter evenly over the entire surface of the rolled dough, leaving a small border around the edges. Then, sprinkle the cinnamon sugar mixture evenly over the butter.
10. Roll it Up: Starting from the long edge closest to you, carefully roll the dough up tightly into a log. Pinch the seam gently to seal it. You should have a long, spiral log.
11. Cut the Rolls: Using a sharp knife or dental floss (for cleaner cuts), slice the log into 12 equal pieces. A piece of dental floss pulled tightly across the log where you want to cut works wonders for neat slices.
12. Prepare the Pan: Lightly grease a 9-inch or 10-inch round or square baking pan. Arrange the cut rolls, cut-side up, in the pan, leaving a little space between them for them to expand slightly.
13. Second Rise (The Final Proof): Cover the pan loosely with plastic wrap or a damp towel. Let the rolls rise at room temperature for about 30-45 minutes, or until they look puffy and have risen noticeably above the rim of the pan. They won’t double in size like a traditional rise, but they should look soft and full.
14. Bake to Golden Perfection: Preheat your oven to 350°F (175°C). Bake the rolls for 20-25 minutes, or until they are deeply golden brown on top and the edges look set. The internal temperature should reach around 190°F (88°C) if you have a thermometer. They should sound hollow when tapped on the bottom.
15. Cool Slightly: Remove the pan from the oven and let the rolls cool in the pan for about 10 minutes. This allows them to set slightly and makes them easier to handle.
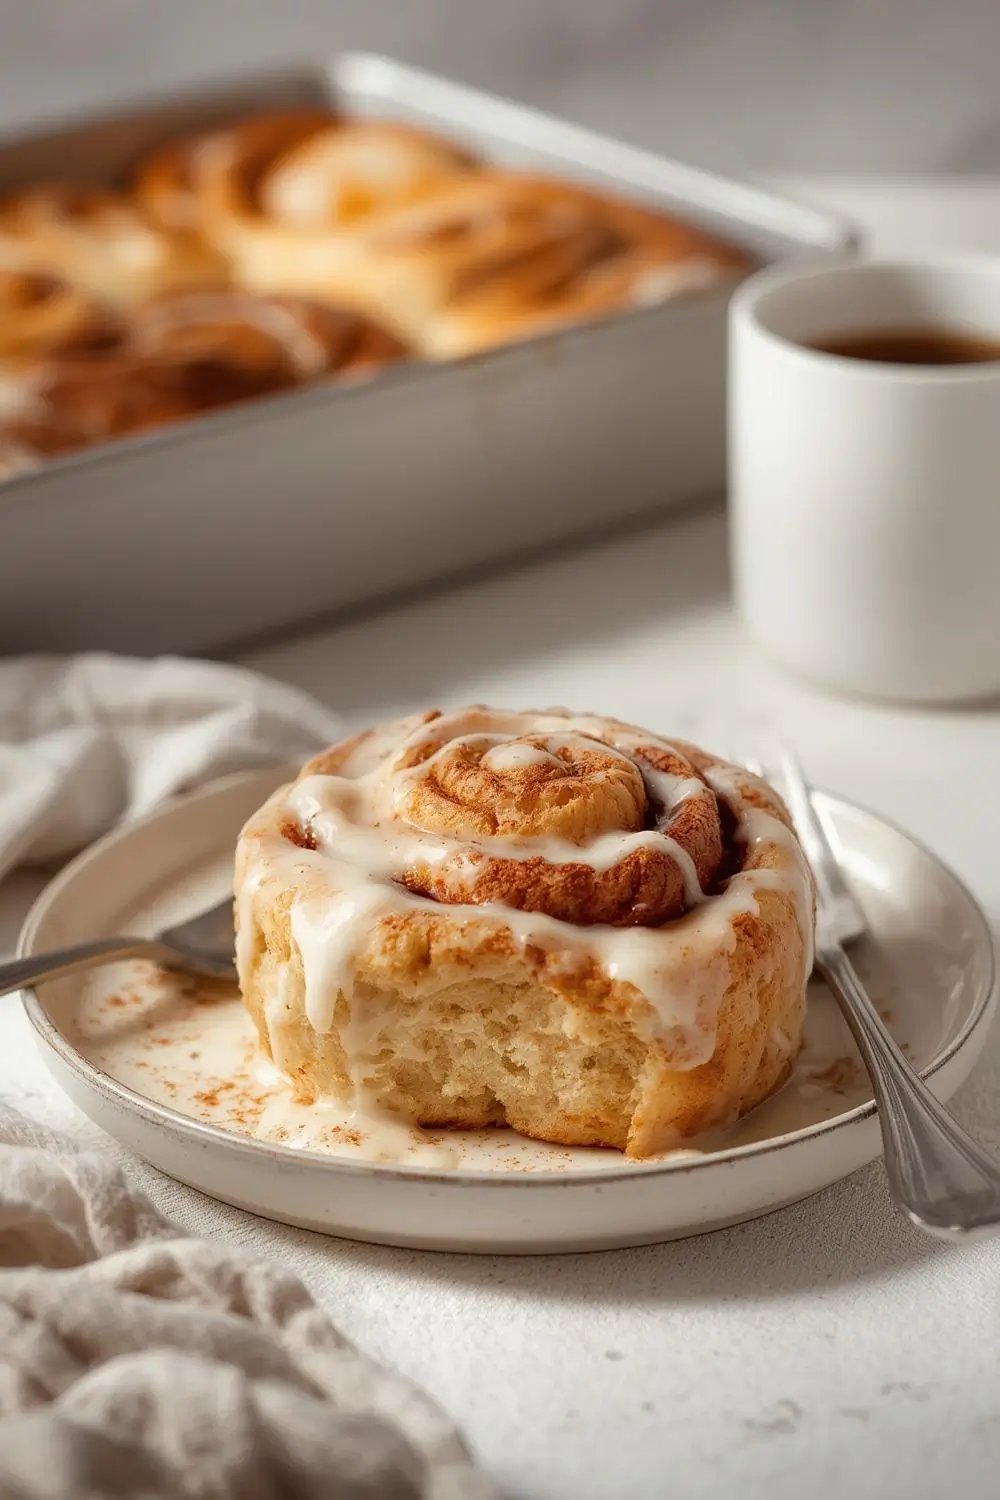
16. Frost & Serve: While the rolls cool, prepare the cream cheese frosting (if using). Beat the softened cream cheese and butter until smooth. Gradually add the powdered sugar and vanilla, beating well. Add heavy cream or milk a tablespoon at a time until you reach a spreadable consistency. Spread or drizzle the frosting over the warm rolls. Serve immediately for the ultimate brunch experience!
Variations and Substitutions: Making it Your Own
- Add-Ins: Fold in ½ cup of chopped pecans, walnuts, or raisins into the cinnamon sugar filling before rolling. For a chocolate twist, add ½ cup of chocolate chips.
- Different Fillings: Swap the cinnamon sugar for a brown sugar and pecan filling, or a simple lemon zest and sugar filling. Get creative!
- Dairy-Free: Use almond milk instead of dairy milk. For the frosting, use dairy-free cream cheese and a dairy-free butter alternative. Ensure your yeast is dairy-free if needed.
- Gluten-Free: Use a high-quality gluten-free all-purpose flour blend (check for xanthan gum). The dough may be slightly more delicate; handle gently. Baking time might need adjustment.
- Sweetener Swap: Replace granulated sugar in the dough with an equal amount of brown sugar for deeper flavor. Use honey or maple syrup in the frosting (adjust liquid slightly).
- Butter Substitute: Use a neutral oil like canola or vegetable oil in the dough for a slightly different texture. For the filling, use a dairy-free butter alternative.
Storage and Reheating: Enjoy Your Brunch Later
- Room Temperature: Leftover rolls are best enjoyed the day they are baked. Store them in an airtight container at room temperature for up to 2 days. They will lose some freshness but remain delicious.
- Refrigerator: For longer storage (up to 5 days), wrap individual rolls tightly in plastic wrap or place them in an airtight container. Reheat gently in the microwave for 15-20 seconds or in a low oven (300°F / 150°C) for 5-10 minutes until warmed through.
- Freezing: Excellent option! After the rolls have cooled completely (after baking and frosting), wrap them tightly in plastic wrap, then place them in a freezer-safe bag or container. Freeze for up to 3 months. To reheat, thaw overnight in the refrigerator, then warm in the oven as above, or microwave briefly. Frost after thawing and reheating.
Common Mistakes to Avoid: Ensuring Success
- Water Temperature: Using water that’s too hot (above 115°F / 46°C) can kill the yeast. Use warm, not hot, water/milk.
- Old Yeast: Expired yeast won’t activate, leaving you with flat rolls. Check the expiration date!
- Over-Kneading: While kneading is important, over-kneading can make the dough tough. 5-7 minutes on a floured surface is usually sufficient.
- Under-Kneading: Under-kneaded dough won’t develop enough gluten, leading to dense rolls. Ensure the dough is smooth and elastic.
- Rushing the Rise: The overnight chill is crucial for flavor and texture. Don’t skip it or shorten the time significantly.
- Overfilling: Don’t overload the rolls with filling, especially if it’s wet (like fruit). This can cause the rolls to burst or become soggy.
- Cutting with a Dull Knife: A sharp knife or dental floss ensures clean cuts and prevents squishing the rolls.
- Skipping the Second Rise: Allowing the rolls to rise slightly before baking ensures they are light and fluffy, not dense.
- Frosting Too Early: Frosting warm rolls can make the frosting melt and slide off. Wait until they are cool enough to handle comfortably.
Your Questions Answered: FAQs
Q: Can I make these rolls ahead of time?
A: Absolutely! The beauty of this recipe is making the dough the night before. Prepare everything up to placing the shaped rolls in the pan, cover them, and refrigerate overnight. Bake them in the morning as described.
Q: What if my dough is too sticky?
A: Add flour a little at a time while kneading. Don’t add too much at once, as you can easily make the dough too dry. The goal is a smooth, elastic dough that’s slightly tacky.
Q: Can I use bread flour instead of all-purpose?
A: Yes! Bread flour has a higher protein content, which creates a slightly chewier texture. You might need a tiny bit less flour when kneading, as bread flour absorbs more liquid.
Q: How do I know when the rolls are done baking?
A: They should be a deep golden brown on top. A visual cue is the edges looking set and slightly pulling away from the pan slightly. An internal temperature of 190°F (88°C) is a reliable indicator.
Q: Can I freeze the unbaked rolls?
A: Yes! After shaping the rolls and placing them in the pan, cover them tightly with plastic wrap and freeze. When ready to bake, remove from the freezer, let them thaw in the refrigerator overnight, then let them rise at room temperature for about 30-45 minutes before baking as usual.
Q: What can I use if I don’t have cream cheese frosting?
A: A simple glaze works beautifully! Mix 1 cup powdered sugar with 2-3 tablespoons milk or cream and ½ teaspoon vanilla. Drizzle over the warm rolls. A light sprinkle of powdered sugar is also lovely.
Q: Can I make these rolls without a mixer?
A: Definitely! You can knead the dough entirely by hand on a floured surface. It just takes a bit more elbow grease, but it’s very achievable.
Q: Why did my rolls come out dense?
A: This is often due to under-kneading (not enough gluten development) or under-proofing (not letting them rise enough before baking). Ensure you knead sufficiently and allow the second rise time.
Q: Can I use instant yeast instead of active dry yeast?
A: Yes! You can use instant yeast (also called rapid-rise or bread machine yeast) in the same amount. You don’t need to activate it in warm milk first; just add it directly to the dry ingredients with the flour.
Q: How do I prevent the rolls from sticking to the pan?
A: Generously grease the pan with butter or non-stick spray before placing the rolls in. You can also line the pan with parchment paper for easy removal.
The Final Touch: A Brunch Celebration
There’s a profound satisfaction in creating something delicious from scratch, especially when it brings joy to your loved ones. These Easy Overnight Cinnamon Rolls transform the often-stressful brunch hour into a moment of pure indulgence. The rich, buttery dough, the warm embrace of cinnamon and sugar, and the optional creamy frosting create a symphony of flavors that will have everyone asking for seconds. The overnight method is your secret weapon, ensuring you can enjoy the fruits of your labor without sacrificing your morning. So, gather your ingredients, embrace the simplicity of the process, and get ready to bake your way to the perfect, effortless brunch. The aroma alone will make it feel like a special occasion every time. Enjoy every warm, gooey bite!