The Ultimate Make-Ahead Overnight CinnamonRoll Dough: Bake Fresh Every Morning
Imagine waking up to the irresistible aroma of cinnamon and sugar filling your kitchen, signaling the start of a perfect weekend or a stress-free holiday morning. What if you could achieve that heavenly scent without the frantic rush of rolling dough at dawn? Welcome to the magic of overnight cinnamon roll dough. This simple, make-ahead technique transforms your baking routine, letting you prep everything the night before and enjoy warm, fluffy cinnamon rolls fresh from the oven come morning. It’s the ultimate solution for busy families, holiday gatherings, or anyone craving a touch of homemade indulgence without the early alarm.
The secret lies in the slow rise. By letting the dough rest, chilled and covered, in your refrigerator overnight, something wonderful happens. The cold temperature gently slows down the yeast’s activity, allowing the flavors to develop more deeply and the gluten to relax fully. This results in rolls that are incredibly soft, tender, and possess a beautiful, layered texture – far superior to rolls made with a rushed, room-temperature rise. Plus, it’s incredibly forgiving; you can even let the dough rise for up to 24 hours in the fridge if your schedule demands it.
This recipe is designed with beginners in mind. I’ll guide you through every step with clear, detailed instructions and helpful tips to ensure your success. You’ll learn why certain ingredients matter, how to handle the dough gently, and how to troubleshoot common issues. Whether you’re a seasoned baker looking for a new time-saver or someone new to yeast doughs, this overnight cinnamon roll dough is your key to effortless, bakery-quality cinnamon rolls.
Why Make Dough Ahead?
- Time Saver: Prep dinner, relax, then wake up to baking.
- Better Flavor: The slow chill develops complex, rich flavors.
- Easier Handling: Chilled dough is much less sticky and easier to roll.
- Stress-Free Entertaining: Have rolls ready to bake when guests arrive.
- Perfect Texture: Guaranteed ultra-soft, fluffy, and layered rolls.
Ingredients Explained: Building Flavor and Structure
The beauty of this recipe is its simplicity, but understanding why each ingredient is used helps you adapt and succeed.
- Warm Milk (1 cup): This activates the yeast. Use whole milk for the richest flavor and tenderness, but 2% or even skim milk will work. Ensure it’s warm (about 110°F / 43°C) – not hot, or it will kill the yeast. A quick test: it should feel comfortably warm, like a baby’s bottle.
- Active Dry Yeast (2 1/4 tsp / 1 standard packet): This is the leavening agent. It feeds on the sugars in the dough and produces carbon dioxide gas, making the dough rise. I use active dry yeast; instant yeast can be substituted, but you might need to adjust the rising time slightly. Proofing the yeast in the warm milk is a good habit to ensure it’s active.
- Granulated Sugar (1/4 cup): Feeds the yeast and adds a touch of sweetness. You can use brown sugar for a deeper flavor, but granulated is standard.
- Salt (1 1/2 tsp): Essential for flavor development and controlling yeast activity. Don’t skip it!
- Large Eggs (2, room temperature): Add richness, structure, and moisture. Room temperature eggs incorporate more easily.
- Unsalted Butter (1/2 cup / 1 stick, melted): Provides incredible tenderness, flavor, and richness. Let it cool slightly before adding to the warm milk mixture to avoid scrambling the eggs.
- Bread Flour (4 1/2 – 5 cups): This is crucial. Bread flour has a higher protein content (usually 12-14%) than all-purpose flour (around 10-12%). This extra protein creates more gluten, giving your rolls their signature soft yet chewy texture and helping them hold their shape beautifully during the rise and bake. You can use all-purpose flour, but the texture will be slightly less tender and potentially denser. Start with 4 1/2 cups and add more as needed.
- Cinnamon Sugar Filling (1/2 cup brown sugar + 2 tbsp ground cinnamon): The heart of the cinnamon roll. Brown sugar adds moisture and a deeper caramel note compared to white sugar. Mix it well with the cinnamon.
- Cream Cheese Frosting (Optional but Recommended): While the rolls are delicious plain, a simple cream cheese frosting elevates them. You’ll need softened cream cheese, butter, powdered sugar, vanilla, and a splash of milk or cream.
Step-by-Step Instructions: From Bowl to Fridge to Oven
1. Activate the Yeast (5-10 mins): In a large mixing bowl (or the bowl of a stand mixer), combine the warm milk, granulated sugar, and active dry yeast. Stir gently and let it sit for 5-10 minutes. You should see it become foamy on top – this confirms the yeast is active and ready to work.
2. Add Wet Ingredients: Add the room temperature eggs, melted (and slightly cooled) butter, and salt to the yeast mixture. Whisk or mix on low speed until well combined.
3. Incorporate Flour Gradually: Add the bread flour, about 1 cup at a time, mixing on low speed after each addition. The dough will start to come together but will be very sticky. Don’t be tempted to add all the flour at once. Mix until the flour is just incorporated and the dough pulls away from the sides of the bowl slightly. It should be soft and pliable, not stiff.
4. Knead the Dough (5-7 mins): If using a stand mixer with a dough hook, knead on medium-low speed for 5-7 minutes until the dough is smooth, elastic, and slightly tacky but not sticky. If kneading by hand, turn the dough out onto a lightly floured surface and knead for 5-7 minutes, adding small amounts of flour only if absolutely necessary to prevent sticking. The dough should pass the “windowpane test” – you can stretch a small piece thin enough to see light through it without tearing.
5. First Rise (1-2 hours): Lightly grease a large bowl with oil or non-stick spray. Place the dough ball in the bowl, turning it once to coat it lightly with oil. Cover the bowl tightly with plastic wrap or a damp kitchen towel. Let it rise in a warm, draft-free place until doubled in size, about 1 to 2 hours.
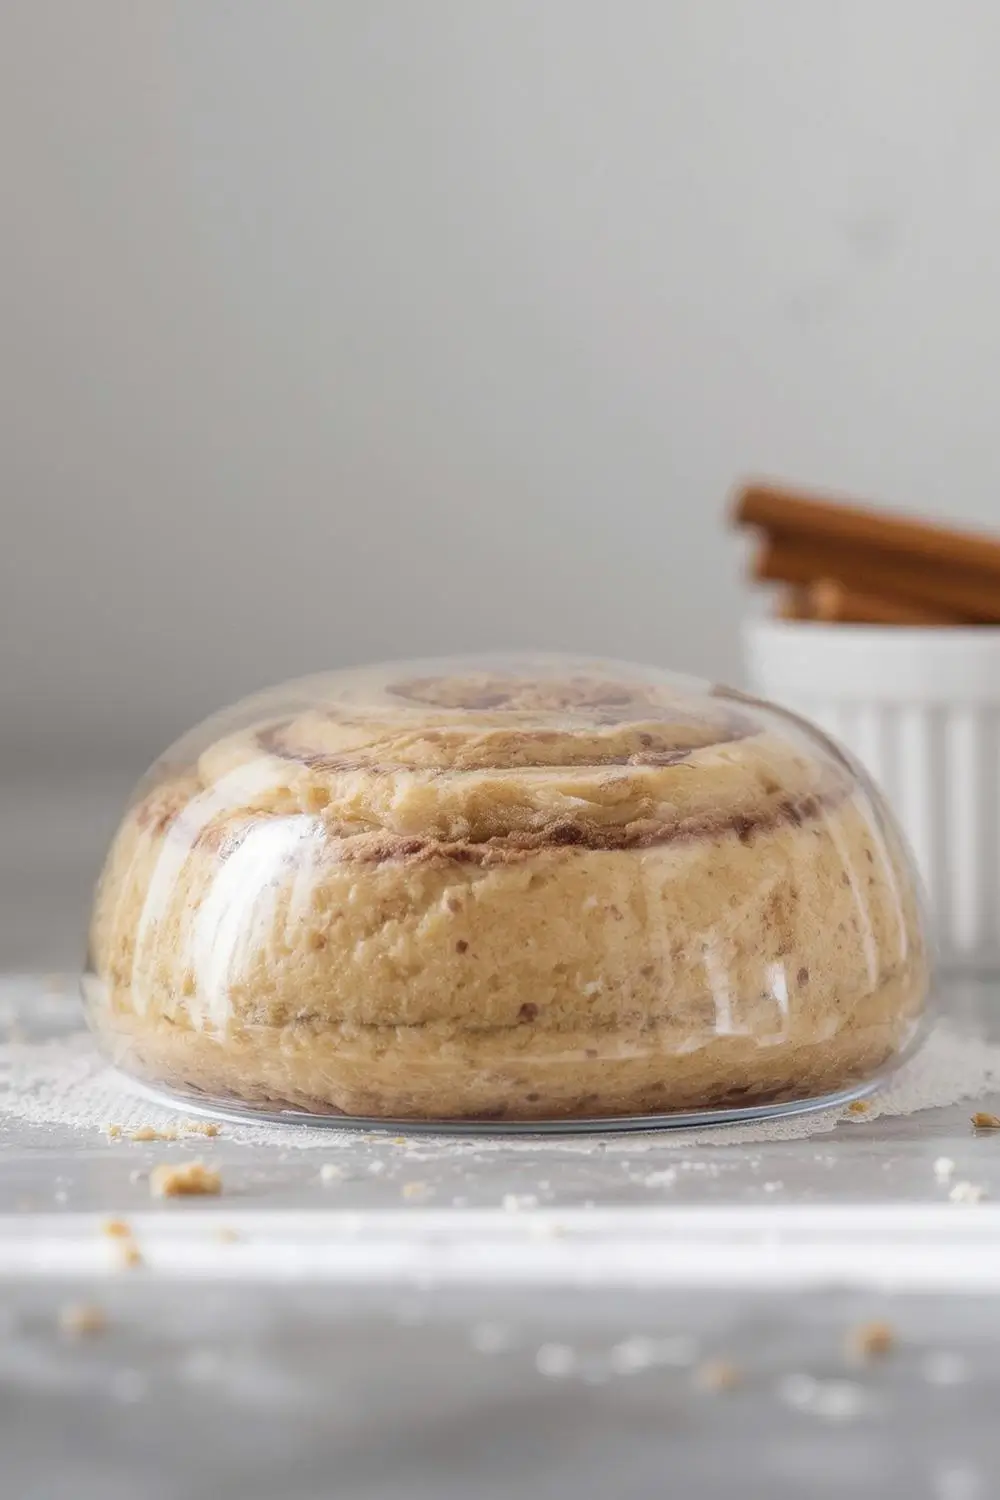
6. Chill Overnight (8-24 hours): Once doubled, punch down the dough gently to release the air. Cover the bowl tightly again and transfer it to the refrigerator. This is the overnight rise. The dough can stay here for 8 to 24 hours. The longer it chills, the more flavor develops. If leaving it longer than 8 hours, punch it down gently once during that time (e.g., after 12 hours) to redistribute the yeast.
7. Prepare the Filling: While the dough chills, mix together the brown sugar and ground cinnamon in a small bowl. Set aside.
8. Shape the Rolls (Next Morning): About 30-45 minutes before you want to bake, take the dough out of the fridge. It will be cold and stiff. Gently punch it down once more. Turn it out onto a lightly floured surface. Roll the dough into a large rectangle, roughly 12 inches by 18 inches. Aim for an even thickness.
9. Add the Filling: Spread the softened butter evenly over the rolled-out dough, leaving a small border around the edges. Sprinkle the cinnamon sugar mixture evenly over the butter.
10. Roll Up & Cut: Starting from the long edge, carefully roll the dough up tightly into a log. Pinch the seam closed. Using a sharp knife or dental floss, cut the log into 12 equal pieces (about 1 1/2 inches thick). Place the rolls cut-side up in a lightly greased 9×13 inch baking pan or two 9-inch round pans.
11. Second Rise (30-45 mins): Cover the pan loosely with plastic wrap or a damp towel. Let the rolls rise at room temperature until they look puffy and have expanded, about 30-45 minutes. They shouldn’t quite double in size again, just puff up nicely.
12. Bake (15-20 mins): Preheat your oven to 350°F (175°C). Bake the rolls for 15-20 minutes, or until they are golden brown on top and cooked through. The internal temperature should reach about 190°F (88°C) if you have a thermometer. They should sound hollow when tapped on the bottom.
13. Frost & Serve: While the rolls cool slightly in the pan for 5-10 minutes, prepare the cream cheese frosting. Beat together softened cream cheese, softened butter, powdered sugar, vanilla extract, and a splash of milk or cream until smooth and creamy. Spread or drizzle the frosting over the warm rolls. Serve immediately for the ultimate experience!
Variations and Substitutions: Making it Your Own
- Flavors: Add 1/2 cup of chopped pecans, walnuts, or raisins to the cinnamon sugar filling. For a twist, mix in 1-2 teaspoons of ground cardamom or orange zest with the cinnamon sugar.
- Flours: As mentioned, all-purpose flour can be used, though the texture will be slightly different. For a heartier roll, try a mix of bread flour and whole wheat flour (up to 1 cup whole wheat).
- Sweetness: Adjust the sugar in the filling to taste. Use more brown sugar for deeper caramel notes, or add a tablespoon of maple syrup to the filling.
- Butter: Use unsalted butter for better control over salt. You can substitute part of the butter with neutral oil if needed, but it will affect flavor and texture.
- Frosting: Skip the cream cheese frosting and make a simple vanilla glaze (powdered sugar + milk + vanilla). For a chocolate fix, add 1/2 cup cocoa powder to the frosting.
- Dairy-Free: Use almond milk or oat milk instead of dairy milk. Use a dairy-free butter substitute and a dairy-free cream cheese for the frosting.
Storage and Reheating: Keeping the Magic Alive
- Room Temperature (1-2 days): Store cooled rolls in an airtight container at room temperature. They will stay fresh for 1-2 days.
- Refrigerator (Up to 5 days): Store cooled rolls in an airtight container in the refrigerator. They will keep well for up to 5 days. Reheat gently in the microwave (10-15 seconds) or a low oven (300°F / 150°C for 5-10 minutes) to restore softness.
- Freezer (Up to 3 months): Wrap individual rolls tightly in plastic wrap, then place them in a freezer-safe bag or container. To reheat, thaw overnight in the fridge and then warm as above, or bake frozen rolls straight from the freezer (add 5-10 minutes to the baking time) on a baking sheet at 350°F (175°C) until warmed through and golden.
Common Mistakes to Avoid: Ensuring Perfect Rolls
1. Killing the Yeast: Using water that’s too hot (above 110°F / 43°C) will kill the yeast. Test the milk temperature carefully.
2. Over-Kneading: Overworking the dough can make it tough. Knead just until smooth and elastic. The windowpane test is your friend.
3. Adding Too Much Flour: This is the most common mistake. The dough will be very sticky initially. Only add flour if it’s literally sticking to your hands or the bowl excessively. The dough should be soft and pliable.
4. Rushing the Rise: Especially the first rise. Give the dough enough time to double in size. Patience is key for flavor and texture.
5. Under-Baking: Rolls should be golden brown and sound hollow when tapped. Under-baked rolls will be doughy in the center.
6. Frosting Too Early: Frost only after the rolls have cooled slightly in the pan for 5-10 minutes. Frosting them while piping hot will melt it off.
7. Not Letting Dough Rest After Punching Down: When you punch down the dough after the first rise, let it rest for 5-10 minutes before rolling it out. This relaxes the gluten again, making it easier to roll.
Frequently Asked Questions: Your Cinnamon Roll Queries Answered
1. Can I use instant yeast instead of active dry yeast?
* Yes! You can substitute instant yeast for active dry yeast in a 1:1 ratio. You don’t need to proof it in the warm milk first; just add it directly to the flour mixture with the other dry ingredients.
2. My dough is too sticky. What should I do?
* This is very common! Only add flour if absolutely necessary. Try kneading for the full recommended time – the dough will become less sticky as the gluten develops. If it’s still too sticky after kneading, you can add a tablespoon or two of flour at a time, but be patient.
3. Can I make these rolls ahead of time and bake them later?
* Absolutely! You can shape the rolls and place them in the pan, then cover them tightly and refrigerate them overnight (or up to 24 hours). The second rise will happen slowly in the fridge. When ready to bake, let them come to room temperature for about 30-45 minutes, then bake as directed. They might take a few extra minutes to bake.
4. Why are my rolls dense and not fluffy?
* This usually happens if the dough wasn’t given enough time to rise properly (first rise too short, second rise too short), if the oven wasn’t hot enough, or if the rolls were over-baked. Ensure your yeast is active, give the dough ample time to rise, preheat your oven fully, and don’t overbake.
5. Can I freeze the unbaked rolls?
* Yes! After shaping the rolls and placing them in the pan, cover them tightly with plastic wrap and then foil. Freeze for up to 3 months. When ready to bake, thaw them overnight in the fridge, then let them come to room temperature for 30-45 minutes before baking as directed (adding 5-10 minutes to the bake time).
6. My frosting is too thick. How do I fix it?
* Simply add a teaspoon or two of milk or cream at a time, mixing well, until you reach the desired spreading consistency. You can also add a splash of vanilla extract for extra flavor.
7. Can I make a smaller batch?
* Yes! This recipe makes about 12 rolls. You can easily halve the ingredients for a smaller batch. The ratios remain the same.
The Perfect Finish: A Warm Embrace
There’s something deeply satisfying about pulling a pan of warm, fragrant cinnamon rolls from the oven, the scent promising pure comfort. The overnight dough method takes the guesswork out of achieving that perfect balance of soft, tender crumb and rich, spiced filling. It transforms cinnamon rolls from a special-occasion treat into a delightful possibility for any morning. The slow rise in the fridge isn’t just a time-saver; it’s a flavor investment, yielding rolls that are truly exceptional. So, embrace the simplicity, trust the process, and enjoy the sweet reward of your patience. Bake these make-ahead rolls and discover the joy of fresh-from-the-oven perfection, every single time.