Imagine transforming something you’d normally toss into the compost bin into a delicious, crunchy snack bursting with flavor. That’s the magic of these Crispy Sourdough Discard Tortilla Chips! Using your leftover sourdough starter discard, this recipe delivers golden, savory chips that are incredibly satisfying and perfect for dipping. They’re a fantastic way to reduce food waste while creating something utterly addictive. Best of all, they’re completely plant-based, free from any pork, bacon, wine, alcohol, beer, whisky, or vodka – just pure, wholesome ingredients.
Why You’ll Love These Chips:
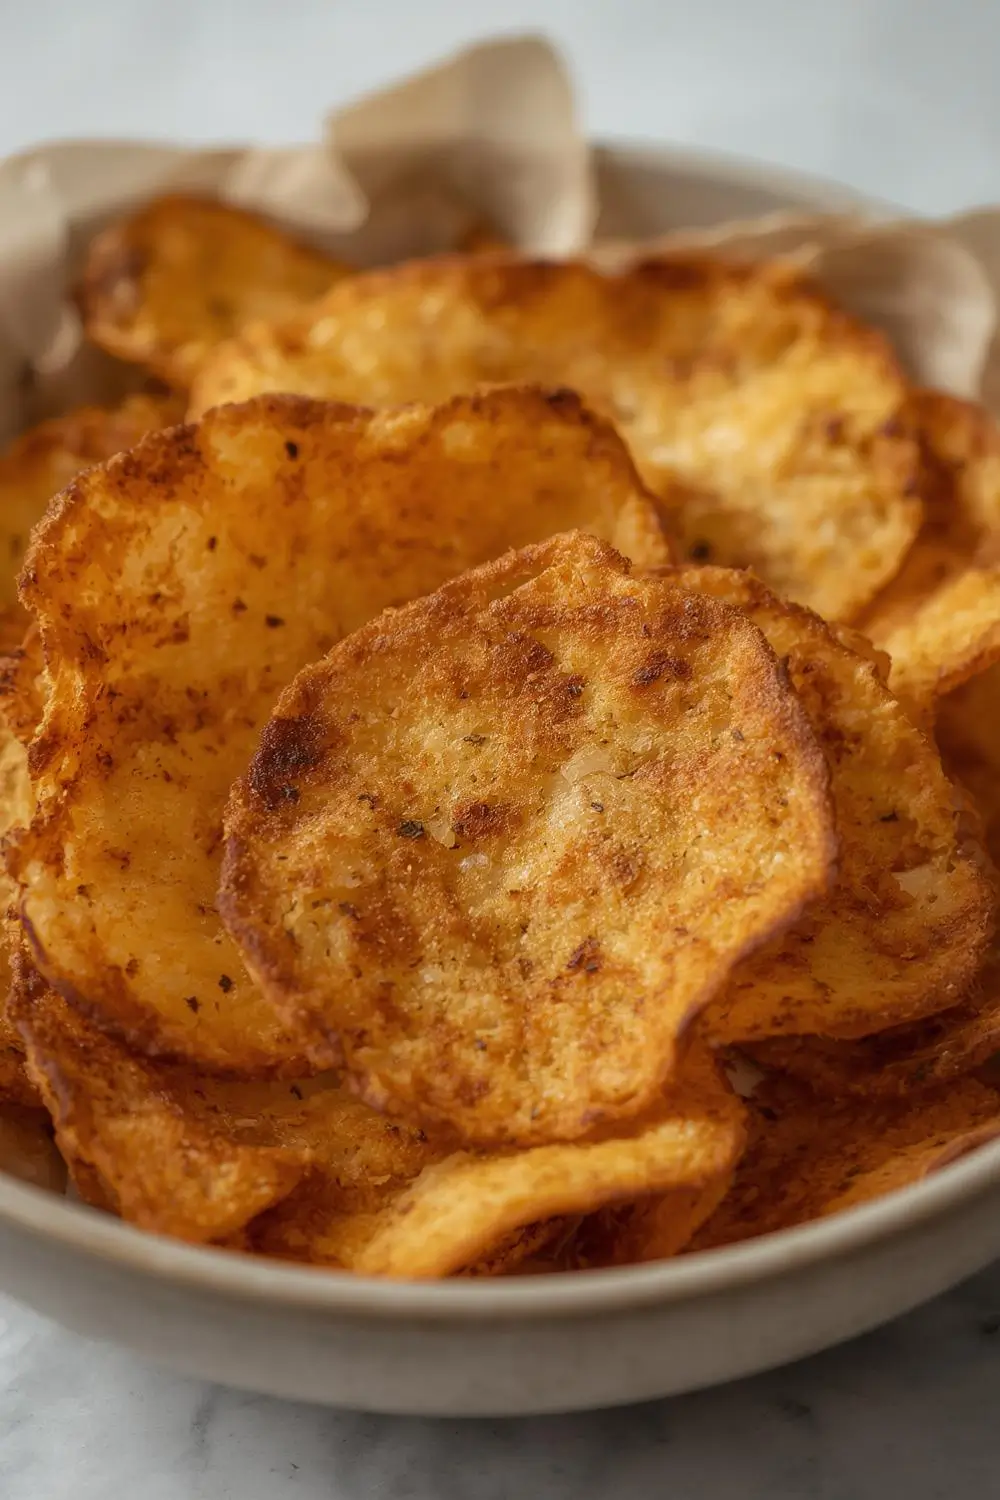
- Zero-Waste Hero: Give your sourdough discard a delicious purpose!
- Crispy & Golden: Baked to perfection for that satisfying crunch.
- Flavorful & Simple: Seasoned simply with salt and pepper, letting the sourdough shine.
- Dipping Perfection: Ideal with salsa, guacamole, hummus, or your favorite dip.
- Beginner-Friendly: Easy steps with no special equipment needed.
- Completely Plant-Based: No animal products or alcohol involved.
Gather Your Ingredients:
1 1/2 cups (about 200g) Sourdough Discard: This is the star! Use your active discard, ideally at its peak rise (around 1-2 days old). It should be thick and bubbly. Why discard?* It’s the perfect base, adding tangy depth and natural leavening power.
- 1/2 cup (120ml) Warm Water: Helps hydrate the dough and activate the sourdough.
- 1/2 cup (60g) All-Purpose Flour: Provides structure. You can use bread flour for a slightly chewier chip, but AP flour works wonderfully.
- 1/2 teaspoon Salt: Enhances all the flavors beautifully.
- 1/4 teaspoon Black Pepper: Adds a subtle warmth.
1 tablespoon Olive Oil or Neutral Oil (like Avocado or Grapeseed): Helps with browning and crispness. Oil choice:* Olive oil adds a lovely flavor, while a neutral oil keeps the focus on the sourdough taste.
- Optional: A pinch of garlic powder or onion powder for extra savory depth (if you enjoy that flavor profile).
Preparing Your Sourdough Discard:
Before you start, ensure your discard is ready. If it’s been sitting in the fridge, take it out a few hours beforehand to come to room temperature. Give it a good stir – it should be thick and lively. If it’s too thick, you can add a tiny splash of water (1/2 tsp at a time) to loosen it slightly, but it should still hold its shape reasonably well.
Mixing the Dough:
1. Combine Dry Ingredients: In a medium bowl, whisk together the all-purpose flour, salt, and pepper (and garlic/onion powder if using).
2. Add Discard & Water: Pour the sourdough discard into the dry ingredients. Add the warm water.
3. Mix Until Combined: Stir with a spatula or your hands until a shaggy dough forms. It will be sticky at first. Don’t worry! This is normal.
4. Knead Briefly: Turn the dough out onto a lightly floured surface. Knead it gently for just 1-2 minutes. The goal is to bring it together into a cohesive ball. Over-kneading isn’t necessary and can make the chips tough. The dough should be smooth and elastic but still slightly tacky.
Resting the Dough:
5. Shape & Rest: Form the dough into a smooth ball. Place it back into the bowl, cover it tightly with plastic wrap or a damp kitchen towel. Let it rest at room temperature for 30-45 minutes. This short rest allows the flour to fully hydrate and the gluten to relax slightly, making rolling much easier.
Rolling & Cutting:
6. Preheat Oven & Prepare Sheets: Preheat your oven to 350°F (175°C). Line two large baking sheets with parchment paper. This prevents sticking and makes cleanup a breeze.
7. Divide & Roll: After resting, divide the dough into 4 equal pieces. Work with one piece at a time, keeping the others covered. On a lightly floured surface, gently flatten the dough ball. Using a rolling pin, roll it out as thin as possible – aim for paper-thin consistency. The thinner, the crispier the chip! If the dough resists, let it rest for 5 more minutes before trying again. You can also gently stretch it by hand.
8. Cut into Chips: Using a sharp knife, pizza cutter, or even a pastry wheel, cut the rolled dough into your desired chip shapes. Squares, triangles, or irregular shapes are all great! Aim for pieces roughly 1-2 inches wide. You can also use a small cookie cutter for fun shapes. Tip: If the dough starts to shrink back, let it rest for a few minutes before rolling again.
Baking to Golden Perfection:
9. Transfer to Sheets: Carefully transfer the cut dough pieces to the prepared baking sheets. Space them out slightly – they won’t spread much but need room to crisp evenly. You might need two sheets.
10. Brush with Oil: Lightly brush the tops of the chips with the olive oil or neutral oil. This promotes browning and adds a touch of richness. Optional: Sprinkle with a tiny pinch of salt or your chosen seasoning blend.
11. Bake: Place the sheets in the preheated oven. Bake for 12-18 minutes, rotating the sheets halfway through baking. The chips are done when they are deeply golden brown and crisp. Baking times vary greatly depending on thickness, oven hot spots, and your desired level of crispness. Keep a close eye after the 10-minute mark! They will crisp up further as they cool.
12. Cool Completely: Remove the chips from the oven and let them cool completely on the baking sheets. This is crucial! They will become significantly crispier as they cool down. Resist the urge to eat them straight away (though it’s hard!).
Variations & Substitutions:
- Seasoning Swaps: Experiment with different seasonings! Try chili powder and cumin for a Tex-Mex kick, smoked paprika for a subtle smokiness, or a sprinkle of nutritional yeast for a cheesy, umami flavor. Just add your chosen spices to the flour mixture.
- Oil Alternatives: While oil helps with browning, you can brush with a little water or broth for a different texture, though it won’t be as crisp. Melted butter can be used for a richer flavor, but ensure it’s dairy-free if needed.
- Flour Options: Bread flour will yield a slightly chewier chip. Whole wheat flour adds a nuttier flavor and denser texture. Gluten-free flour blends can be used, but results may vary significantly.
- Thickness: Thinner chips = crispier. Slightly thicker chips = chewier center with crisp edges. Find your perfect texture!
- No Rolling Pin? Use a wine bottle or clean glass bottle as a rolling pin. Your hands can also gently stretch the dough.
Storage & Reheating:
- Cooling is Key: Store only completely cooled chips in an airtight container at room temperature. They will stay crisp for several days (usually 3-5 days).
- Reheating: To restore crispness, reheat in a single layer on a baking sheet in a 300°F (150°C) oven for 5-10 minutes. A toaster oven works well too. Avoid microwaving, as it makes chips soggy.
- Freezing: You can freeze baked chips in an airtight container for up to 1 month. Reheat directly from frozen in the oven for best results.
Common Mistakes to Avoid:
1. Using Too Thick Discard: If your discard is very thin and runny, your chips will be dense and chewy, not crispy. Use discard that’s thick and bubbly.
2. Over-Kneading: Kneading too much develops too much gluten, leading to tough, chewy chips. A quick 1-2 minute knead is sufficient.
3. Rolling Too Thick: Chips that are too thick won’t cook through and become crispy. Roll as thin as possible.
4. Skipping the Rest: The short rest allows the dough to relax and roll out more easily. Skipping it makes rolling difficult.
5. Overcrowding the Sheet: Chips need space to crisp evenly. Crowding leads to steaming and soggy results.
6. Underbaking: Chips continue to crisp as they cool. If they seem soft when hot, give them more time in the oven.
7. Not Cooling Completely: This is the biggest mistake! Eating them hot means they haven’t reached their full crisp potential.
Frequently Asked Questions (FAQs):
1. What if my discard is too thick or thin?
Too Thick:* Add a tiny splash (1/2 tsp) of warm water and knead briefly. It should loosen up.
Too Thin:* Let it sit out longer to ferment and thicken, or add a little more flour when mixing.
2. Can I use discard straight from the fridge?
* It’s best to use discard that’s come to room temperature for easier mixing and better flavor development. If using cold discard, let it sit out for 1-2 hours first.
3. How do I know when the dough is ready to roll?
* The dough should be smooth, elastic, and just slightly tacky to the touch. It should hold its shape when formed into a ball.
4. Why are my chips not very crispy?
* Check these: Were they rolled thin enough? Did you bake them long enough? Did you let them cool completely? Overcrowding the sheet can also cause steaming.
5. Can I make these without a rolling pin?
* Absolutely! Use a clean wine bottle, a sturdy glass, or even the bottom of a heavy mug. Your hands can also gently stretch the dough.
6. What dips go best with these chips?
* The sky’s the limit! Classic salsa, guacamole, hummus, bean dip, Greek yogurt with herbs, spicy aioli, or even a simple sprinkle of salt and pepper. They’re incredibly versatile.
7. Can I add cheese or other toppings before baking?
* Yes! Sprinkle a little shredded cheese (like cheddar or parmesan) or nutritional yeast on top before baking for extra flavor. Be mindful they might brown faster.
8. How long do the chips stay fresh?
* Stored in an airtight container at room temperature, they typically stay crisp and delicious for 3-5 days. They can last longer, but texture may soften.
9. Can I use this dough for other things?
* Absolutely! This sourdough discard dough is incredibly versatile. Use it to make crackers, flatbreads, or even a simple pizza crust. The flavor is fantastic!
10. What if I don’t have sourdough discard?
* You can make a simple sourdough starter from scratch using flour and water, but it takes several days. Alternatively, you can use a small amount of active sourdough starter (about 1/4 cup) mixed with 1/2 cup flour and 1/4 cup water to make a similar dough. The flavor won’t be identical, but it will work.
A Final Crunch of Flavor
There you have it – your very own batch of Crispy Sourdough Discard Tortilla Chips, born from the humble leftovers of your sourdough journey. They embody the beauty of zero-waste cooking, transforming something discarded into something cherished. The tangy depth of the sourdough, perfectly balanced by a touch of salt and pepper, creates a flavor profile that’s both familiar and delightfully unique. The satisfying crunch is the reward for your patience and a little bit of effort. These chips are more than just a snack; they’re a testament to resourcefulness and the magic of sourdough. So, gather your discard, roll out your dough, and get ready to enjoy the delicious results of your baking adventure. Share them with friends, pair them with your favorite dip, and savor every crispy, flavorful bite. Happy baking!


