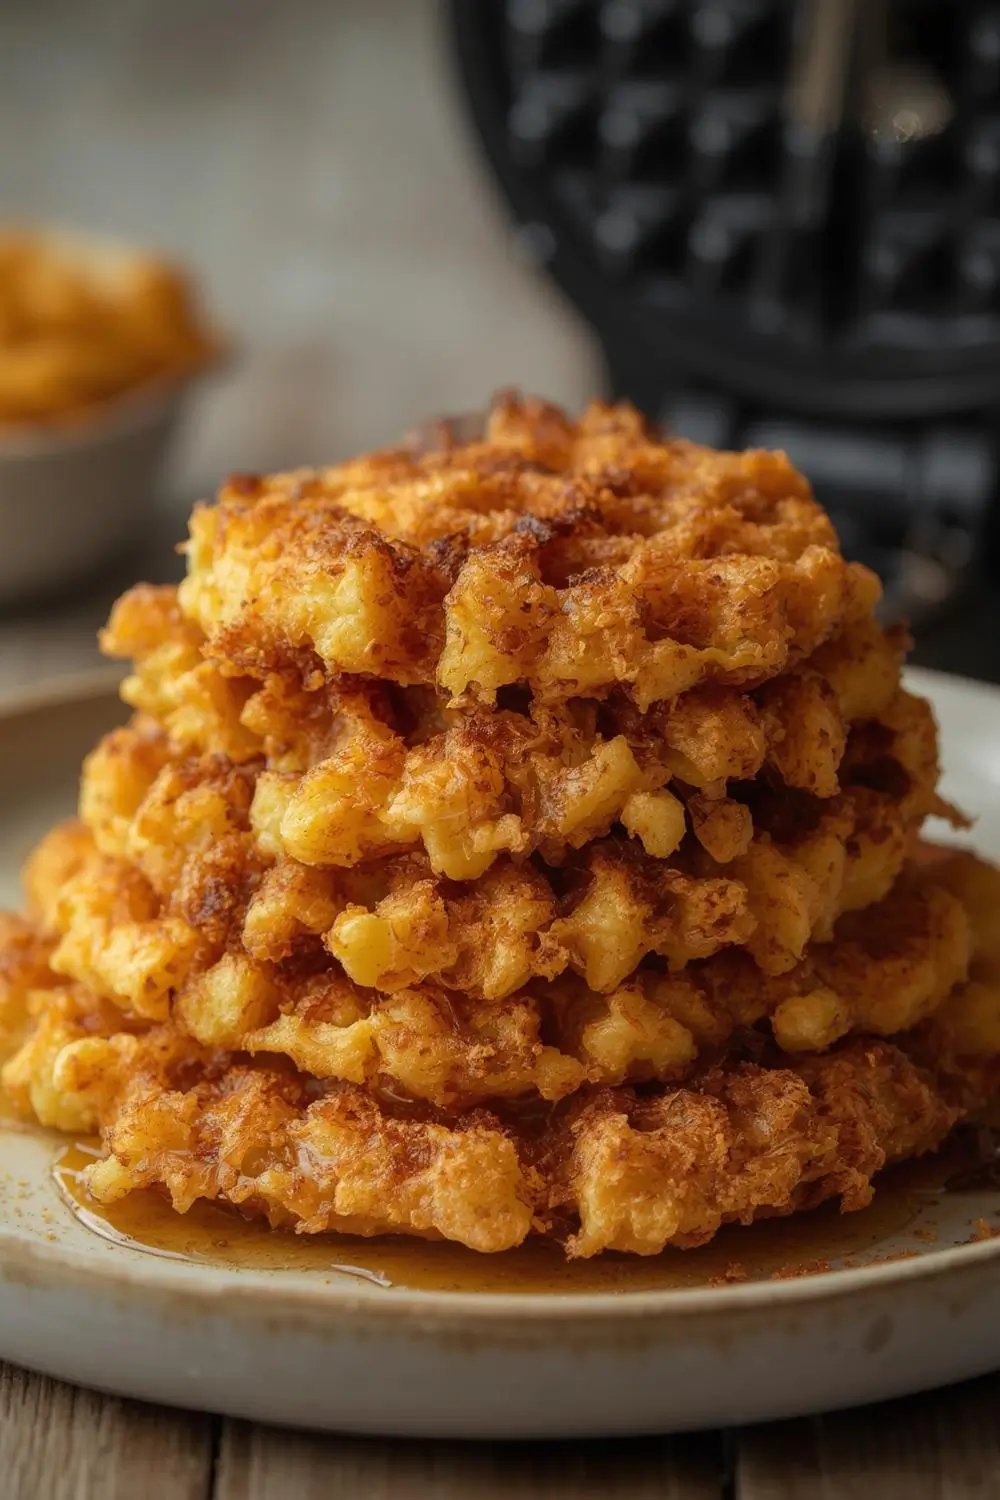
Imagine waking up to the irresistible aroma of perfectly golden, shatteringly crisp hash browns, but without the greasy pan or the frantic flipping. What if you could achieve that restaurant-quality crunch with minimal effort, using a kitchen appliance you probably already own? Welcome to the breakfast revolution: Crispy Sourdough Discard Hash Browns cooked effortlessly in your waffle maker. This ingenious method transforms humble sourdough discard into the star of your morning plate, delivering unparalleled texture and a delightful tangy depth that elevates a simple potato dish into something truly special. Forget complicated recipes or fussy techniques; this is breakfast made easy, delicious, and incredibly satisfying.
Why the Waffle Maker is Your Secret Weapon
Traditional stovetop hash browns often require constant attention, oil, and can be prone to uneven cooking or sticking. The waffle maker changes the game entirely. Its preheated, non-stick grids create uniform pressure and heat, forcing the shredded potatoes and sourdough mixture into perfectly formed, crispy pockets. The result? Hash browns that are uniformly golden brown, incredibly crunchy on the outside, and tender within – every single time. Plus, the mess is minimal, cleanup is a breeze, and you get consistent results that rival any diner. It’s a game-changer for busy mornings or when you want to impress at brunch.
The Magic of Sourdough Discard
Using sourdough discard isn’t just about reducing waste; it’s about adding incredible flavor and texture. The active yeast and lactic acid bacteria in the discard contribute a subtle tanginess that cuts through the richness of the potatoes, making these hash browns uniquely delicious. The discard also helps bind the shredded potatoes together slightly, aiding in the formation of those perfect, compact patties that cook evenly. Don’t worry if your discard is thick or thin; we’ll guide you on adjusting the mixture for perfect results every time.
Your Ultimate Guide to Crispy Sourdough Discard Hash Browns
This recipe is designed for absolute beginners. You don’t need fancy equipment or advanced cooking skills. Just a box grater, a mixing bowl, a waffle maker, and a few pantry staples. Let’s dive into creating your own breakfast masterpiece.
Ingredients: Simplicity at Its Finest
- Potatoes: 2 large russet potatoes (about 1.5 lbs / 700g). Russets are ideal for their high starch content, which creates the best texture. Avoid waxy potatoes like red or Yukon Gold, as they won’t crisp as well.
- Sourdough Discard: 1 cup (240ml). This is the star! Use your active discard, whether it’s thick or thin. If it’s very thick, you might need a splash more liquid; if thin, you might need a touch more potato. The discard’s tang is key.
- Onion: 1/2 medium yellow or white onion, finely grated or finely minced. Adds sweetness and depth.
- Garlic: 1-2 cloves, minced or pressed. A subtle punch of flavor.
- Salt: 1 1/2 teaspoons (adjust to taste). Essential for flavor.
- Black Pepper: 1/2 teaspoon freshly ground. Adds warmth.
- Optional Flavor Boosters:
* Chives or Green Onions: 2-3 tablespoons finely chopped, for freshness.
* Dill: 1 teaspoon dried or 1 tablespoon fresh, for a classic pairing.
* Paprika: 1/2 teaspoon, for a hint of smokiness.
* Cayenne Pepper: A pinch, for a little heat.
* Nutritional Yeast: 2 tablespoons, for a cheesy, umami flavor (great for vegan options).
- Oil (Optional but Recommended): 1-2 teaspoons neutral oil (like vegetable, canola, or avocado) or a light spray of cooking spray. Helps prevent sticking and promotes browning.
Why These Ingredients Work Together
- Potatoes: Russets provide the necessary starch for crispiness.
- Sourdough Discard: Adds tang, binds, and enhances flavor.
- Onion & Garlic: Build a flavor base.
- Salt & Pepper: Essential seasoning.
- Optional Add-ins: Allow for customization based on your taste preferences or what you have on hand.
Step-by-Step Instructions: From Shred to Crisp
1. Prep the Potatoes: Start by thoroughly washing your russet potatoes. There’s no need to peel them – the skin adds texture and nutrients. Using a box grater, shred the potatoes directly into a large mixing bowl. Work quickly to prevent oxidation (browning), which can affect flavor and texture slightly. If you’re concerned, you can place the bowl in the refrigerator while preparing the other ingredients.
2. Combine the Wet Ingredients: In a separate small bowl, whisk together the sourdough discard, finely grated onion, minced garlic, salt, and pepper. If using any optional flavor boosters like chives, dill, paprika, cayenne, or nutritional yeast, add them now. Whisk until well combined.
3. Mix Everything Together: Pour the wet ingredient mixture over the shredded potatoes in the large bowl. Using your hands or a sturdy spatula, gently but thoroughly mix everything together. The goal is to coat every shred of potato with the discard mixture. Be careful not to overmix, which can make the mixture too pasty. You want it to hold together when pressed but still feel slightly loose. If the mixture seems too dry and crumbly, add a tiny splash (1/2 tsp at a time) of water or milk. If it seems too wet and doesn’t hold together, add a little more shredded potato. The ideal consistency should be moist enough to clump when pressed but not soupy.
4. Rest the Mixture (Optional but Recommended): For even better flavor development and texture, let the mixture rest for 10-15 minutes. This allows the starches to absorb some of the liquid, leading to crispier results. Give it a gentle stir before proceeding.
5. Preheat Your Waffle Maker: Plug in your waffle maker and preheat it to the highest setting. Most waffle makers have a light that indicates when they’re ready (usually 3-5 minutes). Ensure the grids are clean and lightly oiled if your model requires it (check your manual). A light spray of cooking oil or a brush with neutral oil on the grids helps prevent sticking, especially if your discard mixture is on the drier side.
6. Form the Hash Browns: Take a generous handful (about 1/2 to 3/4 cup) of the potato mixture. Gently press it into your palm to form a compact, slightly flattened patty, about 3/4 inch thick. Place this patty directly onto one half of the preheated waffle maker grid. Close the lid firmly. If your waffle maker has a light indicator, it should turn off or change color when preheated.
7. Cook to Perfection: Cook for 5-7 minutes. Cooking time can vary slightly depending on your waffle maker’s heat and the thickness of your patties. The hash browns are done when the outside is a deep, golden brown and crispy, and the inside feels firm but not doughy when you carefully insert a toothpick or fork into the center (it should come out clean or with just a few moist crumbs). Avoid opening the lid too early, as this releases heat and can make the hash browns steam instead of crisp.
8. Release and Serve: Once cooked, carefully open the waffle maker. Use a thin spatula (plastic or silicone is best) to gently lift the hash brown patty out. Place it on a wire rack or plate. Repeat the process with the remaining mixture, adding a little more oil to the grids between batches if needed. Don’t overcrowd the waffle maker; cook in batches if necessary.
9. Rest Briefly (Optional): Letting the cooked hash browns rest for 1-2 minutes on a wire rack allows any excess steam to escape, helping them stay crispier for longer.
Serving Suggestions: Beyond the Plate
These crispy sourdough discard hash browns are incredibly versatile:
- Classic Breakfast: Serve them as a hearty side to fried or scrambled eggs, or a simple breakfast sausage.
- Brunch Star: Top them with a perfectly runny fried egg, a dollop of sour cream or Greek yogurt, and a sprinkle of fresh chives.
- Sandwich Base: Use them as a gluten-free bun alternative for a breakfast sandwich.
- Salad Topping: Crumble them over a green salad for a crunchy, savory element.
- Snack: Enjoy them plain as a satisfying, crispy snack.
Storage and Reheating: Keeping the Crunch
- Refrigeration: Store any leftover cooked hash browns in an airtight container in the refrigerator for up to 3 days. They won’t be as crisp as when fresh, but they’re still delicious.
- Reheating: To restore crispiness, reheat them in a toaster oven, regular oven (400°F / 200°C for 5-10 minutes), or a dry skillet over medium heat. Avoid the microwave, as it makes them soggy. A quick blast in a toaster oven is your best bet for maximum crunch.
- Freezing: You can freeze uncooked hash brown patties. Shape them, place them on a baking sheet lined with parchment paper, freeze until solid, then transfer to a freezer bag. Cook from frozen, adding a minute or two to the cooking time.
Common Mistakes to Avoid: Mastering the Method
- Overmixing: This develops too much gluten, leading to a dense, gummy texture instead of light and crisp.
- Using the Wrong Potatoes: Waxy potatoes (like red or Yukon Gold) won’t break down and crisp properly.
- Overcrowding the Waffle Maker: This lowers the temperature and leads to uneven cooking and steaming instead of crisping.
- Opening the Lid Too Early: Releasing the heat prevents the hash browns from cooking through and crisping properly.
- Not Preheating Enough: Ensure your waffle maker is fully preheated before adding the mixture.
- Dry Mixture: If the mixture is too dry and crumbly, it won’t hold together. Add a tiny bit of liquid (water, milk, or even a splash of the discard if it’s very thick).
- Too Wet Mixture: If the mixture is too wet, the hash browns will be soggy and won’t crisp. Add more shredded potato or a tablespoon of flour (if not gluten-free) or breadcrumbs.
Frequently Asked Questions: Your Hash Brown Queries Answered
1. Can I use leftover cooked potatoes? While possible, it’s not ideal. Cooked potatoes are drier and won’t crisp as well. Raw shredded russet potatoes are best.
2. What if my sourdough discard is very thick? Add a splash (1-2 tablespoons) of water, milk, or even a little of the discard’s liquid to loosen it up to the right consistency.
3. Can I make these gluten-free? Absolutely! This recipe is naturally gluten-free. Ensure your sourdough discard is gluten-free if you have a severe allergy, but the potatoes and discard themselves are inherently gluten-free.
4. Can I use a different type of onion? Yellow or white onion are best for flavor. Shallots can be used for a milder taste. Avoid strong raw onions like red onion if you prefer a milder flavor.
5. Do I have to use a waffle maker? While the waffle maker method is unique and fantastic, you can cook these in a skillet with oil over medium-high heat. Shape the mixture into patties, press them firmly, and cook for 3-4 minutes per side until golden brown and crispy. It requires more oil and attention than the waffle maker method.
6. How do I prevent sticking? Ensure your waffle maker is properly preheated and lightly oiled (spray or brush with neutral oil). Don’t overcrowd the grids. If using a skillet, use enough oil and cook over medium-high heat.
7. Can I add cheese? Yes! Stir in 1/4 to 1/2 cup of grated sharp cheddar, Parmesan, or feta cheese into the mixture before cooking for extra flavor and richness.
8. Can I make these ahead of time? You can prepare the mixture ahead of time and refrigerate it for up to 24 hours. Cook them fresh when you’re ready to eat for the best texture.
9. Are these suitable for meal prep? Yes! Cook a batch, let them cool completely, store in an airtight container in the fridge, and reheat in the toaster oven or skillet for a quick, crispy breakfast.
10. What if I don’t have a waffle maker? As mentioned, you can use a skillet with oil. Alternatively, you can shape the mixture into small patties and bake them on a baking sheet in a preheated oven (400°F / 200°C) for 20-25 minutes, flipping halfway, but they won’t be as crispy as the waffle maker method.
The Final Crisp: Your Breakfast Revolution Awaits
Creating Crispy Sourdough Discard Hash Browns in your waffle maker is more than just a cooking hack; it’s a celebration of resourcefulness, flavor, and the joy of simple, delicious food. You’ve transformed something often discarded into the star of your breakfast table, achieving a texture that’s truly revolutionary. The tangy depth from the sourdough discard adds a layer of complexity that plain potatoes simply can’t match, making each bite a delightful surprise. This method is foolproof, requires minimal effort, and delivers restaurant-quality results in your own kitchen. Whether you’re a seasoned sourdough baker or just starting your discard journey, this recipe is a must-try. It’s perfect for busy mornings, weekend brunches, or simply indulging in a crispy, satisfying treat. So, grab your box grater, embrace your sourdough discard, and get ready to revolutionize your breakfast routine. Your taste buds will thank you for the crispy, tangy, and utterly delicious experience. Enjoy every golden, crunchy bite!


