Table of Contents
- 1 Why Chili Meal Prep Bowls Work So Well
- 2 Building Blocks: What Each Meal Prep Bowl Includes
- 3 Sample Recipe for Meal Prep Chili Bowls (6 Portions)
- 4 Freezing & Reheating Best Practices
- 5 Flavor Variations & Customizations
- 6 Sample Weekly Plan & Serving Ideas
- 7 Serving Suggestions & Pairings
- 8 Nutrition Considerations & Tips
- 9 Frequently Asked Questions
- 10 Final Thoughts
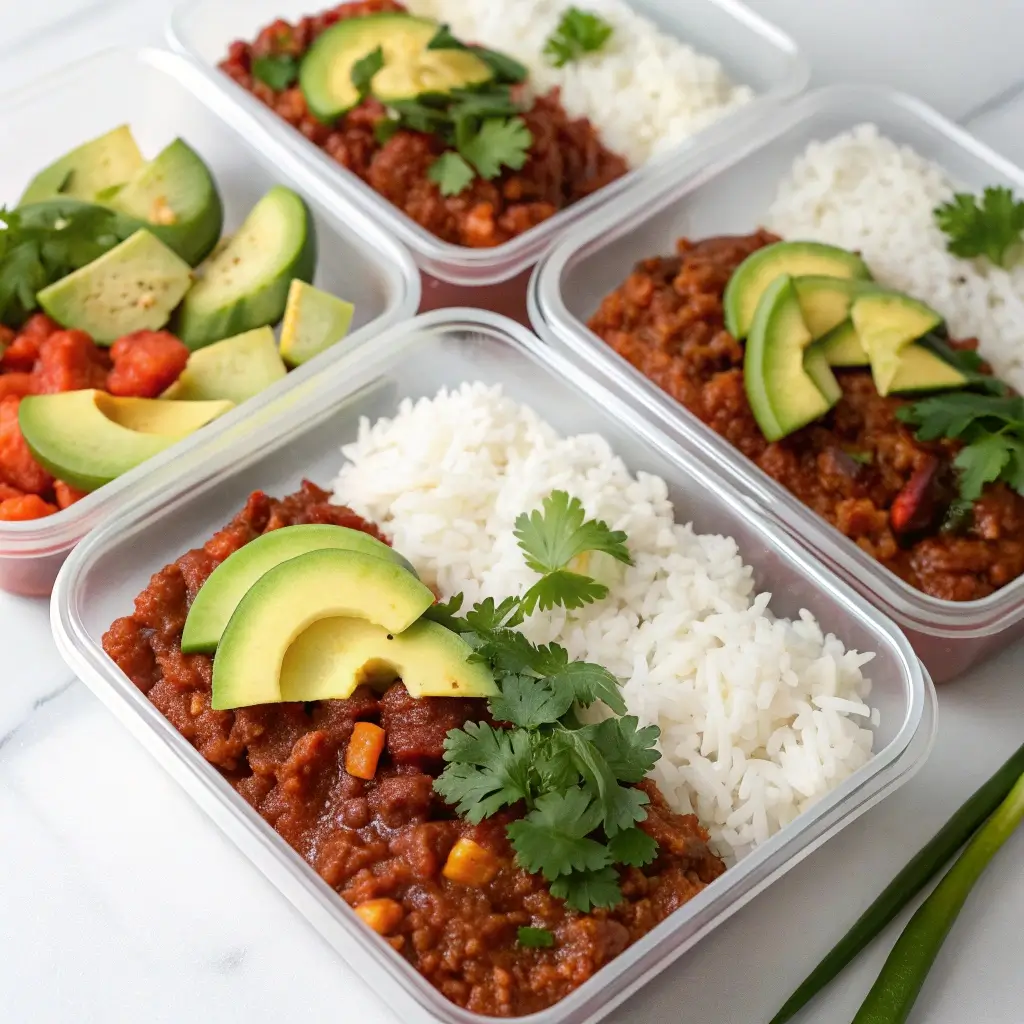
When life gets busy, one of the best ways to stay on track with healthy eating is to have ready‑to-heat dinners waiting in your freezer. Chili meal prep bowls are a perfect solution—nutrient-rich, comforting, delicious, and fully freezer-friendly so you can grab, reheat, and eat without the stress of nightly cooking.
This article gives you a full guide: how to build the perfect meal prep chili bowl, the best ways to freeze and reheat, flavor-variation ideas, ordering tips, a sample recipe, FAQ, and more. Let’s get your freezer lined with hearty, satisfying meals.
Why Chili Meal Prep Bowls Work So Well
-
Make once, eat many: You can batch-cook chili in big quantities and portion it into bowls for multiple meals.
-
Freezer-friendly: Chili holds up very well in the freezer, and with care in packaging, it retains great flavor and texture.
-
Balanced nutrition: Protein, fiber, vegetables, and optional carbohydrate base make these bowls satisfying and complete.
-
Flexible & customizable: Swap proteins, beans, vegetables, heat levels, and bases (rice, quinoa, cauliflower rice).
-
Time saver: Instead of cooking nightly, you only cook once and reheat portions as needed.
-
Stress-free dinners: On a busy evening, just open a container, reheat, and add fresh toppings.
Building Blocks: What Each Meal Prep Bowl Includes
A well-balanced chili bowl typically has these components:
-
Protein-rich chili base
-
Vegetables inside the chili (and possibly on the side)
-
Carbohydrate or base (rice, quinoa, sweet potato, cauliflower rice)
-
Toppings (fresh, added after reheating)
-
Seasoning & spice to ensure the flavor holds up after freezing
Below are details on each component and what to keep in mind when assembling for the freezer.
Chili Base (Protein + Beans or Bean Alternatives)
Choose a chili recipe that reheats well and doesn’t break down too much. For meal prep:
-
Use lean ground protein (turkey, chicken, lean beef, or plant-based crumbles).
-
Or a chunk-style chili with cubed beef or turkey pieces.
-
Include beans (kidney, black, pinto) for fiber and bulk—unless you prefer a no-bean version.
-
Load it with vegetables like bell pepper, onion, tomato, zucchini, carrots, corn (optional), etc.
-
Keep the chili slightly looser (not super thick) before freezing, because textures firm up in the freezer.
Base / Carbohydrate Layer
You want something to make the bowl feel full and balanced:
-
Rice (white, brown, basmati)
-
Quinoa or rice‑quinoa blends
-
Cauliflower rice (low-carb option)
-
Sweet potato cubes (roasted or steamed)
-
Whole grains like farro or barley (if you’re okay with them)
If using rice or grains, cook them slightly underdone (a minute or two less than usual) so that reheating later doesn’t produce mushy texture.
Toppings (Added After Reheating)
These are fresh additions that brighten and finish the bowl:
-
Chopped cilantro
-
Sliced green onions
-
Avocado or guacamole
-
Lime wedges
-
Shredded cheese or dairy-free cheese
-
Sour cream or Greek yogurt (or dairy-free alternative)
-
Jalapeño slices or hot sauce
-
Salsa or pico de gallo
You’ll want to freeze the bowl without these fresher toppings; add them after reheating.
Sample Recipe for Meal Prep Chili Bowls (6 Portions)
Here’s a recipe you can use as a base. Adjust quantities as needed.
Ingredients (for chili)
-
1 Tbsp olive oil
-
1 large onion, diced
-
1 bell pepper, diced
-
2 carrots, diced
-
3 garlic cloves, minced
-
1.5 lb (≈ 680 g) lean ground turkey or beef
-
1 can (14–15 oz) diced tomatoes
-
1 can (15 oz) tomato sauce
-
1 can (15 oz) beans (kidney, black, or pinto), drained & rinsed
-
1½ cups low-sodium broth (vegetable or chicken)
-
1.5 Tbsp chili powder
-
1 tsp ground cumin
-
½ tsp smoked paprika
-
1 tsp dried oregano
-
Salt and black pepper (to taste)
-
Optional: ½ tsp cayenne or red pepper flakes
Ingredients (for base & optional extras)
-
3 cups cooked rice (or 3 cups cooked quinoa / cauliflower rice)
-
Optional: roasted corn kernels, diced zucchini, chopped fresh peppers
-
Toppings: avocado, cilantro, green onion, lime wedges, cheese, yogurt
Instructions
-
Sauté aromatics
In a large pot, heat olive oil over medium heat. Add diced onion, bell pepper, and carrot. Sauté for ~5 minutes until vegetables soften. Add minced garlic; cook 30 seconds until fragrant. -
Cook the protein
Add the ground meat. Break it apart and brown until fully cooked. Drain excess fat if present. -
Add spices and tomato base
Stir in chili powder, cumin, smoked paprika, oregano, salt, and pepper. Let spices toast briefly (30–60 seconds). Add diced tomatoes and tomato sauce; stir to combine. -
Add beans and broth
Add drained beans and 1.5 cups broth. Stir well. If chili seems too thick, you can add a little more broth. Bring to a simmer. -
Simmer
Reduce heat to low and simmer for 20–30 minutes, uncovered or partially covered, stirring occasionally. The chili should deepen in flavor and slightly thicken. -
Prepare base
While chili simmers, cook your base (rice, quinoa, cauliflower) according to package instructions. As noted, under-cook slightly if possible so reheating doesn’t make mush. -
Portion into bowls
Let chili cool a bit (to prevent steam damage to containers). Divide base among six freezer-safe meal prep containers (each gets ~½ cup base or more depending on your preference).
Ladle chili over the base, leaving ~½ cm from the rim to allow for expansion. Wipe containers clean at edges and seal. -
Label & freeze
Label containers with date and contents. Freeze flat in one layer until solid, then stack if needed.
Freezing & Reheating Best Practices
Freezing Tips
-
Use freezer-safe containers with well-fitting lids or high-quality freezer bags (if “bag mode”).
-
Leave a small headspace because contents will expand slightly when freezing.
-
Cool the chili before sealing—letting it steam hot can lead to freezer burn or lid deformation.
-
Freeze flat (containers or bags) to save space and make stacking easier.
-
Date and label containers so you rotate oldest first.
Reheating Tips
-
Microwave: Remove lid, cover loosely, and heat 1–2 minutes. Stir, then continue heating in 30‑second increments until fully warmed.
-
Oven / toaster oven: Transfer contents to an oven-safe dish, cover with foil, and heat at 325 °F (160 °C) for 20–30 minutes or until bubbling.
-
Stovetop: Place chili bowl in a saucepan or pot; add splash of water or broth, warm gently over medium-low, stirring occasionally until heated through.
-
Once hot, add fresh toppings (avocado, cheese, cilantro) before serving.
Flavor Variations & Customizations
Here are ideas to keep your chili bowls exciting across weeks:
-
Mexican‑style: Add corn, black beans, lime juice, and cilantro. Use cumin, chili powder, a touch of smoked paprika.
-
Southwest chili: Include diced green chiles, use quinoa instead of rice, and top with salsa.
-
Pumpkin chili: Stir in some pumpkin puree toward the end for a creamy fall twist (watch liquid balance).
-
White chicken chili: Use shredded chicken, white beans, green chiles, and a lighter broth.
-
Vegetarian / vegan: Omit meat and use extra beans, lentils, or meatless crumbles. Use vegetable broth.
-
Spicy heat: Add chipotle in adobo, diced jalapeños, cayenne, or hot sauce.
-
Low-carb / keto version: Skip rice; use cauliflower rice or extra veggies instead. Use no beans or reduce beans.
-
Cheesy bowls: Add shredded cheese inside before freezing (it melts during reheating) or sprinkle freshly after heating.
-
Southwest bowl: Top with tortilla strips or crushed chips right before serving.
Sample Weekly Plan & Serving Ideas
Here’s an example plan using these chili prep bowls:
Sunday (Prep Day):
-
Cook 2× recipe (12 portions)
-
Portion into freezable meal prep containers
-
Freeze half; refrigerate a couple for eating earlier in the week
Monday to Wednesday (Eat from fridge):
-
Reheat and eat
-
Use toppings to vary flavor (e.g. Monday: avocado & cilantro, Tuesday: jalapeños & lime, Wednesday: cheese & sour cream)
Thursday to Sunday (Eat from freezer):
-
Pull out one container each evening
-
Thaw in refrigerator in morning or reheat directly from frozen
-
Serve with tortilla chips, side salad, or steamed veggies
Variations in base help keep things fresh—some bowls over rice, others over cauliflower rice, or even sweet potato if you like.
Serving Suggestions & Pairings
To make your bowl feel more complete:
-
Side salad: Greens with simple vinaigrette add freshness and fiber
-
Roasted veggies: Broccoli, zucchini, or Brussels sprouts make great sides
-
Cornbread muffins: A small, light cornbread on the side
-
Warm tortillas or chips: For scooping or dipping
-
Citrus slices: Lime or lemon wedges bring brightness
-
Pickled toppings: Quick pickled onions, jalapeños, or radishes add tang
Nutrition Considerations & Tips
-
Use lean proteins or plant-based proteins to keep fat moderate.
-
Beans and vegetables boost fiber and satiety.
-
Limit added oil—stick to 1 Tbsp or less for whole batch.
-
Watch sodium in canned goods—opt for low-sodium versions.
-
Be mindful of topping choices: avocado, cheese, or sour cream can raise calories quickly, so use accordingly.
-
Adjust base amount to match your calorie goals (e.g. use less rice, more vegetables).
Frequently Asked Questions
How long will these chili meal prep bowls last in the freezer?
They stay good for about 3 months. After that, quality (texture and flavor) may start to decline.
Can I freeze these bowls with toppings?
No—avoid freezing delicate toppings like avocado, cilantro, or sour cream. Add them fresh after reheating.
What size containers are best?
Containers of around 2 to 3 cups total volume (500–700 mL) work well for a chili + base + buffer space. Use containers labeled freezer-safe.
Do I have to thaw before reheating?
Not necessarily. Many chili bowls reheat well directly from frozen; just add extra time and stir occasionally. Thaw overnight if you prefer faster reheating.
Will beans become mushy after freezing?
They may soften somewhat, but if the chili isn’t overcooked before freezing, beans hold up fairly well. Using firmer bean varieties helps (e.g. kidney instead of soft white beans).
Can I use leftovers from other chili recipes?
Yes! Just ensure your chili is not overly watery. Adjust consistency before freezing (reduce if needed). Combine with an appropriate base and portion.
How do I prevent freezer burn or off-flavors?
Seal containers tightly, limit air inside, cool before sealing, and avoid repeated thaw/refreeze cycles.
Final Thoughts
Chili is already a beloved comfort food, and turning it into chili meal prep bowls elevates it to a practical powerhouse for your weekly menu. You get flavor, nutrition, convenience, and stress-free dinners in one.
Make a big batch, portion it thoughtfully, freeze what you won’t eat in the next few days, and enjoy ready-to-reheat meals that feel like you cooked them fresh. Customize them how you like—bean or no bean, spicy or mild, with rice or veggie base—and top them freshly each time for a bowl of warmth and satisfaction.
Save this recipe, adapt it to your taste, and let your freezer do the heavy lifting. When you want cozy comfort on a busy night, your chili meal prep bowls will be just what you need.
