
Table of Contents
- 1 Understanding Braised Chicken
- 2 Preparing the Chicken
- 3 The Searing Process (Making Crispy Skin)
- 4 Bringing It All Together (Serving Suggestions)
- 5 Troubleshooting Tips and Common Mistakes
- 6 Braised Chicken Variations and Flavor Enhancements
- 7 How to Serve Braised Chicken for a Complete Meal
- 8 Frequently Asked Questions
There’s nothing quite like a braised chicken in the oven with crispy skin—the crispy, golden brown skin combined with tender, juicy meat makes for an unforgettable meal. Whether you’re looking for a savory weeknight dinner or something special for the weekend, this recipe will teach you the art of braising chicken to perfection. By using simple ingredients and foolproof techniques, you’ll discover how to get that crispy skin and melt-in-your-mouth texture.
In this article, we’ll break down every step of the process, from selecting the best chicken to mastering the braising technique. So, get ready to create a dish that will have your family and friends coming back for more. Let’s dive into the juicy details!
Understanding Braised Chicken
What is Braising?
Braising is a cooking method that involves cooking meat slowly in a bit of liquid, usually at a low temperature. Unlike other techniques where meat is cooked over high heat, braising allows the chicken to become incredibly tender while absorbing the flavors of the seasonings and liquids it’s cooked with. The key here is to cook the chicken at a gentle pace, which allows it to stay moist and flavorful.
When it comes to braised chicken in the oven, you’ll typically use bone-in cuts like chicken thighs or drumsticks. The bones help lock in the natural juices, which is why this method is perfect for juicy, flavorful chicken.
Why Choose Braised Chicken?
- Tender Meat: The low and slow cooking process makes the chicken incredibly tender, ensuring that every bite melts in your mouth.
- Crispy Skin: While braising might sound like a method that stews the chicken, a little technique goes a long way to getting that coveted crispy skin. By searing the chicken first and then finishing it in the oven, you get the best of both worlds.
- Versatile Flavor: From garlic and herbs to vegetables and seasonings, braising allows you to experiment with a variety of flavors. The chicken absorbs the braising liquid, becoming even more savory and rich.
Preparing the Chicken
Choosing the Right Cut
When it comes to braised chicken, bone-in, skin-on pieces work best, particularly chicken thighs. Why? The bones and skin help retain moisture during the braising process, resulting in flavorful, tender meat and crispy skin. You can also use chicken legs or drumsticks for a similar effect. Avoid boneless, skinless cuts, as they won’t have the same rich, juicy texture.
Marinating the Chicken
Although marinating isn’t always necessary when braising, it can make a huge difference in flavor. Consider marinating your chicken for at least 30 minutes or overnight to let the flavors soak in. A simple marinade of olive oil, garlic, lemon juice, salt, and pepper will do the trick, or you can add herbs like thyme or rosemary for an extra punch of flavor.
Seasoning for Success
While braising is all about flavor infusion, the right seasoning can elevate your dish. Make sure to generously season your chicken with salt, pepper, and herbs. For a rich depth of flavor, you can rub some garlic, paprika, and even chili flakes under the skin of the chicken. This step is essential to ensure your braised chicken has the perfect balance of flavors.
Choosing the Right Cut
When making braised chicken in the oven with crispy skin, your choice of cut matters! Bone-in, skin-on cuts like chicken thighs or drumsticks are ideal because the bone and skin help lock in flavor and moisture. The skin, in particular, will play a big part in achieving that golden, crispy texture we all crave.
While you can technically use boneless skinless chicken breasts, they won’t provide the same juicy, tender results. Stick with thighs or legs for the ultimate braised chicken experience. For a more refined presentation, you can also use chicken quarters, which combine the best of both worlds (drumstick and thigh).
Marinating the Chicken
For those looking to enhance the flavor of the chicken even more, marinating can take this recipe to the next level. A simple marinade of olive oil, lemon juice, garlic, and herbs like rosemary and thyme will make your chicken more succulent. If you have more time, let your chicken sit in the marinade overnight in the refrigerator. This gives the flavors time to penetrate the meat, ensuring each bite is bursting with flavor.
However, even a quick 30-minute marinade will work wonders if you’re short on time, and don’t forget to season the skin generously with salt and pepper to ensure it crisps up well in the oven.
Seasoning for Success
The seasoning stage is where the flavor really starts to shine. When preparing braised chicken, seasoning is essential for maximizing taste. Start with a liberal amount of salt and pepper—this simple duo helps bring out the natural flavors of the chicken. You can also experiment with additional spices such as smoked paprika, garlic powder, or chili flakes for a kick of heat.
Don’t be afraid to rub the seasoning directly under the skin. This helps the chicken absorb all of the wonderful flavors during cooking. Adding fresh herbs like rosemary, thyme, or sage is another way to elevate the dish.
The Searing Process (Making Crispy Skin)
Searing the Chicken for Maximum Crispiness
Getting that crispy skin is crucial for this recipe, and it all starts with the searing process. To achieve that golden-brown texture, it’s important to sear the chicken before braising. This initial sear locks in the moisture while rendering the fat in the skin, which helps the chicken crisp up in the oven. Here’s how to do it right:
-
Preheat Your Skillet: Heat a heavy skillet (preferably cast iron) over medium-high heat. Once it’s hot, add a tablespoon of oil to the pan—preferably something with a high smoke point, like vegetable oil or grapeseed oil.
-
Sear the Chicken Skin Side Down: Place the chicken in the pan, skin side down. Don’t move it around! Let it sear undisturbed for about 5-7 minutes until the skin becomes golden brown and crispy. You can even press the chicken gently with a spatula to ensure the skin gets even contact with the skillet.
-
Flip the Chicken: Once the skin has achieved that crispy perfection, flip the chicken over and sear for an additional 2 minutes on the other side. This step ensures that both sides of the chicken are properly cooked before braising in the oven.
Adding the Braising Liquid
Once the chicken is beautifully seared, it’s time to create the braising liquid. This liquid will add flavor and moisture to the chicken while it cooks slowly in the oven. The braising liquid can be as simple as chicken stock, but feel free to get creative with ingredients such as garlic, onions, herbs, and a splash of broth or stock. You can even include a touch of citrusy lemon for a fresh contrast.
-
Create a Flavorful Base: In the same skillet, add diced onions, garlic, and perhaps some carrots or celery to form a savory base. Let them cook for a few minutes until softened.
-
Add the Liquid: Pour in your chicken broth or stock, just enough to cover the bottom of the pan. This liquid will steam the chicken, keeping it moist and infusing it with savory goodness.
Oven-Braising Technique
Now it’s time to pop everything into the oven! This is the stage where the braised chicken will undergo slow cooking, absorbing all those fantastic flavors from the liquid.
-
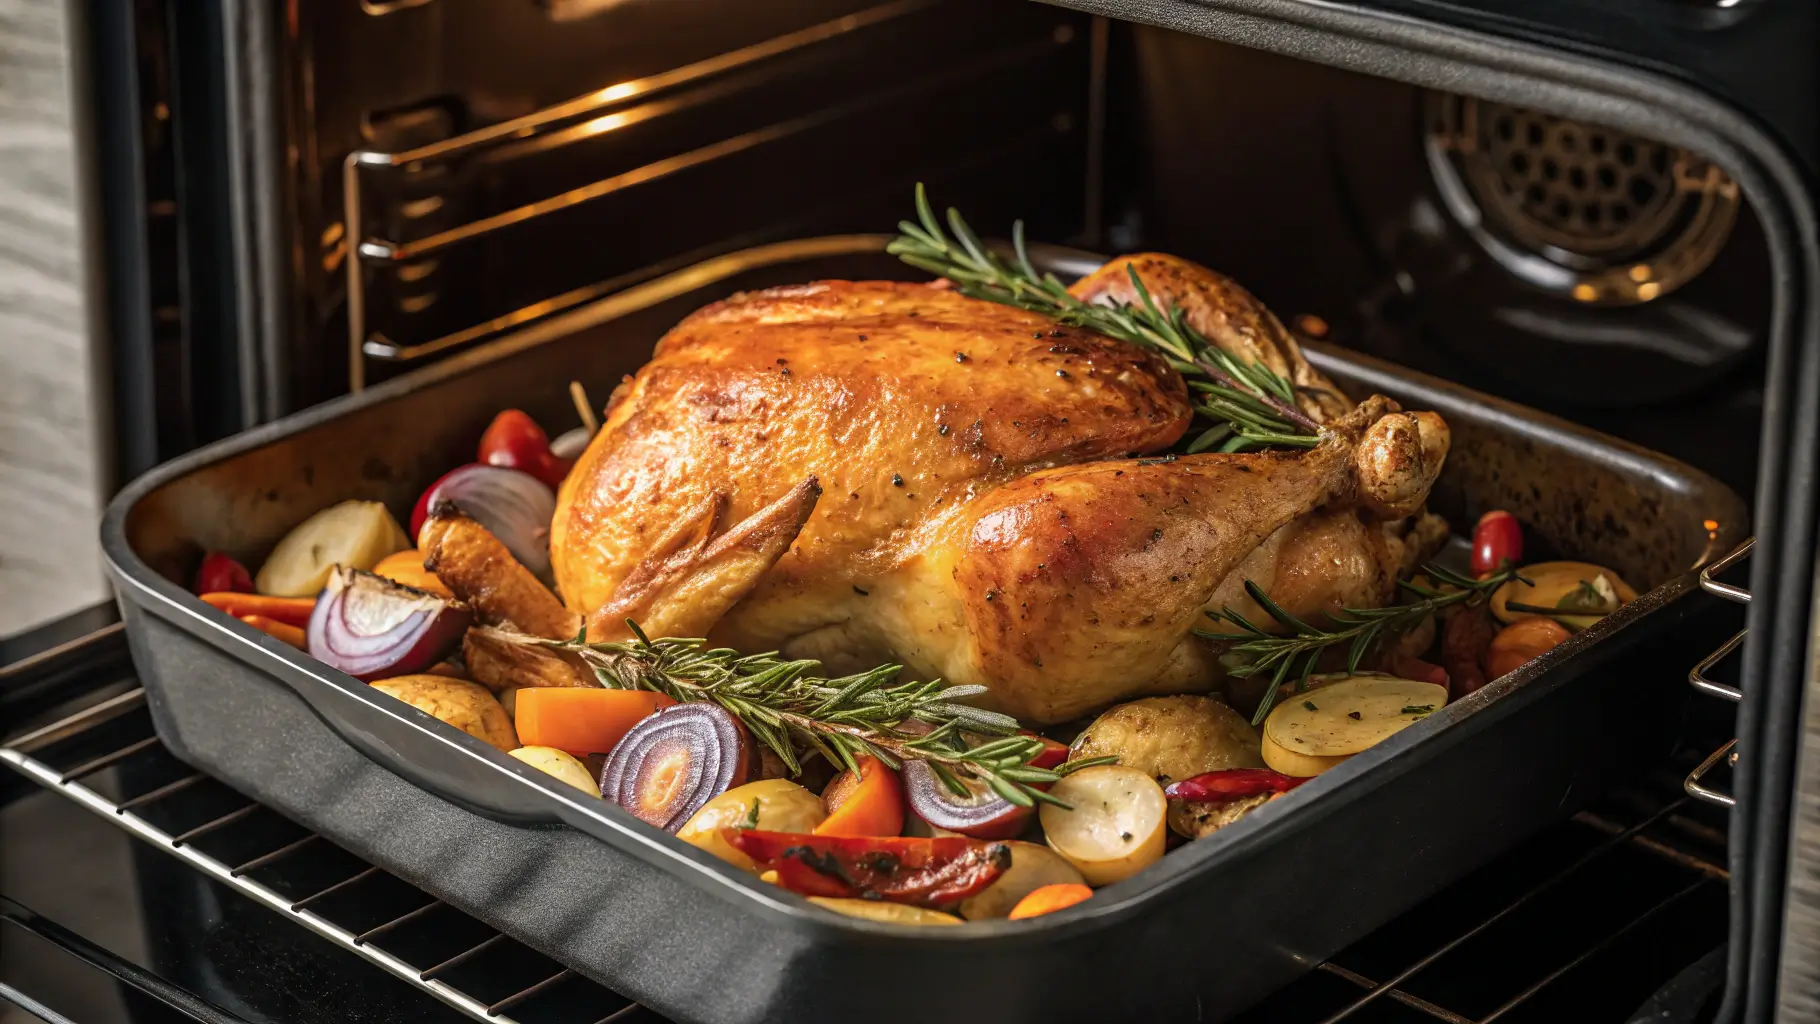
Cover and Braise: Transfer your skillet to a preheated 350°F (175°C) oven. Braise the chicken for about 30 minutes, depending on the thickness of the chicken pieces. The slow cooking process will tenderize the meat, making it fall-off-the-bone delicious.
-
Uncover and Crisp the Skin: After 30 minutes, uncover the chicken and continue baking for another 10-15 minutes. This will help the skin become even crispier, ensuring it retains that gorgeous golden-brown color.
Bringing It All Together (Serving Suggestions)
Resting the Chicken
After braising, it’s essential to let your chicken rest for a few minutes before serving. This allows the juices to redistribute, ensuring that each bite remains moist and tender. Cover the chicken loosely with foil and let it sit for about 5-10 minutes.
Perfect Sides for Braised Chicken
Braised chicken pairs wonderfully with various sides that balance the richness of the dish. Consider serving it alongside:
- Mashed Potatoes: Creamy mashed potatoes are a classic pairing with braised chicken, offering a comforting side that complements the juicy chicken.
- Roasted Vegetables: Try roasting carrots, parsnips, or Brussels sprouts in the same pan to add flavor to the meal.
- Rice Pilaf: A flavorful rice pilaf with herbs and a touch of butter also pairs wonderfully with braised chicken.
- Crisp Salad: A simple green salad with a zesty vinaigrette can cut through the richness of the chicken and provide a refreshing contrast.
Garnishing Your Dish
While your braised chicken will already look beautiful, a few finishing touches can elevate its presentation. Consider garnishing the chicken with:
- Fresh herbs like thyme or parsley
- A squeeze of lemon for added freshness
- A drizzle of extra virgin olive oil for a silky finish
These small additions bring both color and flavor to your plate, making it even more appetizing.
Troubleshooting Tips and Common Mistakes
Chicken Skin Isn’t Crispy Enough
Sometimes, even when you follow the steps carefully, you might find that the chicken skin isn’t as crispy as you’d like. Don’t worry! There are several things you can do to fix this:
-
Ensure the Skin Is Dry: Before searing, make sure the chicken skin is as dry as possible. Pat it down with paper towels to remove any moisture. Moisture prevents the skin from crisping up properly.
-
Increase the Oven Temperature: If the skin isn’t crisping up in the oven, you can increase the temperature to 400°F (200°C) for the final 10-15 minutes of braising. Just be careful not to dry out the chicken.
-
Don’t Skip the Searing Step: Searing the chicken before braising is crucial for crispy skin. If you skip this step or rush it, the skin won’t have a chance to develop that crispy texture.
Chicken Is Too Dry
If your chicken comes out too dry, there could be a few reasons behind it:
-
Overcooking: One of the most common mistakes is overcooking the chicken. Since braising involves slow cooking, the chicken can dry out if it’s left in the oven for too long. Make sure you’re checking the internal temperature, which should reach 165°F (74°C).
-
Lack of Braising Liquid: Always ensure you have enough braising liquid to cover the bottom of the pan. If the pan gets too dry during cooking, the chicken can lose moisture and become dry.
Chicken Won’t Brown or Develop a Golden Color
Sometimes, the chicken might not develop that beautiful golden color you’re hoping for. This can happen if the oven temperature is too low. Try raising the temperature to 400°F (200°C) for the last 10-15 minutes, uncovered. The direct heat helps develop that crispy, golden skin.
Braised Chicken Variations and Flavor Enhancements
Add a Kick with Spices
While the classic version of braised chicken is already delicious, you can experiment with a variety of spices to add new flavors. Consider incorporating:
-
Cayenne Pepper: For those who love heat, a pinch of cayenne pepper can spice things up and give the chicken a kick.
-
Smoked Paprika: Smoked paprika adds a deep, smoky flavor to the chicken, which pairs beautifully with the savory braising liquid.
-
Ginger and Garlic: For a slightly Asian-inspired twist, try adding grated ginger and garlic into the braising liquid. This will infuse the chicken with fragrant, bold flavors.
Add Vegetables for More Depth
One way to add more layers of flavor and texture to your braised chicken is to include vegetables. You can roast them alongside the chicken in the oven for an all-in-one meal. Some great options include:
- Carrots: Sweet, tender carrots pair wonderfully with braised chicken.
- Onions: Adding onions will create a savory, caramelized flavor that complements the chicken.
- Potatoes: For a hearty meal, toss in some potatoes to soak up the braising liquid and become soft and flavorful.
Braise with Stock or Vinegar
To enhance the flavor of the braising liquid, consider using a rich chicken stock or a splash of apple cider vinegar. Chicken stock adds depth and savory richness, while a bit of apple cider vinegar provides a mild acidity that brightens the dish. Both options are excellent for adding complexity to the flavor profile.
How to Serve Braised Chicken for a Complete Meal
Serve with a Side of Rice or Grains
Braised chicken pairs wonderfully with grains like rice, quinoa, or couscous. The grains soak up the savory braising liquid, making every bite even more flavorful. You can even prepare a flavorful pilaf by cooking the rice with herbs, garlic, and a little butter.
Pair with Fresh Greens or Salad
A crisp salad balances out the richness of the braised chicken. A refreshing green salad with a tangy vinaigrette cuts through the savory flavors and provides a contrast to the tender, braised meat. Consider using greens like arugula, spinach, or mixed baby greens.
Make it a Comfort Meal with Mashed Potatoes
For those who want a truly comforting meal, mashed potatoes are a must. Creamy, buttery mashed potatoes serve as the perfect base for the juicy chicken, allowing the braising liquid to pour over and infuse each bite with flavor.
Find tips for crispy chicken skin here on How to get the perfect crispy chicken skin article.
Frequently Asked Questions
Can I Use Boneless Chicken for This Recipe?
While it’s best to use bone-in chicken for this recipe, boneless chicken can work in a pinch. However, bone-in chicken tends to hold more flavor and moisture, and the skin crisps up better, giving you that sought-after texture.
How Do I Know When the Chicken Is Fully Cooked?
To ensure the chicken is cooked through, use a meat thermometer to check the internal temperature. It should reach 165°F (74°C). Additionally, the meat should be tender and fall off the bone when it’s properly braised.
Can I Make This Recipe Ahead of Time?
Absolutely! Braised chicken actually tastes better the next day as the flavors have more time to develop. You can braise it ahead of time, let it cool, and store it in the fridge. When you’re ready to serve, simply reheat it in the oven or on the stove.
Can I Freeze Braised Chicken?
Yes, you can freeze braised chicken! To freeze, let the chicken cool completely, then store it in an airtight container or freezer bag. It will keep for up to 3 months. To reheat, thaw it overnight in the fridge, then warm it up in the oven until heated through.