Table of Contents
- 1 Understanding the Ingredients
- 2 Key Ingredients in the Disney Chocolate Chip Cookie Recipe
- 3 Why Metric Measurements Matter in Baking
- 4 Step-by-Step Instructions for Disney Chocolate Chip CookieS
- 5 Preparing the Ingredients
- 6 Mixing the Dough
- 7 Chilling the Dough for Best Results
- 8 Baking Disney Chocolate Chip Cookies
- 9 How to Bake the Perfect Disney Chocolate Chip Cookies
- 10 Tips for Perfect Disney Cookies Every Time
- 11 Troubleshooting Common Issues with Disney Chocolate Chip Cookies
- 12 Why Your Cookies Didn’t Turn Out as Expected
- 13 Storing and Serving Your Disney Chocolate Chip Cookies
- 14 How to Store Your Disney Chocolate Chip Cookies
- 15 How to Serve Your Disney Chocolate Chip Cookie
- 16 FAQs About the Disney Chocolate Chip Cookie Recipe
- 17 Wrapping Up: Your Perfect Disney Chocolate Chip Cookie Recipe
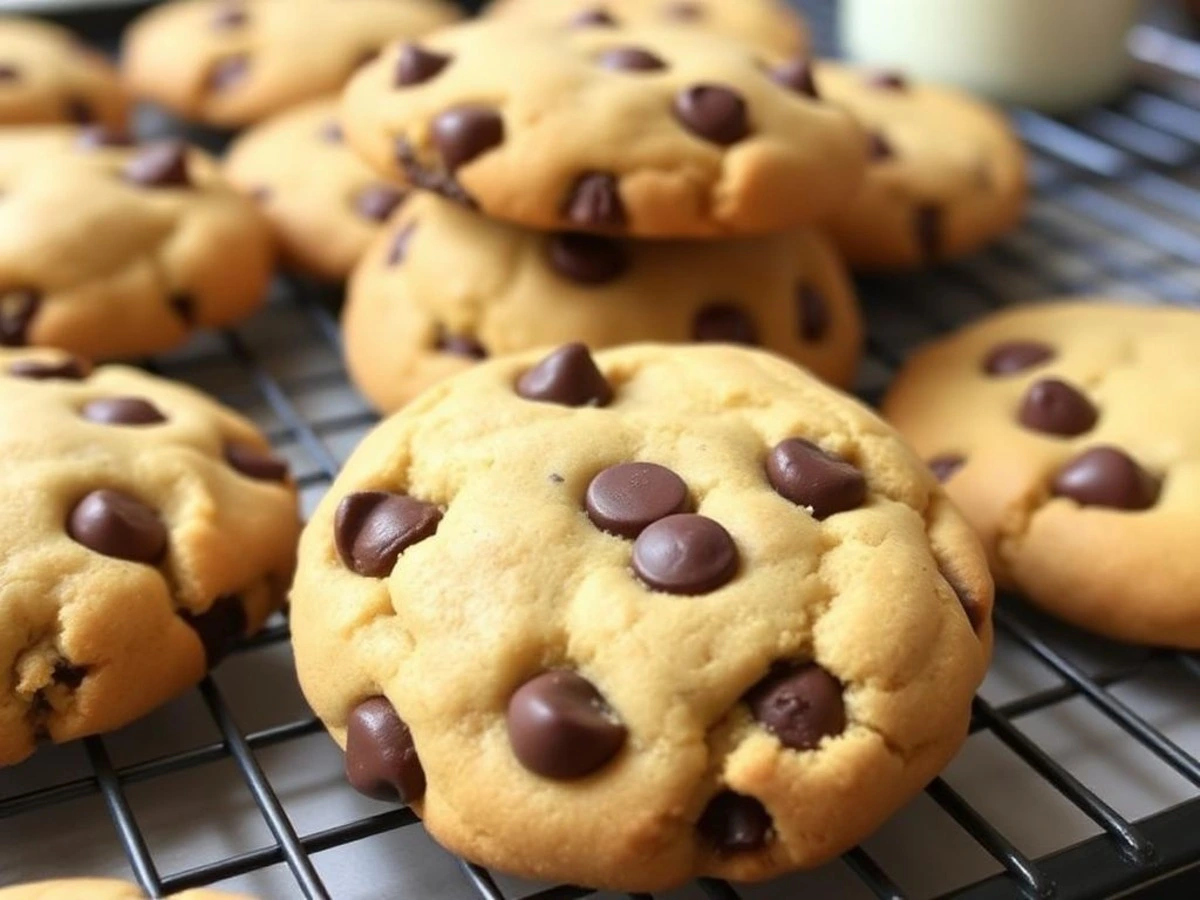
Baking the perfect chocolate chip cookies is an art, and when you throw Disney into the mix, things get even more magical! If you’ve ever had the joy of tasting a Disney chocolate chip cookie, you know exactly what I’m talking about. These cookies are soft, chewy, and loaded with chocolate goodness, making them the ultimate treat.
But, here’s the thing: the secret to achieving that perfect texture and flavor doesn’t just lie in the ingredients—precision is key. That’s why we’re going to focus on metric measurements throughout this recipe. By using grams instead of cups, you’ll be able to recreate these cookies with the exact same consistency and taste every time.
In this article, we’ll walk through every step of the process, from gathering your ingredients to baking and storing these delightful cookies. We’ll explore everything from the importance of using metric measurements to troubleshooting any issues you might face. Let’s dive into this Disney-inspired recipe that’s bound to become your new go-to treat!
Understanding the Ingredients
When it comes to baking, it’s crucial to understand the role each ingredient plays in the recipe. The Disney chocolate chip cookie recipe isn’t just about throwing ingredients into a bowl. It’s about balance, texture, and flavor. So, let’s break down each key ingredient and its purpose in creating the perfect cookie.
To make your Disney chocolate chip cookie as close to the magic as possible, you’ll need the following ingredients. Let’s explore each one.
Flour
Flour is the backbone of any cookie recipe. For the best texture, all-purpose flour works perfectly. Too much flour can make your cookies dry and crumbly, while too little can make them too soft. Measuring your flour with metric measurements will ensure you don’t overdo it, which is key to getting that perfect, chewy texture.
Butter
The butter you use will directly affect the flavor and texture of your cookies. Using unsalted butter allows you to control the amount of salt in your dough, which is important for balancing sweetness. Make sure your butter is softened to room temperature before mixing—it’ll make the process much easier!
Brown Sugar and Granulated Sugar
A combination of brown sugar and granulated sugar creates the perfect balance between sweetness and chewiness. The brown sugar adds moisture, which helps achieve that iconic chewy texture, while the granulated sugar contributes to the crispness around the edges. Both sugars work together to give your cookies a perfect bite.
Chocolate Chips
Of course, the chocolate chips are the star of the show! Choose your favorite type—semi-sweet is often the preferred option. Be sure to measure them correctly with metric measurements so you have the perfect ratio of chocolate to dough in every bite.
Eggs and Vanilla Extract
Eggs help bind the dough together and give your cookies structure. The vanilla extract adds that warm, comforting flavor we all love in chocolate chip cookies. Be sure to use fresh eggs and high-quality vanilla extract for the best results.
Baking Soda and Salt
Baking soda helps your cookies rise and spread, while salt enhances the flavors. A pinch of salt goes a long way, so don’t skip this step! As with all ingredients, be sure to measure accurately with metric measurements for the perfect cookie.
Why Metric Measurements Matter in Baking
Baking is a science, and accuracy is crucial for success. That’s where metric measurements come into play. But why is this so important?
Accuracy in Baking: Why Grams Are Better Than Cups
When you use cups to measure ingredients, there’s a lot of room for variation. A cup of flour, for example, can vary greatly depending on how it’s scooped. In contrast, using grams ensures that you’re always using the exact right amount. This level of precision is vital to achieving consistent, delicious cookies every time you bake.
Converting from Imperial to Metric for Consistency
If you’re used to using imperial measurements (like cups and teaspoons), converting to metric measurements might feel like a big shift. But trust me, once you get the hang of it, you’ll see just how much more reliable it is. Converting your ingredients into grams is easy, and it will give you consistent, high-quality cookies each and every time.
By now, you can see that the ingredients you choose—and how you measure them—are the foundation of your Disney chocolate chip cookies. In the next section, we’ll walk through the process of preparing your dough with step-by-step instructions that ensure your cookies come out just right.
Now that we’ve covered the ingredients and why metric measurements are essential, it’s time to dive into the actual baking process! Don’t worry, we’ll break it down step by step. The process is easier than it seems, and with a little care and attention to detail, you’ll be enjoying this magical Disney chocolate chip cookie in no time.
Preparing the Ingredients
Before you start mixing your dough, it’s essential to prepare your ingredients correctly. This will set you up for success and ensure that your cookies turn out just right.
Measuring the Dry Ingredients (Flour, Baking Soda, Salt)
First things first: measuring your dry ingredients accurately. It’s tempting to scoop flour directly from the bag, but that can lead to packing too much flour into your measuring cup. Instead, spoon the flour into the measuring cup and level it off with a knife. If you’re using metric measurements, weigh the flour directly for even more accuracy.
Once your flour is measured, sift it with the baking soda and salt. This ensures everything is evenly mixed. Sifting also prevents clumps, especially with the baking soda, which can cause uneven rising if not distributed evenly throughout the dough.
Softening the Butter (Importance of Room Temperature Butter)
Next up: butter. This step is crucial for getting the right texture. Using room-temperature butter ensures that the butter will cream smoothly with the sugars, creating that light and fluffy base for your cookie dough. If the butter is too cold, it’ll be difficult to mix, and if it’s too soft, the dough will be too runny. So, set your butter out about 30 minutes before you start baking. It should be soft enough to leave an indent when pressed but still hold its shape.
Mixing the Dough
Now it’s time to bring all the ingredients together to create that perfect cookie dough. This part of the process involves careful mixing to ensure everything comes together just right.
Creaming the Butter and Sugars
Start by placing your softened butter and both sugars—brown sugar and granulated sugar—into a large mixing bowl. Use an electric mixer or a stand mixer to cream the butter and sugars together. You want to mix them until the mixture is light and fluffy. This typically takes around 2-3 minutes. Creaming the butter and sugar properly helps create a tender texture, so don’t rush this step! The longer you mix, the fluffier your dough will be.
Adding Eggs and Vanilla Extract
Once your butter and sugars are creamed together, it’s time to add the eggs and vanilla extract. Add one egg at a time, mixing well after each addition. Be sure to scrape down the sides of the bowl to ensure everything gets incorporated. After both eggs are mixed in, add in the vanilla extract. Mix until everything is smooth and well combined.
Slowly Mixing in the Dry Ingredients
Now comes the fun part: incorporating the dry ingredients. Add your dry flour mixture into the wet mixture slowly, about half at a time. Mix at a low speed to avoid flour flying everywhere. Don’t over-mix at this stage; just stop once the dry ingredients are combined into the wet ingredients. Over-mixing can lead to tough cookies, and we want those soft, chewy results!
Folding in the Chocolate Chips
Finally, it’s time to fold in the chocolate chips. Gently stir them into the dough with a spatula. This step is important because it ensures an even distribution of chocolate without overworking the dough. Make sure every scoop of dough has a generous amount of chocolate goodness in it.
Chilling the Dough for Best Results
Once your dough is mixed, it’s tempting to dive right in and start baking, but here’s a secret trick from the pros: chilling the dough. Chilling dough before baking isn’t just a suggestion—it’s a must for achieving the perfect cookie texture.
Why? When dough is chilled, the fat in the butter firms up, preventing the cookies from spreading too much during baking. This results in a thicker, chewier cookie. Plus, chilling the dough helps the flavors meld together, which only improves the taste.
Importance of Chilling Dough Before Baking
Chilling the dough allows the flour to fully hydrate, which helps improve the texture. It also helps control the spread of the cookie, ensuring they bake up thick and chewy, instead of thin and crispy. This step makes all the difference, so don’t skip it!
How Long to Chill the Dough for Optimal Texture
For the best results, cover your dough with plastic wrap and refrigerate it for at least 30 minutes. If you have the time, chilling the dough for up to 2 hours (or even overnight) will yield even better results. When you’re ready to bake, simply scoop out the dough and get ready to pop them into the oven!
Now that your dough is ready and chilled, it’s time to bake those Disney chocolate chip cookies and bring the magic to life! This part of the process is where precision really counts. If you follow these steps carefully, you’ll be on your way to baking the perfect, chewy, Disney-inspired chocolate chip cookies.
Baking can be a bit of an art form, but don’t worry! We’ll walk through every detail to ensure your cookies come out perfect every time.
Oven Temperature (Metric Conversion for Fahrenheit)
One of the first things to get right is the oven temperature. For these Disney chocolate chip cookies, you’ll want your oven preheated to 180°C (350°F). Using metric measurements ensures your temperature is spot-on, which is crucial for achieving the right cookie texture. A slightly higher temperature can cause the cookies to spread too much, while a lower temperature can result in them being too soft.
Make sure to let your oven reach the full temperature before placing the dough on the baking sheet.
Cookie Size and Spacing
When it comes to size, a standard ice cream scoop or a tablespoon works well for portioning out the dough. For evenly sized cookies, scoop about 1.5 tablespoons of dough for each cookie. This ensures they bake at the same rate.
As for spacing, leave at least 2 inches between each cookie on the baking sheet. Cookies need room to spread, and overcrowding the pan will lead to uneven baking. If you want to make larger cookies, adjust the baking time accordingly.
Baking Time: How Long Should You Bake for Perfect Cookies?
The baking time is key to getting the perfect texture. For Disney-style chocolate chip cookies, bake for about 9-11 minutes. Your cookies should be lightly golden at the edges, but still soft in the center. If they start to turn darker at the edges, they may be overbaked. Every oven is different, so keep an eye on them toward the end of the baking time. The goal is to remove them from the oven when they’re just beginning to set and the edges are slightly golden.
There are a few tricks you can keep in mind to make sure your Disney chocolate chip cookies turn out perfectly every single time.
How to Avoid Overbaking
It’s easy to get carried away when you smell those warm cookies baking, but overbaking is the most common culprit for dry cookies. To avoid this, set a timer and check your cookies around the 9-minute mark. Remember, they’ll continue to cook a little on the baking sheet after you take them out of the oven. So, if the edges are golden and the center is still slightly soft, you’re in the sweet spot!
How to Get the Chewy Texture (Don’t Overmix!)
The key to achieving that chewy texture you love in Disney cookies is to avoid overmixing the dough. Once you add the dry ingredients to the wet ingredients, mix until just combined. Overmixing activates the gluten in the flour, which can lead to tough cookies instead of soft, chewy ones. So, when it comes to mixing, less is more!
With these tips in hand, you’re ready to bake your own batch of Disney chocolate chip cookies that’ll rival the ones from the parks. Just remember to keep an eye on the baking time, get your oven temperature right, and let the dough rest when needed. And don’t forget—sometimes a little patience is all it takes to make cookies magical!
For more guidance on baking perfect cookies every time, visit our post on Baking Tips for Perfect Cookies.
Even the most experienced bakers encounter hiccups from time to time. Don’t worry—if your Disney chocolate chip cookies didn’t turn out quite like you expected, we’ve got you covered! In this section, we’ll explore some common cookie issues and offer solutions to help you troubleshoot and get things right.
Sometimes, despite following the recipe step by step, your cookies might not come out exactly how you envisioned. If you’re experiencing one of these common issues, don’t stress—let’s figure out what went wrong and how to fix it!
Flat Cookies: Why It Happens and How to Fix It
Flat cookies can be frustrating, especially when you’re hoping for thick, chewy Disney-style cookies. This issue is often caused by one or more of the following:
- Too much butter: Using soft butter (or too much of it) can make the dough spread too much during baking. Be sure to follow the measurements closely and avoid using melted butter.
- Dough not chilled: If you skip the chilling step, the butter in the dough won’t have time to firm up, causing the cookies to spread too thin. Chilling the dough for at least 30 minutes (preferably longer) will help.
- Baking at too low a temperature: If your oven temperature is too low, the cookies won’t hold their shape. Always preheat your oven to 180°C (350°F) to ensure your cookies bake properly.
To fix flat cookies, simply reduce the butter slightly, chill the dough for longer, or increase the oven temperature.
Dry or Crumbly Cookies: Causes and Solutions
If your cookies turn out dry or crumbly, the issue is usually related to the ratio of wet to dry ingredients. Here are some possible causes:
- Too much flour: Adding too much flour can lead to a dry texture. Be sure to measure the flour properly—use metric measurements for accuracy. Avoid packing flour into the measuring cup.
- Under-mixing the dough: If you don’t mix the dough long enough, the ingredients may not bind together correctly, leading to a crumbly texture. Mix until the dough is just combined, but no more.
To solve this, adjust your flour measurements and make sure the dough is fully incorporated before chilling.
Cookies Too Soft or Gooey: How to Adjust
If your cookies are too soft or gooey in the center, it’s likely that the dough wasn’t chilled long enough or the baking time was too short. Here’s what to check:
- Under-chilled dough: If the dough isn’t cold enough, the cookies may spread too much during baking, resulting in a soft center. Always chill the dough for at least 30 minutes—longer is better.
- Baking time: Soft cookies might also mean they haven’t baked long enough. Keep an eye on them and ensure they’re lightly golden at the edges before taking them out. If you’re unsure, let them bake for another minute or two.
For gooey cookies, increase the chilling time, and make sure the cookies are baked until they’re just golden around the edges but still soft in the middle.
Your Disney chocolate chip cookies are baked, and now it’s time to think about how to store them for freshness and how to serve them for the ultimate magical experience. Whether you’re planning to enjoy them right away or save them for later, here’s everything you need to know about storing and serving your delicious cookies.
Storing your cookies properly is key to keeping them fresh and chewy for as long as possible.
Best Storage Methods to Keep Cookies Fresh for Longer
The best way to store your Disney chocolate chip cookies is in an airtight container. This prevents the cookies from drying out and helps maintain their chewy texture. You can store them at room temperature for up to 4-5 days, but be sure to separate layers of cookies with parchment paper to avoid them sticking together.
If you want to keep them fresh for even longer, consider storing them in the fridge for up to a week. Just let them come to room temperature before enjoying. To ensure the cookies stay soft, you can add a slice of bread to the container—this will help absorb moisture and keep the cookies fresh.
Freezing Baked Cookies for Later Enjoyment
If you’ve baked a large batch of cookies and want to save some for later, freezing is the way to go. Simply place the cookies on a baking sheet and freeze them individually for about an hour. Once frozen, transfer the cookies to a freezer-safe bag or airtight container. They can be stored in the freezer for up to 3 months. To enjoy, just let them thaw at room temperature for a few minutes or heat them up in the microwave for a few seconds to restore that fresh-baked taste.
When it comes to serving your Disney chocolate chip cookie, there are endless possibilities to make the experience even more special.
Serving Suggestions for a Magical Experience
- With Milk: For the ultimate classic treat, serve your cookies with a cold glass of milk. The creamy milk perfectly complements the sweet, chocolatey goodness of the cookies and adds to the nostalgic feeling.
- At a Disney-Themed Party: If you’re hosting a Disney-themed party, these cookies will steal the show! You can serve them on a Mickey Mouse-shaped plate or decorate them with Disney-themed toppers. They’ll be a hit with both kids and adults!
- As a Gift: Pack your cookies in a cute jar or box with a Disney theme for a thoughtful gift. Whether for a birthday, holiday, or just because, these cookies make the perfect gift for any Disney lover.
This Disney chocolate chip cookie recipe is a magical treat, bringing the famous flavors right into your kitchen. If you’re looking for more fun and delicious cookie recipes, check out this collection of amazing cookie ideas.
Can I use a different type of chocolate chips?
Absolutely! While semi-sweet chocolate chips are traditional for this recipe, you can easily switch things up. Feel free to use milk chocolate, dark chocolate, or even white chocolate chips for a different flavor profile. You can also experiment with chopped chocolate for a more rustic look and richer flavor. Just keep in mind that the type of chocolate will affect the overall sweetness of the cookies, so adjust your sugar slightly if needed.
Can I substitute the butter for margarine or oil?
If you don’t have butter on hand, you can substitute it with margarine or vegetable oil. However, using margarine might alter the texture slightly, making your cookies a bit more crispy rather than chewy. Vegetable oil can also work, but it won’t give the same flavor or texture as butter. For the most authentic Disney-like flavor and chewy texture, unsalted butter is your best option.
Can I make this recipe vegan?
Yes, you can easily make these Disney chocolate chip cookies vegan by swapping out a few ingredients. Use vegan butter or coconut oil instead of regular butter, and replace the eggs with an egg substitute like flax eggs (1 tablespoon ground flaxseed mixed with 3 tablespoons water, left to sit for a few minutes). For the chocolate chips, choose a dairy-free variety, and you’re good to go!
How can I adjust this recipe for smaller or larger batches?
If you want to make a smaller batch, simply cut the recipe in half. Use a kitchen scale to adjust your metric measurements accordingly, and you’ll have fewer cookies, but with the same great taste. To make a larger batch, double the ingredients—again, using metric measurements will ensure that you get the right proportions and consistency. Just remember that larger batches may need slightly more time in the oven.
What are some ways to enhance the flavor of these cookies?
Want to take your Disney chocolate chip cookies to the next level? Here are a few ideas to enhance their flavor:
- Add a pinch of cinnamon or nutmeg for a warm, spicy kick.
- Sprinkle a little sea salt on top of the cookies before baking for a sweet and salty contrast.
- Mix in some chopped nuts like walnuts or pecans for extra texture and flavor.
- Use brown butter instead of regular butter for a richer, nuttier taste.
These small tweaks will give your cookies a unique twist!
Why did my cookies spread too much?
If your cookies spread too much, there are a few common causes:
- Dough not chilled enough: If the dough is too soft when placed on the baking sheet, it can spread excessively. Be sure to chill the dough for at least 30 minutes (longer is better!).
- Too much butter: Excess butter can cause the cookies to flatten too much. Make sure you’re measuring accurately using metric measurements.
- Too much liquid: If you added more vanilla or eggs than the recipe calls for, the dough may be too wet. Double-check your measurements and adjust accordingly.
To prevent spreading, make sure your dough is firm and chilled before baking, and check that all your ingredient measurements are spot-on.
Congratulations! You’ve made it to the end of the journey to creating your very own Disney chocolate chip cookies. We’ve covered everything from the importance of using metric measurements for accuracy to the best techniques for baking and troubleshooting common issues. By following these steps, you’ll be able to bake cookies that are chewy, delicious, and just like the ones you’d find at Disneyland.
Remember, using metric measurements is a game-changer in the kitchen. With grams and milliliters, you can be sure your ingredients are perfectly balanced, ensuring that your cookies turn out with the best texture, taste, and consistency. Whether you’re baking a small batch for yourself or making a large batch for family and friends, precision makes all the difference.
Encouragement to Try the Recipe and Enjoy the Results with Family and Friends
Now that you’ve got all the knowledge and tools, it’s time to get baking! Don’t be afraid to experiment with different types of chocolate chips or add your own personal touch to the recipe. These Disney chocolate chip cookies are perfect for any occasion—whether it’s a cozy night in with a glass of milk or a Disney-themed party with friends and family.
Enjoy the process, and most importantly, enjoy the cookies! After all, baking is all about having fun and sharing those sweet moments with the people you love. So, gather your ingredients, preheat that oven, and get ready to enjoy your own slice of Disney magic!
